Frame 01OpeningBathtub-to-shower conversion

Chapter 01 — What you are actually buying

A tub is a waterproof box.

Removing it means building one.

A bathtub is a single moulded vessel. It holds water because it is one piece with a drain in it. Take it out and you lose that — and the tiled shower that replaces it has to achieve the same thing out of separate materials, joined together, on site.

That is the whole job. Not the tile you can see, but the bonded waterproofing behind it, the bed sloped correctly to the drain, the drain itself sized and set at the right height, and the way all of it is turned up at the walls and out at the threshold. Get that right and the tile is decoration. Get it wrong and the tile is the thing that hides the leak.

The good news is that the opening is usually already the right size. A standard alcove tub is roughly a shower footprint, the drain is roughly in the right place, and the wall behind it is coming off anyway. The work is real, but it is contained to one part of one room.
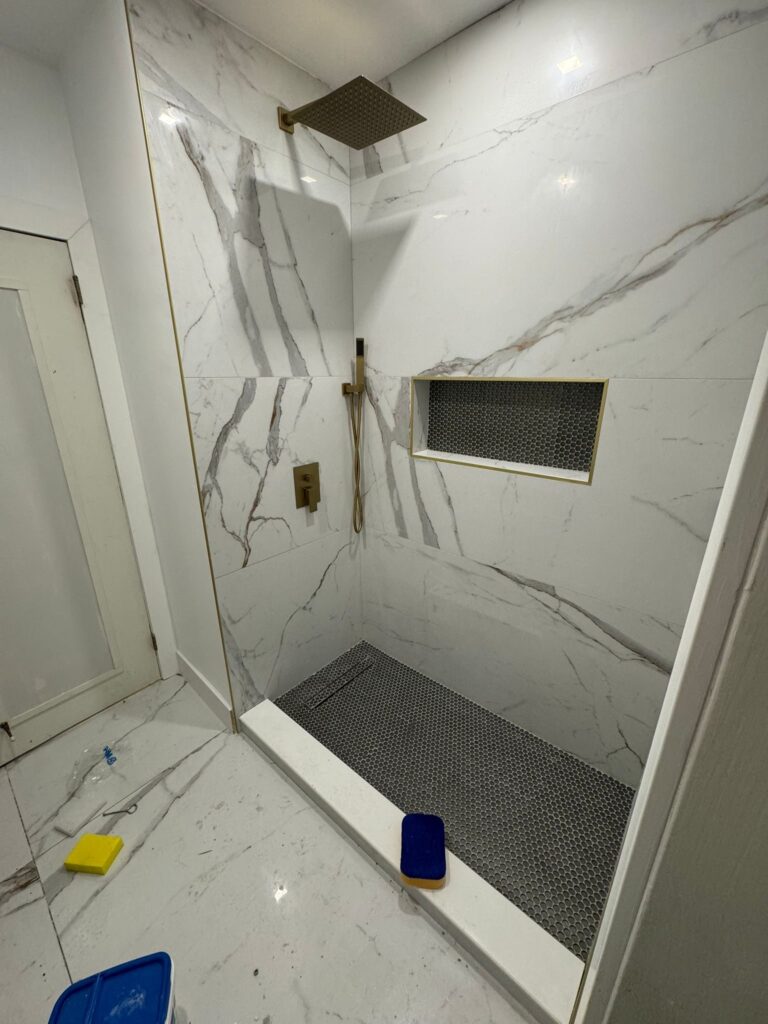
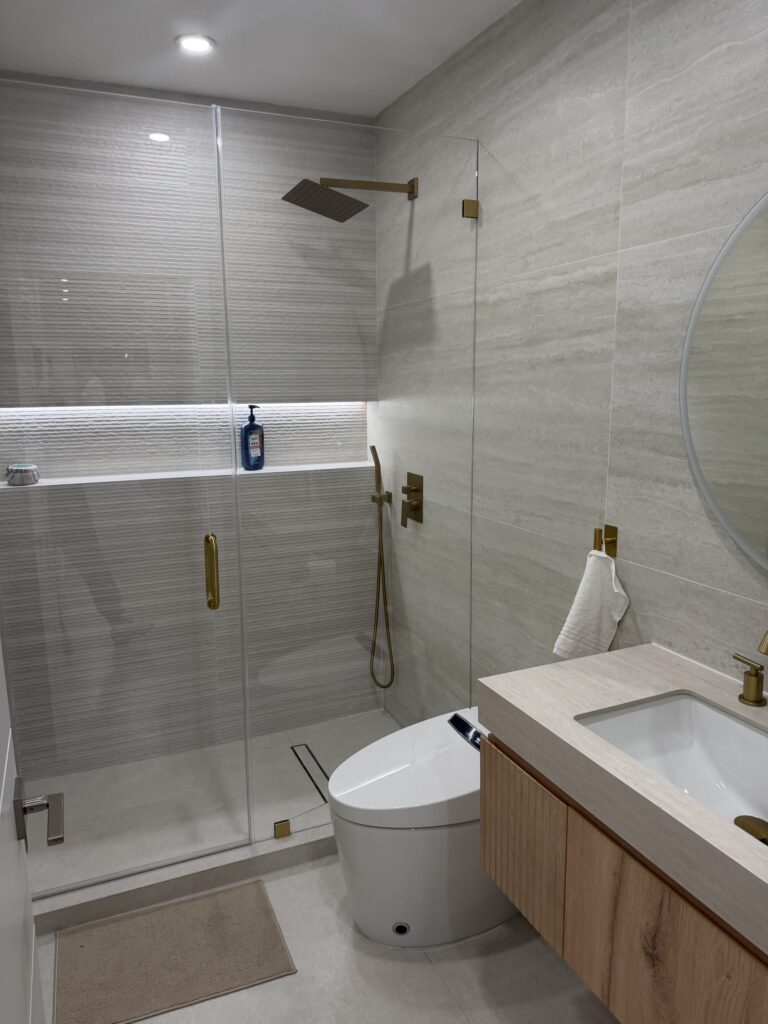
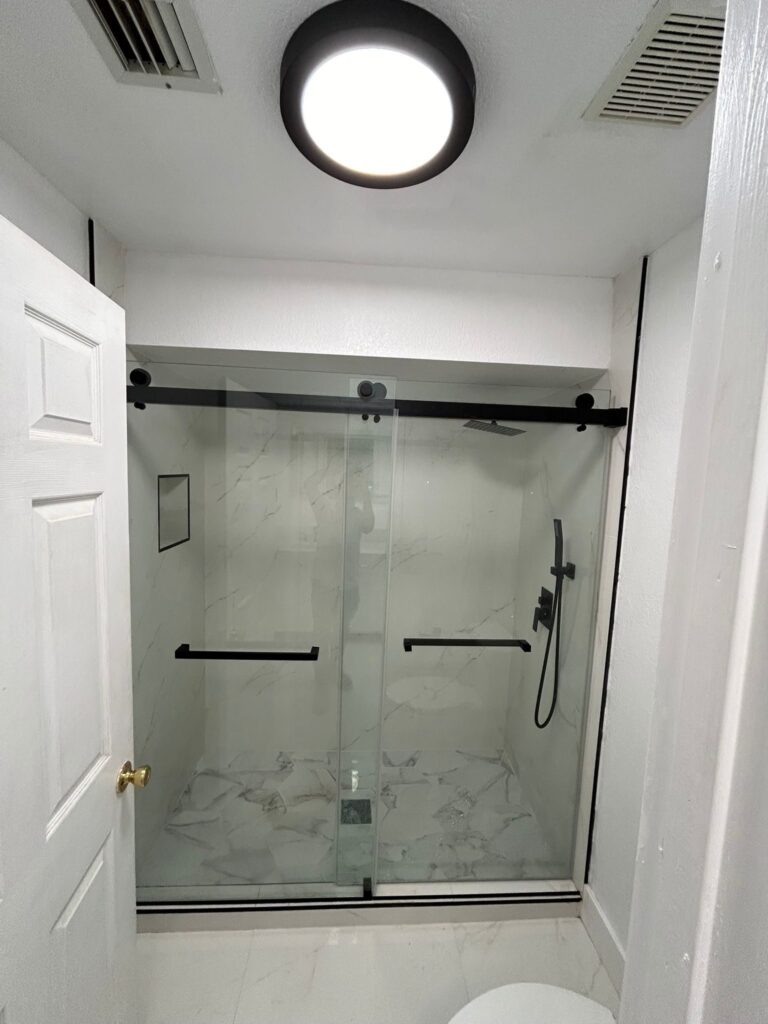
Walk-in shower finished in large-format marble-look porcelain, with a recessed niche, a linear drain at the back wall and a fixed glass panel
Large-format wall tileRecessed nicheLinear drain at the wallFixed glass panelLevel threshold
Frame 01 · a finished conversionAnnotations mark what is visible in this frame. These frames come from several different bathrooms and no city, client, cost or date is claimed for any of them.
  • Large-format wall tilevisible in this frame
  • Recessed nichevisible in this frame
  • Linear drain at the wallvisible in this frame
  • Fixed glass panelvisible in this frame
  • Level thresholdvisible in this frame
Shown
Walk-in shower with linear drain
Behind it
Bonded membrane and sloped bed
Note
Several bathrooms across this page
BONDED

Waterproofing behind the tile

A bonded membrane over walls and floor, turned up and lapped, is what makes the assembly watertight. Tile and grout are not waterproof on their own.

SLOPE

Everything falls to the drain

The bed under the tile is formed to fall so water reaches the drain rather than standing. A flat shower floor is a wet floor.

PERMIT

Plumbing work is permitted

Moving or altering drainage and supply is permitted work with an inspection, even when the room is not changing shape.
Frame 02ScopeWhat is included

Chapter 02 — What a conversion actually covers

A waterproofing job with a shower on top.

Strip-out, plumbing, waterproofing, finish

Scene 01Removal
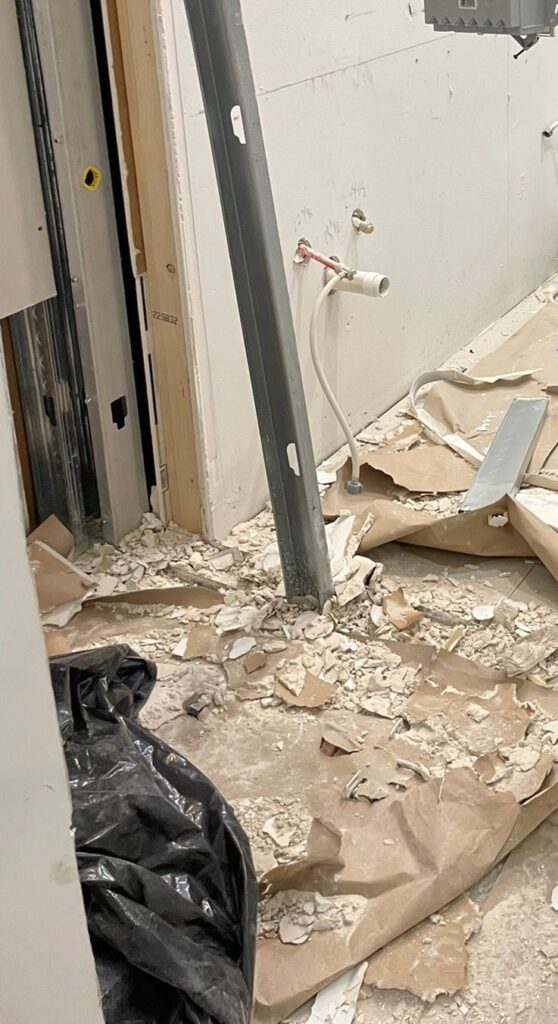
Bathroom stripped back during demolition, with the wall board removed, supply pipework exposed and debris still on the floor

Strip back to the structure

The tub, the surround and the wall board come out so the framing, the supply pipework and the drain are visible. Almost every decision that follows depends on what is behind the wall, and none of it can be assessed until it is open.

Nothing is quoted as certain until the wall is open.

Scene 02Drainage

Drain position, size and fall

A tub drain and a shower drain are not interchangeable. The drain is set at the right height for the finished floor, in the right place for the layout, and the bed is formed to fall to it from every direction — or to one line if a linear drain is used.

The drain decides the floor build-up, not the other way round.

Scene 03Waterproofing
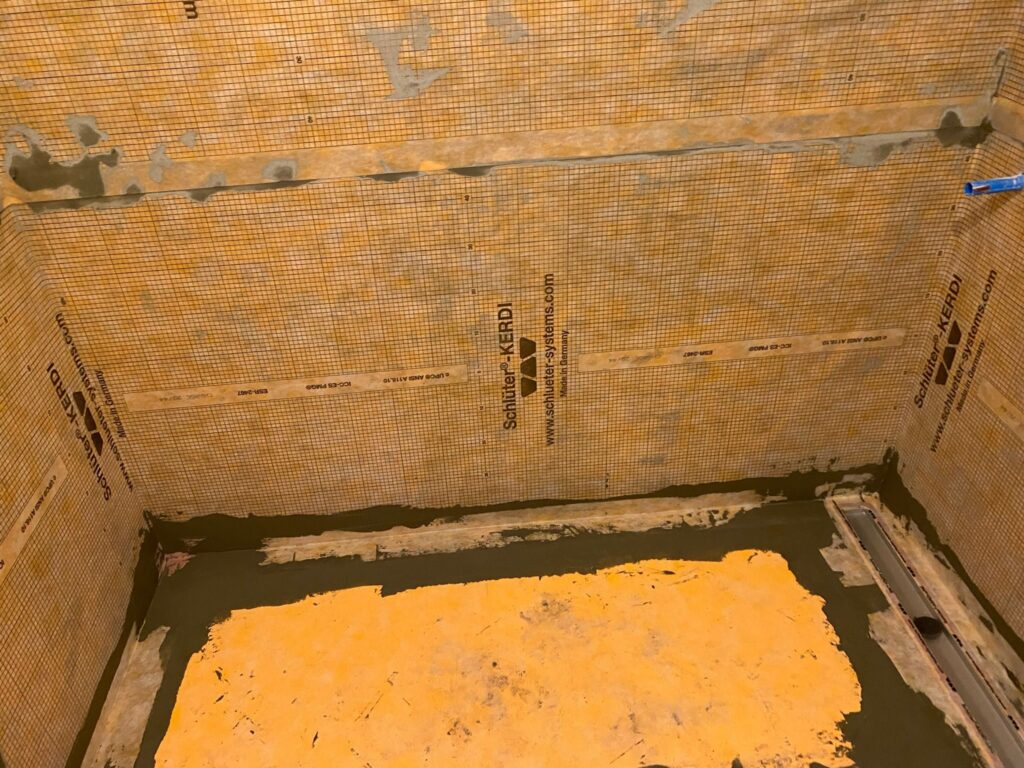
Shower alcove waterproofed with a bonded orange membrane over the walls and floor, with the linear drain body set and the sloped bed formed

A bonded, continuous membrane

Walls and floor are waterproofed as one continuous system, lapped at every joint, sealed around the drain and turned up the walls well above the spray line. This is the layer that actually keeps water out of the structure.

This is the part you will never see and never want to redo.

Scene 04Finishing
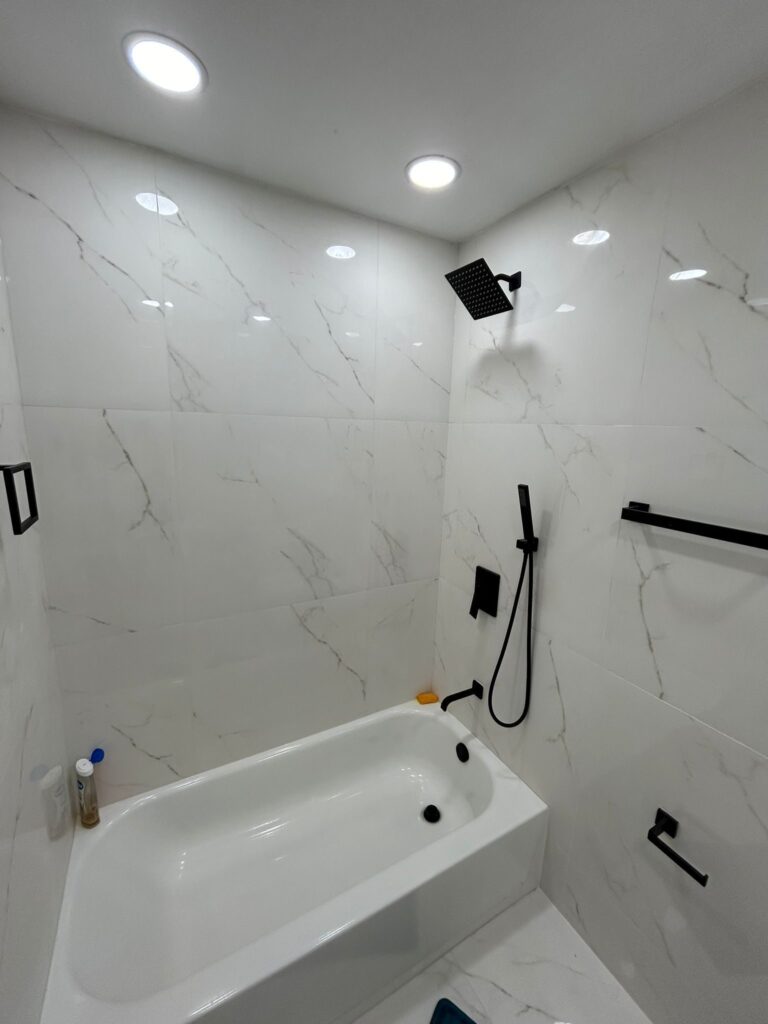
Bath with a shower over it, tiled in marble-look porcelain with matt black fixtures — the arrangement most conversions start from

Tile, glass and fittings

Tile set out so cuts fall sensibly and the niche lands where it is useful, then glass measured to the finished opening, and the fittings set where they can be reached without standing in the spray.

Glass is measured after tiling, never before.

Scene 04 is an illustrative diagram. Permitting does not photograph well.

Not sure whether your drain can move? That is the first thing we check.

Frame 03Finished conversionsSeveral bathrooms · not one project

Chapter 03 — Finished walk-in showers

Where a conversion ends up.

Several bathrooms, not one project

These frames are from different bathrooms and are shown as separate installations rather than one project. They are here to show the decisions a conversion actually makes: screen or enclosure, step or no step, where the niche goes, where the controls go. Use the arrows, the ticks or the arrow keys.

Walk-in shower with a frameless glass screen and brass fittings, opening directly off the bathroom floor with no step
01 · No step at all

01 / 05

01 · No step at all

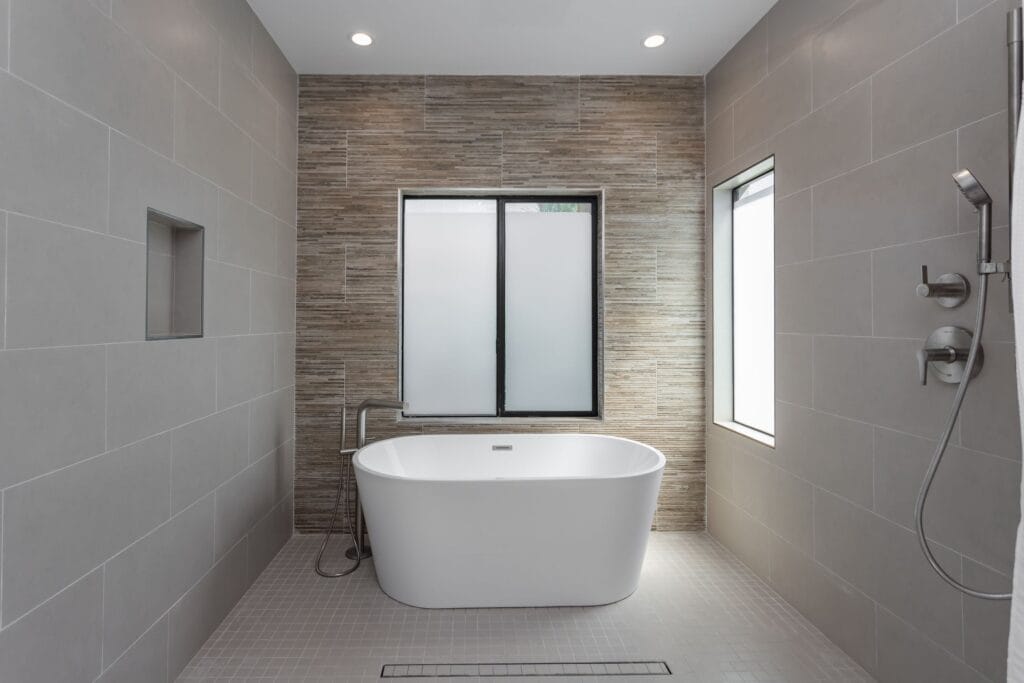
A frameless glass screen with the shower floor continuing straight off the bathroom floor. Removing the step is the single change that most affects how a shower feels to use, and it is decided by the drain and the floor build-up rather than by taste.

02 · Niche and controls

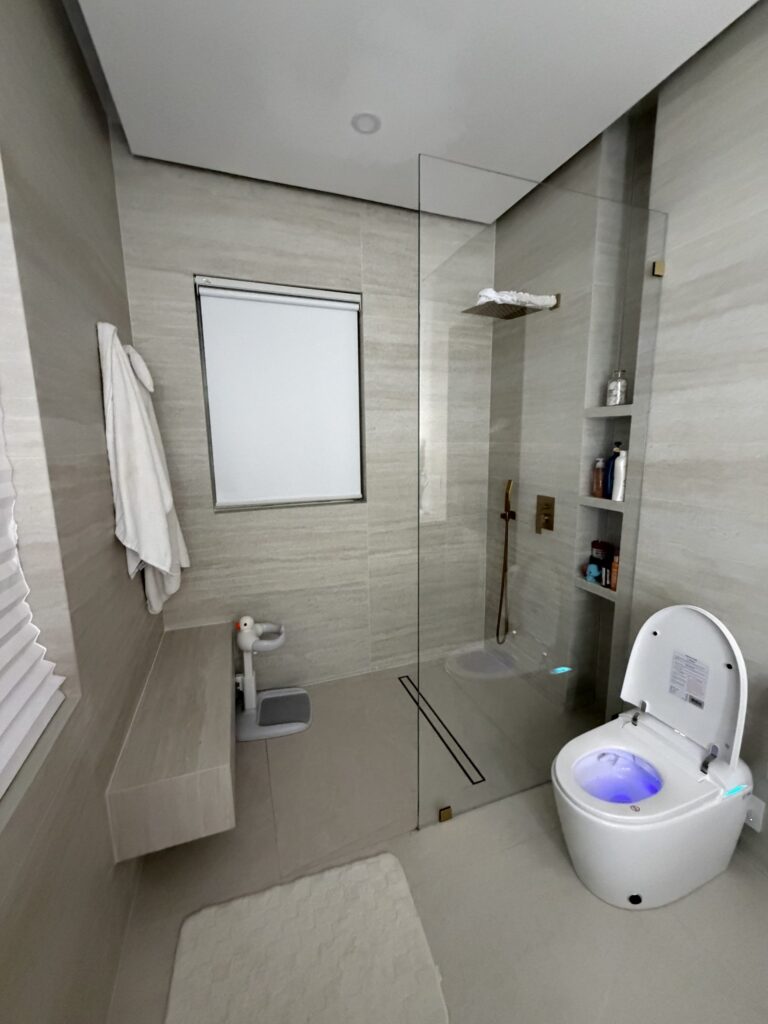
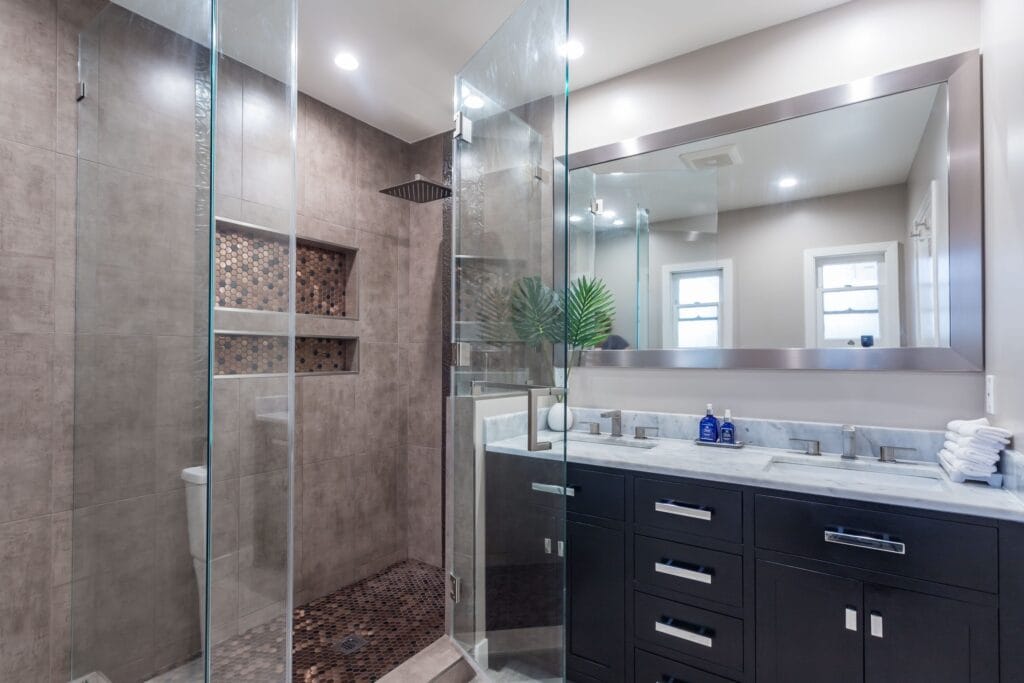
The niche set into the tiled wall and the mixer positioned away from the spray, so the shower can be turned on without standing under it. Both are set out before tiling, because both are holes in the waterproofing that have to be detailed.

03 · Working with the room

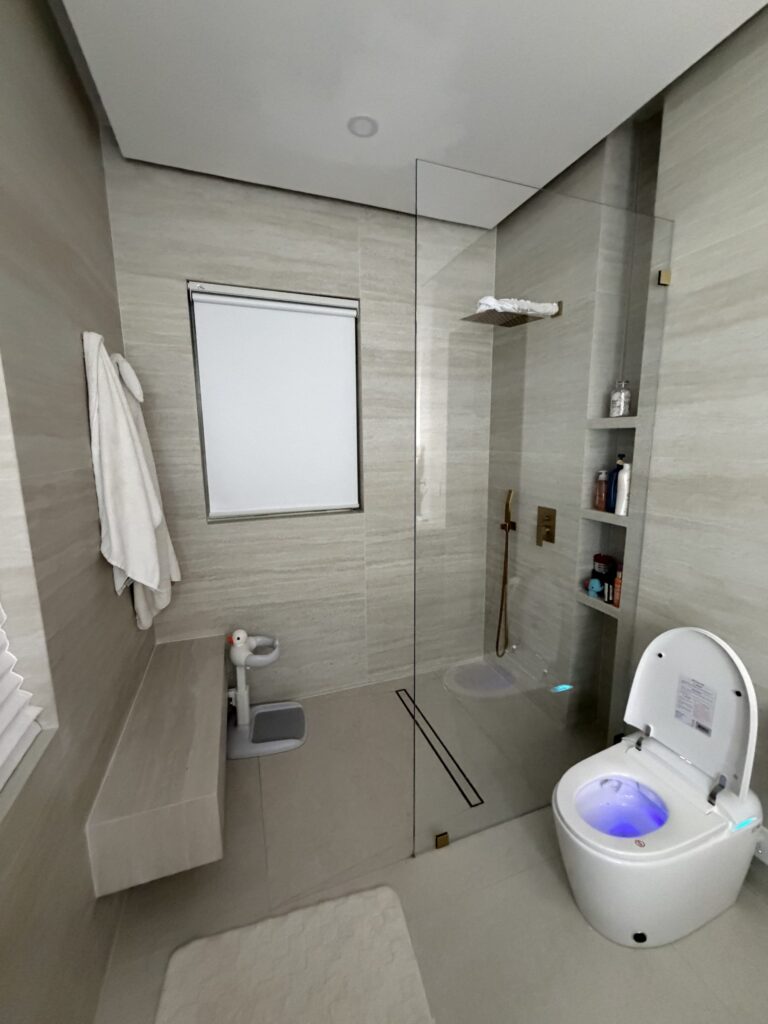
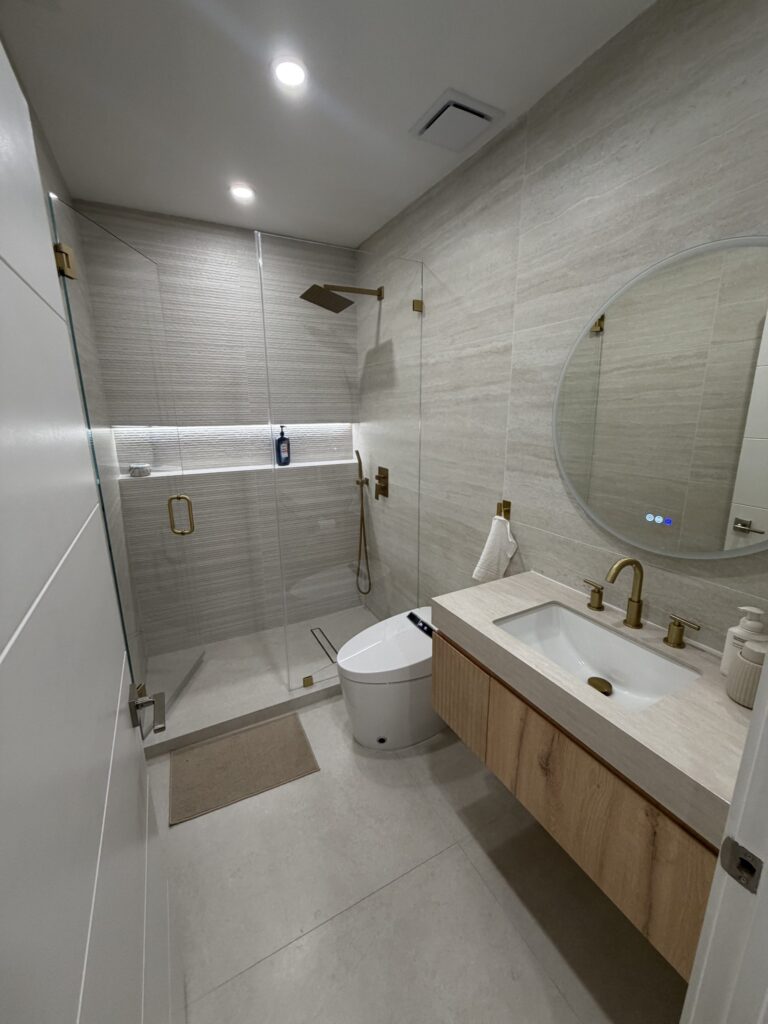
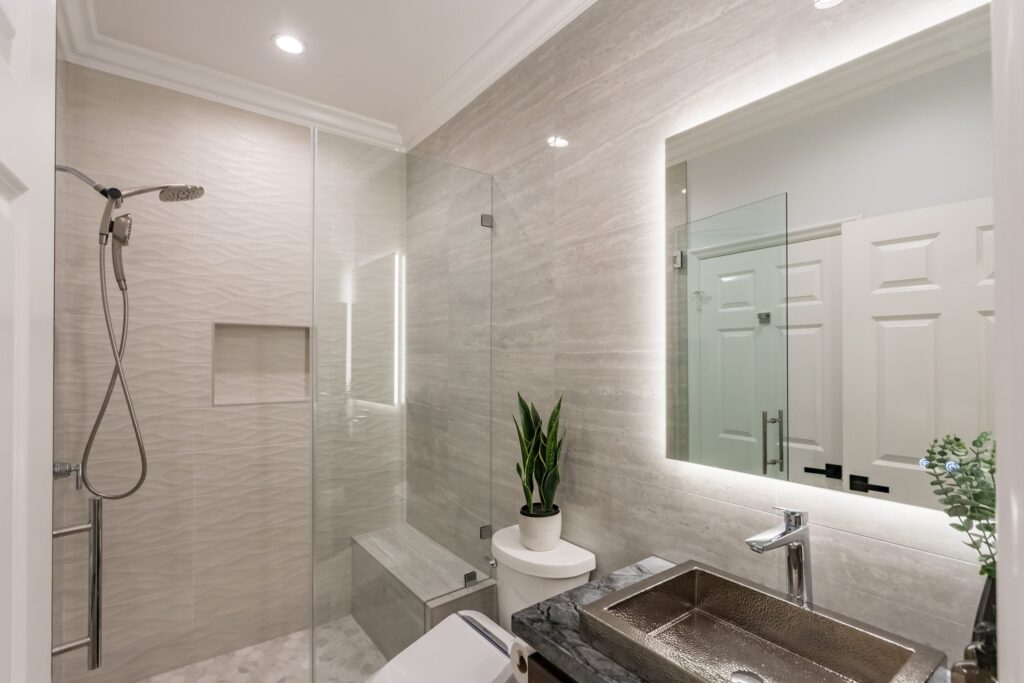
The shower alongside a wall-hung toilet. In a small bathroom, taking the tub out frees the floor area that makes the rest of the layout work — that is often the real reason for a conversion.

04 · Shower and vanity together

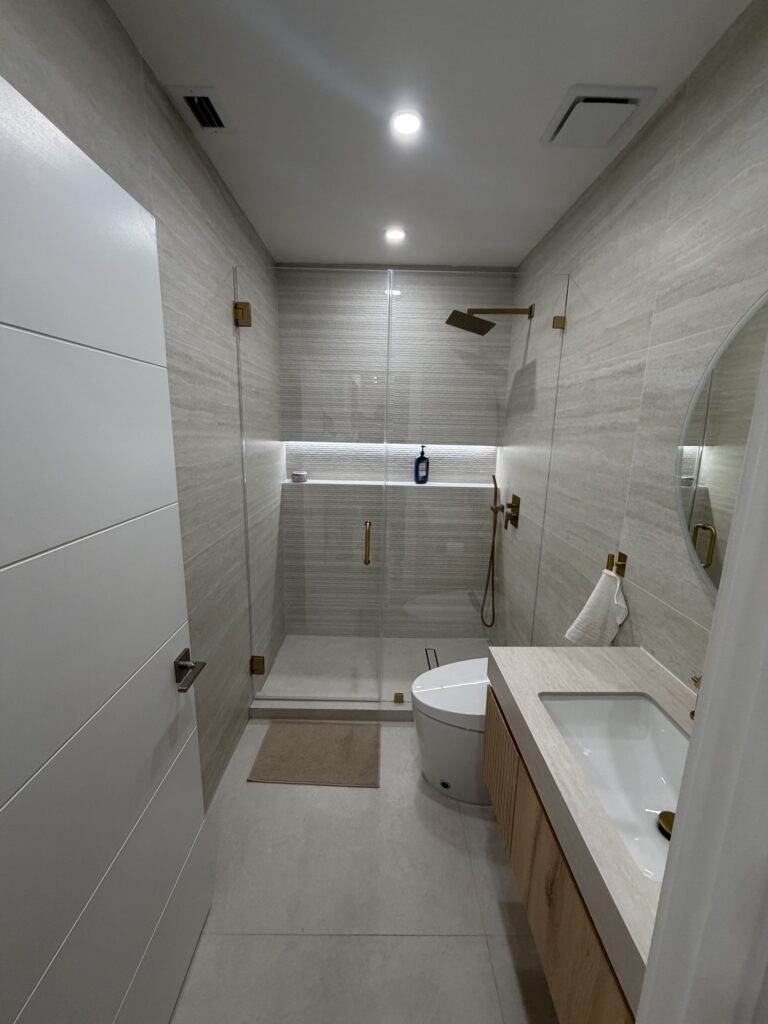
The finished shower beside the vanity run. Converting a tub usually means the whole room gets re-tiled, so the shower and the rest of the bathroom end up as one decision rather than two.

05 · From the doorway

The view most people actually see. A conversion is judged from here — whether the room reads as larger, whether the glass keeps the light, and whether the tile lines run through.

Want to see a finished conversion in person? We can arrange it.

Frame 04The conversions, readObserved detail only

Chapter 04 — Reading the work

What the bathroom frames show.

Observed across several finished bathrooms

The membrane is the product

The waterproofing frame is the most informative image on this page. The orange bonded membrane covers the walls and the floor as one continuous system, lapped at the corners and sealed around the drain body. Everything after it is finish. Everything before it is preparation.

The bed is sloped, not flat

In the same frame the floor is formed with a fall toward the drain rather than laid flat. That slope is built before any tile goes on, and it is what stops water standing in the finished shower.

The alcove is the tub footprint

The waterproofed opening is the width of a standard alcove bath. That is what makes these conversions practical: the space, the framing and roughly the drain position already exist, so the work is contained rather than a full re-plan.

Thresholds vary

Across the finished frames some showers have a low kerb and glass on a track, and at least one runs straight off the bathroom floor with no step at all. Which is possible depends on the floor build-up and the drain, and it is decided early.

Niches are planned, not added

Every niche in these frames is set into the tiled wall with its own trim. A niche is a deliberate penetration through the waterproofing, formed and sealed before tiling. It cannot be cut in afterwards.

What is not claimed

These frames come from an ungrouped pool of the client’s bathroom work and show several different bathrooms. No before-and-after pairing is claimed, no city, client, cost or timeline is attached, and no bathroom here is described as accessibility compliant.

Every conversion starts behind the tile, not in front of it.

Frame 05MaterialsIllustrative · not project photography

Chapter 05 — Bases, waterproofing and glass

What keeps water where it belongs.

And what each choice asks of you later

Illustrative diagrams

System

Bonded waterproofing membrane

A sheet or liquid membrane bonded over the walls and floor of the shower, lapped at joints, sealed at the drain and turned up well above the spray line. Tile and grout are not waterproof; this layer is.

UpkeepNothing to maintain — which is exactly why it has to be right first time.

System

Drain and sloped bed

A centre drain with the bed falling to it from all sides, or a linear drain with a single-plane fall. Linear drains suit large-format tile because the floor can be laid in fewer, larger pieces.

UpkeepClear the drain and its trap periodically; it is the one moving part.

Material

Wall and floor tile

Large-format porcelain on the walls reduces grout lines and reads calmer in a small room. Floors need a surface with enough slip resistance when wet, which is why mosaic or textured tile is common underfoot even where the walls are large format.

UpkeepReseal cement grout as recommended; check silicone joints annually.

Material

Glass screens and enclosures

A single fixed panel, a sliding enclosure or a hinged door — chosen for the opening, the swing space and how much of the room you want to keep visually open. Frameless costs more and reads lighter.

UpkeepSqueegee after use and keep tracks clear; hard water is the enemy of glass.

Fittings

Valve, outlets and controls

A mixer set where it can be reached from outside the spray, plus the choice between a fixed head, a hand shower on a rail, or both. Thermostatic control is worth having where more than one person uses the room.

UpkeepService the valve cartridge if flow or temperature drifts.

Upgrade

Niches, benches and grab rails

Recessed niches, a bench and blocking for grab rails are all formed before tiling. Blocking in particular costs almost nothing to add during the work and is expensive to retrofit afterwards.

UpkeepAdd the blocking even if you do not want the rail yet.

These panels are illustrative diagrams explaining shower construction in general. They are not photographs of Elbaz Construction work, and listing an option here does not mean it was used on the bathrooms shown above.

Tiled base or moulded tray — easier to choose with someone who has built both.

Frame 06Three bathrooms, closerDifferent properties

Chapter 06 — Three details worth asking about

Closer in.

Three different bathrooms

The parts of a shower that decide whether it is pleasant to use every day are small and specific. These are three of them, from three different bathrooms.

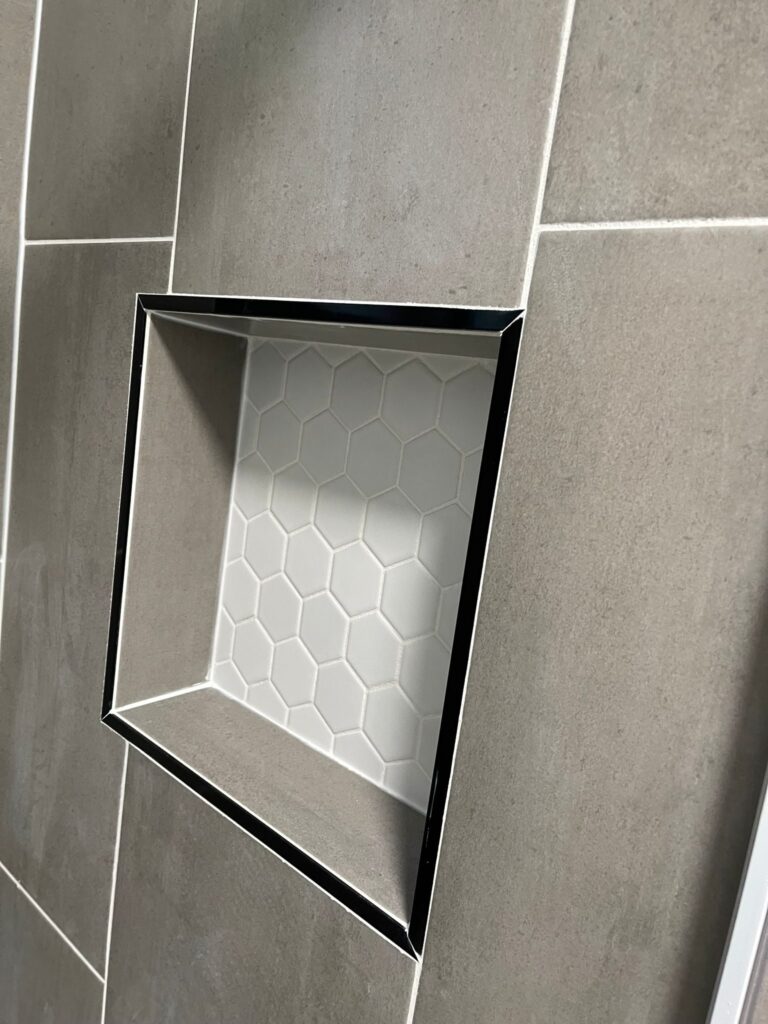
Recessed shower niche framed with a dark trim and lined with hexagonal mosaic tile

01Niche

A hole in the waterproofing, done properly

A recessed niche framed with a dark trim and lined with mosaic. Every niche is a deliberate penetration through the membrane, formed and waterproofed before tiling, with the base pitched slightly so water does not sit in it. It cannot be added later without opening the wall.

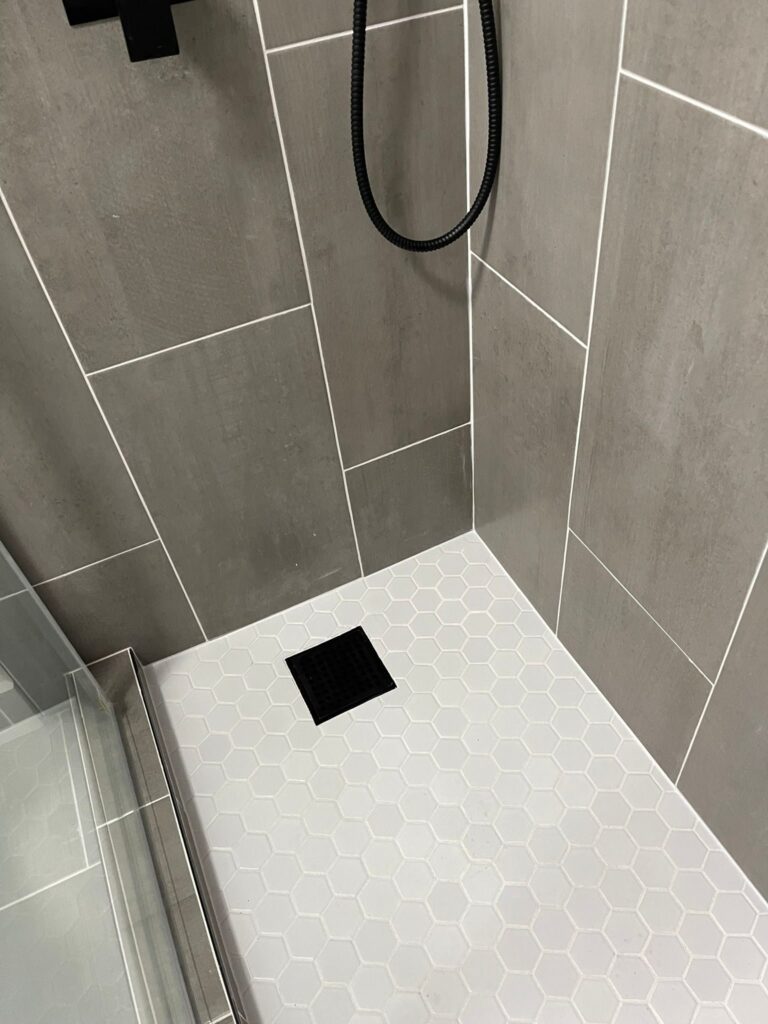
Shower floor tiled in pale hexagonal mosaic with a square centre drain and a matt black trim, seen from the opening

02Floor

Why shower floors are usually mosaic

A hexagonal mosaic floor with a square centre drain. Small units let the floor be laid to a fall in several directions at once, and the extra grout gives grip underfoot — which is why floors are often mosaic even where the walls are large-format.

Walk-in shower enclosed with sliding glass panels on a black track, with a grab rail fixed to the tiled wall

03Enclosure

Glass, track and a grab rail

Sliding panels on a black track, with a grab rail fixed into the tiled wall. The rail is only possible because blocking was built into the wall before tiling. Adding one afterwards means fixing into tile and hoping, which is not the same thing.

Send us photographs of the bathroom and we will tell you what is possible.

Frame 07ProcessNine stages

Chapter 07 — Nine stages, in order

How a tub becomes a shower.

Consultation to final plumbing inspection

Consultation

Why you want the change — space, access, resale, or simply never using the bath — and what the room has to do afterwards.

You getA licensed contractor, not a call centre.

CheckThe reason is established before a layout is drawn.

Survey

The existing tub, the alcove dimensions, the floor build-up, where the drain sits and what is above and below the room. On an upper floor, what is beneath matters.

You getA clear view of what is possible in your room.

CheckFloor build-up checked before a level threshold is promised.

Layout and specification

Screen or enclosure, step or no step, where the niche and controls go, drain type, and the tile that follows from those decisions.

You getDecisions made in the right order, not the convenient one.

CheckNiche and control positions fixed before demolition.

Written scope

What is included, what is allowance, and the rate for concealed damage — because water damage behind a tub surround is common and cannot be seen beforehand.

You getA scope naming the concealed-damage rate.

CheckUnknowns priced as rates up front.

Permit

Altering drainage and supply is permitted work with an inspection. Where the room and the plumbing locations are unchanged the scope is smaller, but it is still permitted work.

You getThe permit handled for you.

CheckRough-in inspected before anything is closed up.

Removal and repair

Tub, surround and wall board out. Framing, pipework and subfloor inspected, and any water-damaged material replaced before rebuilding.

You getPhotographs of what was behind your tub.

CheckConcealed damage documented while it is visible.

Drain, bed and waterproofing

Drain set to the finished level, the bed formed to fall, then the bonded membrane over walls and floor, lapped and sealed. Where required this stage is water-tested.

You getThe waterproofing photographed before it is covered.

CheckMembrane checked and, where appropriate, flood-tested.

Tiling and fittings

Tile set out from the most visible line, niche and bench finished, then the valve, outlets and any grab rails fitted to blocking built in earlier.

You getCuts falling where they should, not where they land.

CheckSet-out agreed before the first tile is fixed.

Glass, inspection and handover

Glass measured to the finished opening and installed, final inspection, silicone joints finished, and care guidance for the specific tile and glass.

You getA shower that drains, seals and looks finished.

CheckFinal walk with you, with the water running.

We pull the plumbing permit and book the inspection.

Frame 08ApprovalsPlanning, permits, inspections

Chapter 08 — Small room, real requirements

Permits, inspections and access.

What genuinely applies

A tub-to-shower conversion is a small job that touches plumbing, waterproofing and sometimes structure. Here is what that means in practice in the tri-county area.

Plumbing work is permitted

Altering or relocating drainage and supply is permitted work with an inspection, even when the room is not changing shape and the fixtures stay in roughly the same places.

Rough-in is inspected before it is covered

The plumbing rough-in is inspected before walls and floors are closed up. That is the point of the inspection — once it is tiled, nobody can see it.

Waterproofing is not optional

Shower waterproofing is a code requirement, not a quality upgrade, and in a conversion it is the single most consequential part of the work.

Condominium approval

Most associations require approval for bathroom work above ground level, and many restrict work hours and require proof of contractor licence and insurance before access is granted.

What is below matters

On an upper floor or in a condominium, a leak has somewhere to go. Associations frequently require flood-testing of the waterproofing, and it is worth doing whether or not it is required.

Load-bearing walls

If the conversion involves removing or altering a wall rather than just the tub, that is a structural question and changes the permit scope.

Ventilation

A shower generates more moisture than a bath. Where existing ventilation is inadequate, improving it is part of doing the job properly rather than an upsell.

Accessibility, described honestly

A low or level threshold, a bench, a hand shower and grab rails all make a shower easier to use. That is not the same as certified accessibility compliance, and we do not describe it as such unless a project is specifically designed and verified to that standard.

Blocking for grab rails

Even if you do not want rails now, blocking built into the wall during the work costs very little and makes fitting them later straightforward rather than a gamble.

Closeout

Inspection sign-off, product documentation and warranty paperwork, plus care guidance for the tile, grout and glass actually installed.

Permit requirements vary by municipality and by building. Nothing here is a determination for your property. We confirm what applies — including any association process — before work is scheduled.

Moving a drain is inspected work. Let us look at what your address needs.

Frame 09VariablesCost · programme · decisions

Chapter 09 — What moves the number

Cost, programme and the decisions behind both.

Drain position, footprint, and finish level

Fewer variables

Straight swap

The tub comes out and a shower goes into the same alcove, with the drain staying essentially where it is and a low kerb at the threshold.

  • Existing alcove and drain position reused
  • Low kerb rather than a level threshold
  • Tiling contained to the shower area
  • Smallest permit scope
The usual shape of these jobs

Full room

The conversion triggers a re-tile of the whole bathroom, a new vanity or a relocated fitting, and a proper glass enclosure.

  • Whole room re-tiled to match
  • Some plumbing relocated
  • Frameless or sliding glass to the opening
  • Niche, bench or blocking added
More moving parts

Level threshold

A curbless shower running straight off the bathroom floor — the best result and the most demanding, because the floor build-up has to accommodate the fall.

  • Floor structure and build-up assessed
  • Drain and fall designed into the floor
  • Linear drain often required
  • Flood-testing strongly advisable

Threshold height

A level, curbless shower is more demanding than a low kerb because the fall has to be built into the floor.

Drain type and position

Keeping the existing drain is cheaper than moving it; a linear drain costs more than a centre drain.

Extent of tiling

Re-tiling the whole room rather than the shower alone is often the largest single line.

Concealed damage

Water-damaged framing or subfloor behind a tub surround is common and cannot be seen until removal.

Glass

Frameless panels cost meaningfully more than framed or sliding enclosures, and are measured after tiling.

Tile format

Large-format wall tile reduces grout lines but needs a flatter substrate and more careful setting.

Fittings

Thermostatic valves, dual outlets and body jets add plumbing as well as hardware cost.

Access and building rules

Condominium approvals, lift bookings and restricted work hours all extend the programme.

We do not publish a fixed price for tub-to-shower conversions, because the two biggest variables are invisible at quotation: whether you want a level threshold (which depends on your floor build-up) and what is behind the existing tub surround. We price the shower construction, the tiling, the glass and the fittings as separate lines, and we agree a concealed-damage rate before we start — so if we find rot behind your tub, it is a known number rather than a conversation you have while the bathroom is open.

For a number specific to your bathroom, we need the footprint and the drain position.

Frame 10Sequence of workIllustrative diagram

Chapter 10 — The order of work

How a tub becomes a shower.

Strip-out to final inspection

Illustrative diagram

Stage 01

Survey and protect

Measure the alcove and floor build-up, confirm drain position, then protect the route through the house and the rest of the room.

Stage 02

Remove the tub

Tub, surround and wall board out, leaving framing, supply pipework and drain exposed for inspection.

Stage 03

Repair and prepare

Replace any water-damaged framing or subfloor, adjust framing where needed, and install blocking for niches, benches and grab rails.

Stage 04

Drain and bed

Set the drain to the finished floor level and form the bed to fall toward it.

Stage 05

Waterproofing

Bonded membrane over walls and floor, lapped at joints, sealed at the drain and turned up above the spray line. Flood-test where appropriate.

Stage 06

Tiling

Wall and floor tile set out from the governing line, with niche and bench finished and cuts falling at the edges.

Stage 07

Fittings and sealing

Valve, outlets, rails and accessories fitted, then silicone joints finished at every change of plane.

Stage 08

Glass and handover

Glass measured to the finished opening, installed and adjusted, then inspection, clean and care guidance.

An illustrative diagram of the general order of work on a tub-to-shower conversion. It is not a photograph of a project, and details vary with the floor build-up, the drain and the building.

If the bathroom is already stripped, we start at the rough-in.

Frame 11On siteWhat to expect while it happens

Chapter 11 — Living without that bathroom

In the room.

Assembled from the frames above

Frame 11 · on siteBuilt from the same bathroom frames used in the galleries on this page — genuine work, moved rather than invented. Nothing here is stock footage.

The room is out of useFrom strip-out to glass, that bathroom is unusable. If it is the only one, that shapes the programme and we say so before starting.
Noisy and dusty at the startRemoval is the loud, dusty stage and it is short. Containment and floor protection go in first.
Water off, brieflySupply is isolated for parts of the work. Those windows are scheduled with you rather than sprung on you.
What we may findWater damage behind a tub surround is common. The repair rate is agreed in advance so it is a number, not a negotiation.
Waiting is part of itWaterproofing and setting materials need curing time, and flood-testing takes a day. Those quiet days are the job working, not stalling.
Glass comes lastGlass is measured after tiling and then fabricated, so there is a gap between a finished-looking shower and a usable one.
HandoverWater run, drainage checked, silicone finished, and care guidance for the tile, grout and glass actually installed.

Ready to see what this would look like in your bathroom?

Frame 12QuestionsFAQ and credentials

Chapter 12 — Questions, and why us

What people ask before they convert.

Grouped so you can find yours

Feasibility

Most standard alcove tubs can, because the opening is already roughly a shower footprint and the drain is close to where it needs to be. What varies is the threshold: whether a level, curbless shower is possible depends on your floor build-up and the drain, and that is a survey question rather than a catalogue one.

It is worth thinking about honestly, particularly with small children or with resale in mind. If the house has another bath, the decision is easy. If it does not, we will raise it rather than let you discover it later.

Usually yes, and that is often the real reason people do it. Removing a tub and putting clear glass in its place gives back both floor area and sight lines.

Construction

A bonded membrane over the walls and floor, lapped at joints, sealed around the drain and turned up above the spray line. Tile and grout are not waterproof — they are the wearing surface over the layer that is.

So water reaches the drain instead of standing. The fall is formed in the bed under the tile before anything is set, which is why a shower floor cannot simply be laid flat and grouted.

Not necessarily, but it helps with large-format floor tile because the floor only has to fall in one direction. A centre drain needs the floor to fall from four directions, which is easier with smaller units.

Permits

Yes — altering drainage and supply is permitted work with an inspection, even when the room stays the same shape. The rough-in is inspected before anything is closed up.

Most associations require approval for bathroom work above ground level, proof of licence and insurance, and restricted work hours. Many require flood-testing of the waterproofing — which is worth doing regardless.

Accessibility

No. A low or level threshold, a bench, a hand shower and grab rails all make a shower easier and safer to use, and we fit them regularly. Certified accessibility compliance is a specific standard with specific dimensions, and we would not describe a shower as compliant unless it was designed and verified to it.

Add the blocking now even if you do not want the rails yet. Timber blocking built into the wall before tiling costs almost nothing; fixing a rail into tile later is a much weaker and more expensive proposition.

Timing

From strip-out to usable is typically a few weeks rather than a few days, because waterproofing and setting materials need curing time and the glass is measured and fabricated only after tiling is finished.

Maintenance

Squeegee the glass, keep the drain clear, and reseal cement grout as recommended. Silicone joints at changes of plane are a wear item and will eventually be renewed — that is normal rather than a failure.

Slightly, because there is more grout. That extra grout is also what gives grip underfoot, which is the trade most people accept once they think about it.

Still have questions? Ask about the waterproofing. That is the job.

Frame 13ReviewsGoogle

Chapter 13 — What clients said

Reviews, quoted as written.

Rated 4.8 from 343 Google reviews at the time of writing.

Frame R1ReviewGoogle
Very satisfied with my bathroom and the way it looks now they crew was very professional, The service was quick, and the staff was friendly , The customer service staff went above and beyond , The customer support was fantastic! They quickly resolved my bathroom issues and were very friendly , highly recommended!!

Leynol CarvajalGoogle review

Frame R2ReviewGoogle
If I could refer anybody to getting their bathroom redone it’s through this company very reliable honest and clean work

Jonathan VargasGoogle review

Frame R3ReviewGoogle
Thank you Ashley ! We love the new bathrooms. Good with communication and very clear with explanations . I will definitely use them again in the future

Andrew TyupaGoogle review

Read every review on Google, unedited.

Schedule a Consultation (754) 236-0675
Preferred contact method

We use your details only to respond to this enquiry. No lists, no resale.

Thanks — that came through.

Your enquiry is with the Elbaz Construction team. A licensed contractor will call you back to ask about the lot, the drawings and your timing. If it is easier to talk now, call (754) 236-0675, Sunday to Friday 7am to 7pm.

Frame 14StartConsultation, not a sales visit

Chapter 14 — Start here

Send us the bathroom.

A short conversation, not a sales visit

A photograph of the tub and one of the room from the doorway answers most of the first questions. Whether a level threshold is possible needs a look at the floor, and what is behind the surround needs the wall open — but everything before that can be established quickly.

What happens after you send it

01
We read what you sendPhotographs of the tub and the room, and whether this is the only bathroom.
02
We call you backA licensed contractor, to ask about the floor, what is below, and whether you want a level threshold.
03
We survey the roomAlcove dimensions, floor build-up, drain position and what is above and below.
04
You get it in writingA scope separating shower construction, tiling, glass and fittings — with the concealed-damage rate named.

Useful to have ready

  • Photographs of the tub and of the room from the doorway
  • Whether this is the only bathroom in the home
  • Whether you want a level threshold or accept a low kerb
  • Whether you are in a condominium
  • Whether anyone using it needs seating or grab rails