


10 service categories · 100 service pages · Miami-Dade, Broward & Palm Beach
View all servicesThe journey
Six stages, start to finish.
A walk-in shower conversion is a small room with a lot going on in it: drainage, waterproofing, framing, glass, tile and at least one inspection. This page walks the whole thing in order, so you can see what you are actually agreeing to before anyone quotes you.
Use the stage markers to jump straight to what you care about — or read it through once and you will know more about how these are built than most people who have already had one done. Nothing here is a sales pitch; it is the sequence we actually follow.
Stage 01 · Discover
Who a walk-in shower is actually for
Four reasons cover almost every conversion we are asked to build. They lead to genuinely different showers, so it is worth knowing which one is yours.
Staying in the home
This is the most common reason people call us, and it is the one where the details matter most. Stepping over a tub wall is the single hardest movement in most bathrooms. Removing it changes the room from something to be managed into something you stop thinking about.
- A low or level threshold, so there is nothing to climb over
- Blocking behind the tile for grab bars — fitted now, or added later without re-tiling
- A bench or a fold-down seat, positioned for the reach to the controls
- A handheld on a slide bar alongside the fixed head, usable seated or standing
- Controls moved to the entry side so the water starts before you are under it
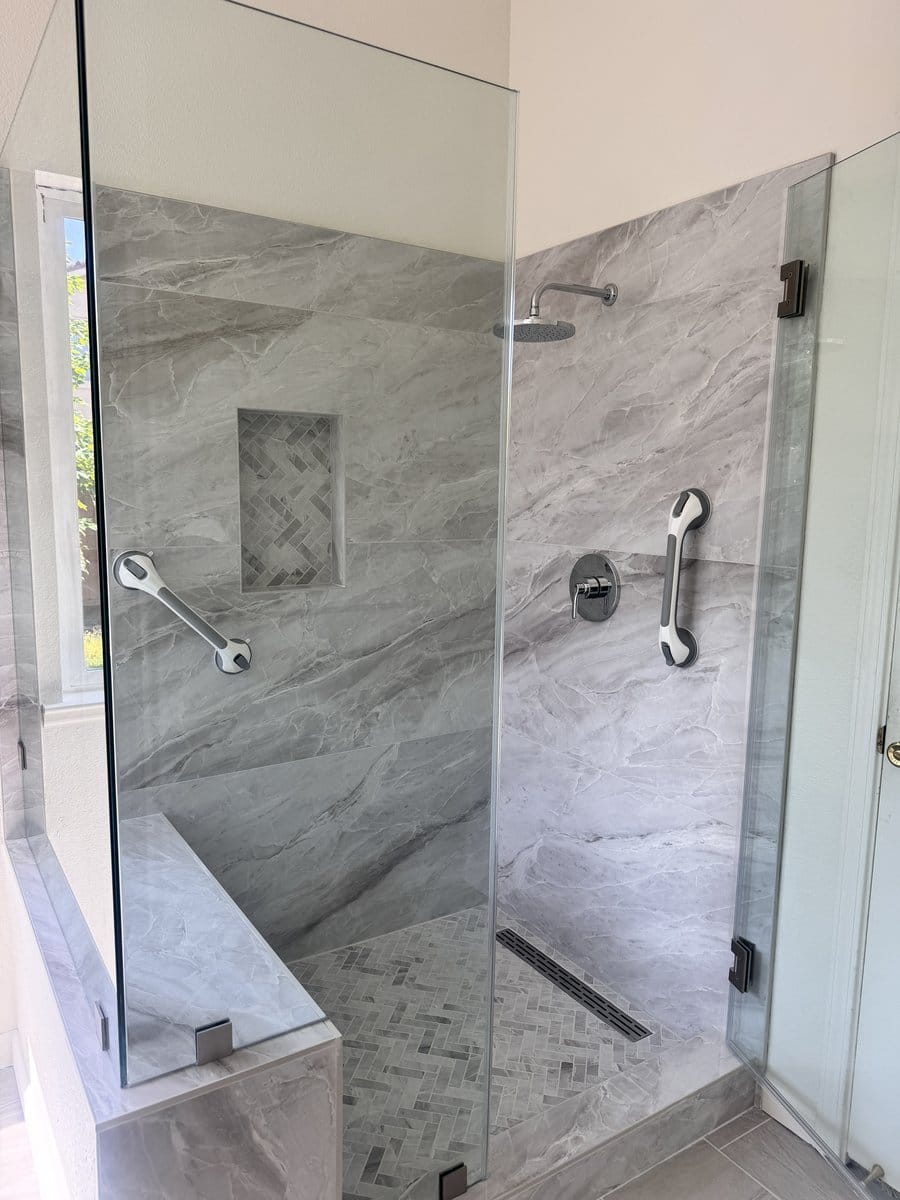
Project 01: grab bars fitted either side, with a handheld on a slide bar.
Reclaiming the floor
In a small or narrow bathroom, an unused tub is the most expensive storage shelf in the house. Taking it out and running the shower the full width of the wall usually buys back enough floor to make the room feel like a different bathroom, without moving a single wall.
- The shower takes the tub's footprint — no structural work in most layouts
- A clear glass panel instead of a curtain keeps the whole room visible
- A wall-hung vanity puts floor back under your feet
- Wall-to-wall tile makes the room read as one volume, not three zones
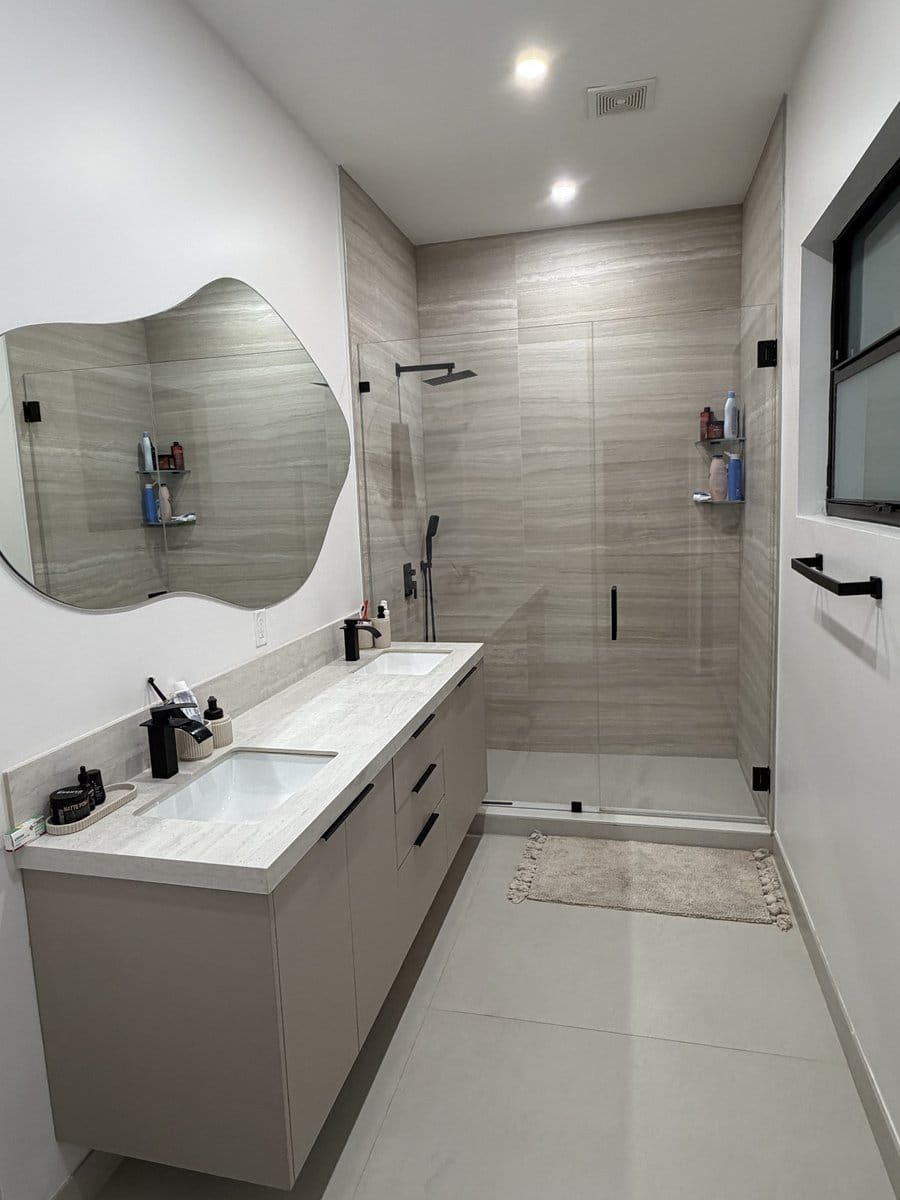
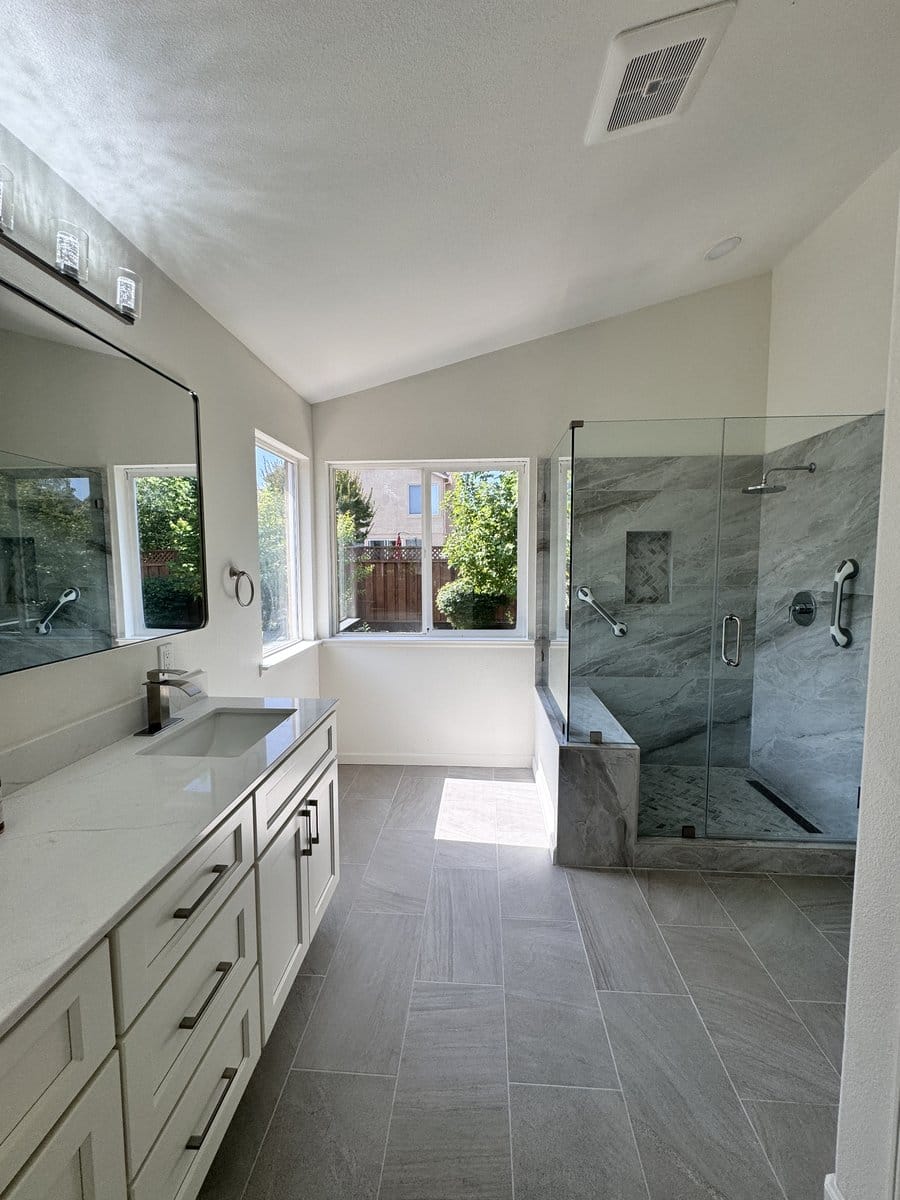
Project 02: the completed room — the shower runs the full width at the far end.
Something is leaking
Tile does not keep water out — the waterproofing behind it does. When an old shower fails it is nearly always that layer, and no amount of re-grouting fixes it. The honest answer is usually to strip it back, look at what is there, and rebuild the assembly properly.
- We open it up before quoting the repair, not after
- Damaged framing or subfloor is dealt with while it is open, not tiled over
- A full waterproofing system goes back in, not a patch at the failure point
- If it turns out to be smaller than feared, the scope comes down — we will tell you
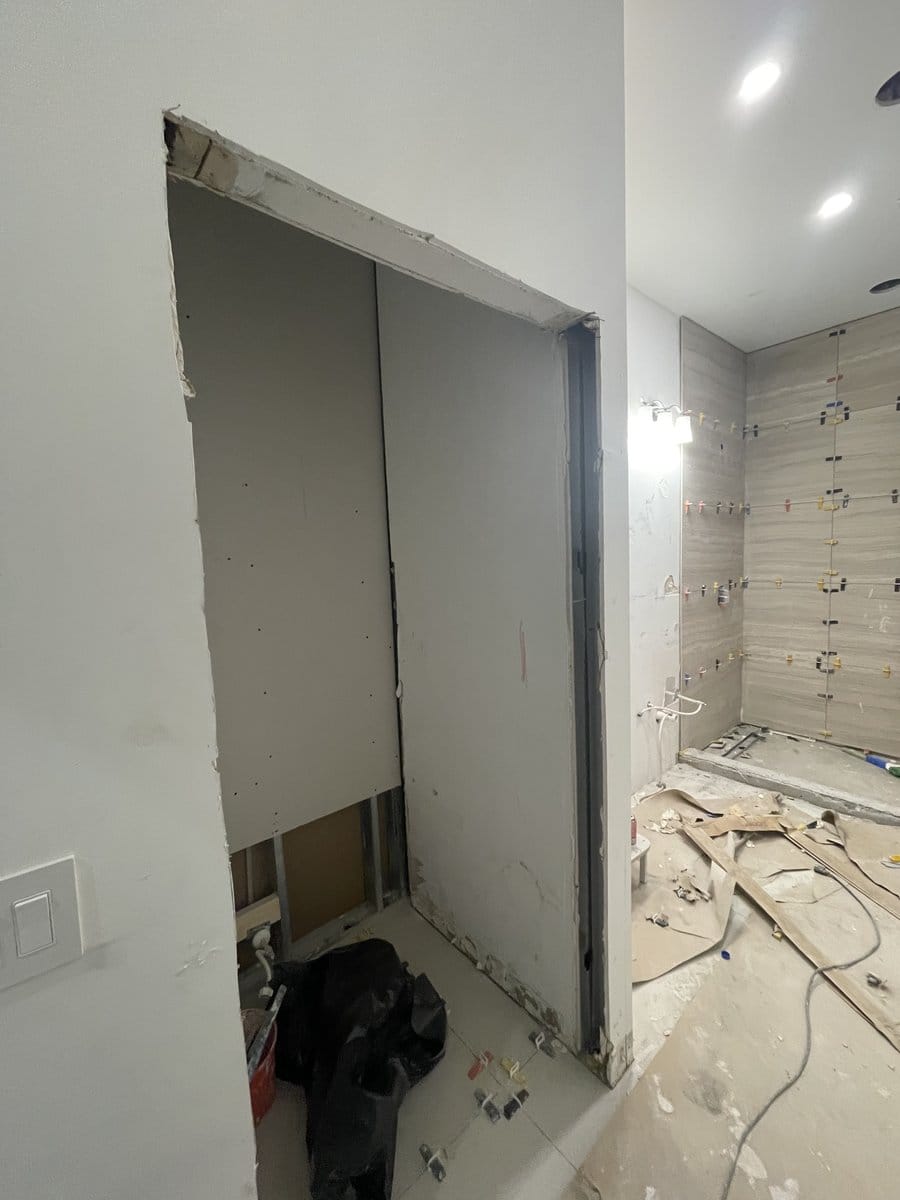
Project 02, during: stripped back so what is behind the tile can actually be seen.
It is simply dated
A sound bathroom that just looks tired is the easiest version of this job, and the one where the budget goes furthest into finishes rather than repairs. It is also the one where planning the layout properly pays off most, because you are not fighting a problem — you are choosing.
- Large-format wall tile means fewer grout lines to clean and to age
- Glass instead of a curtain is the single biggest visual change
- A recessed niche removes the corner caddy for good
- Matching the shower fittings to the vanity ties the room together
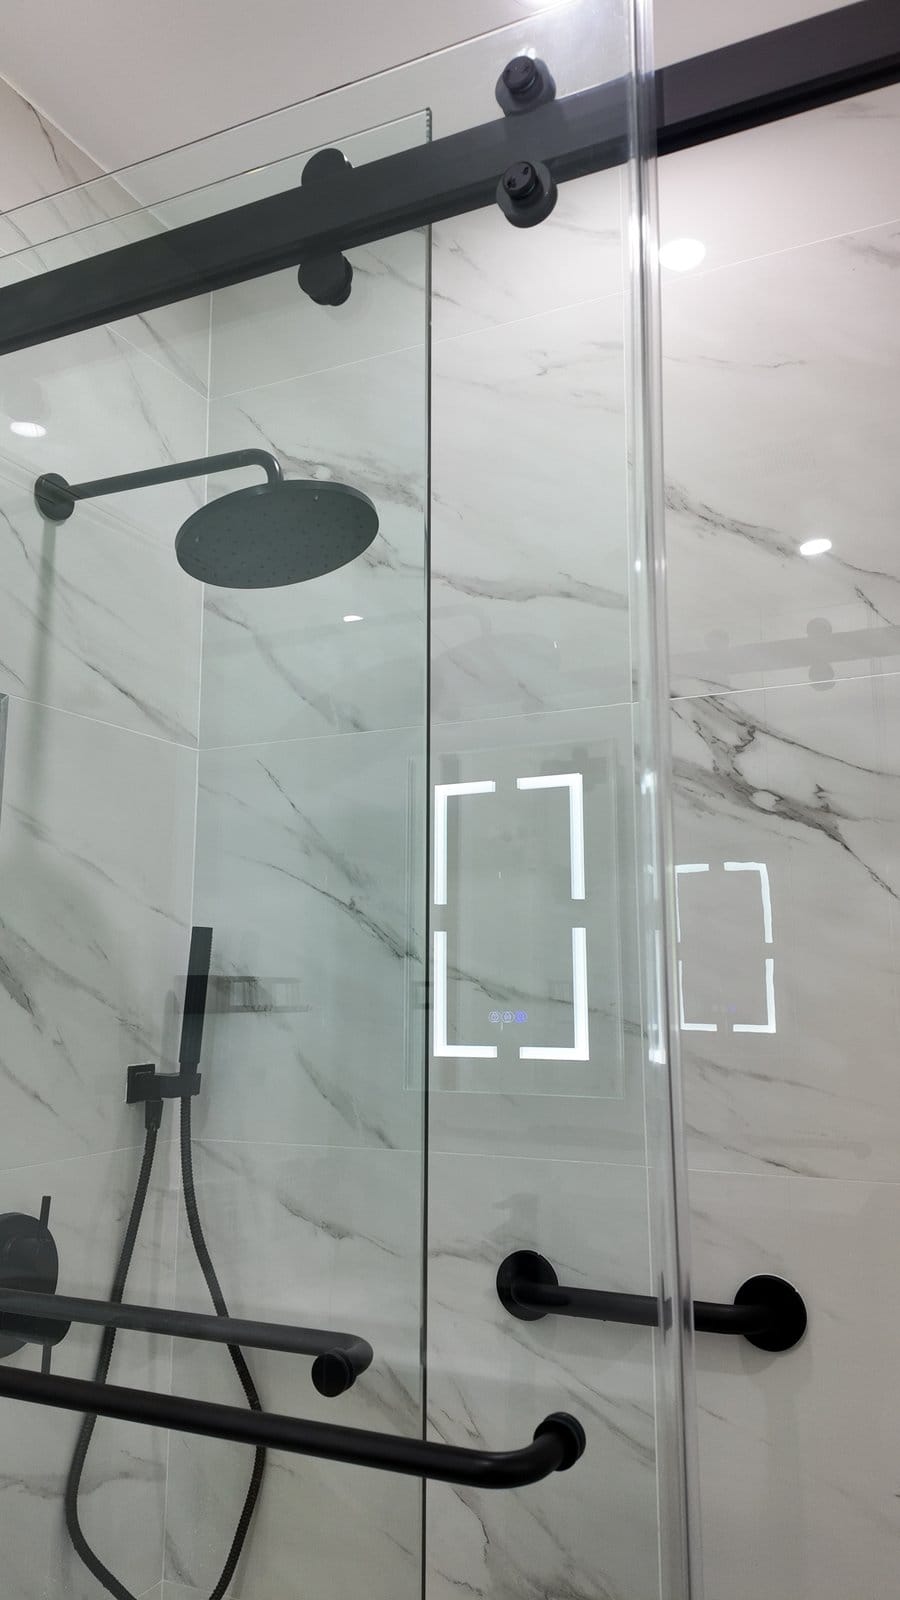
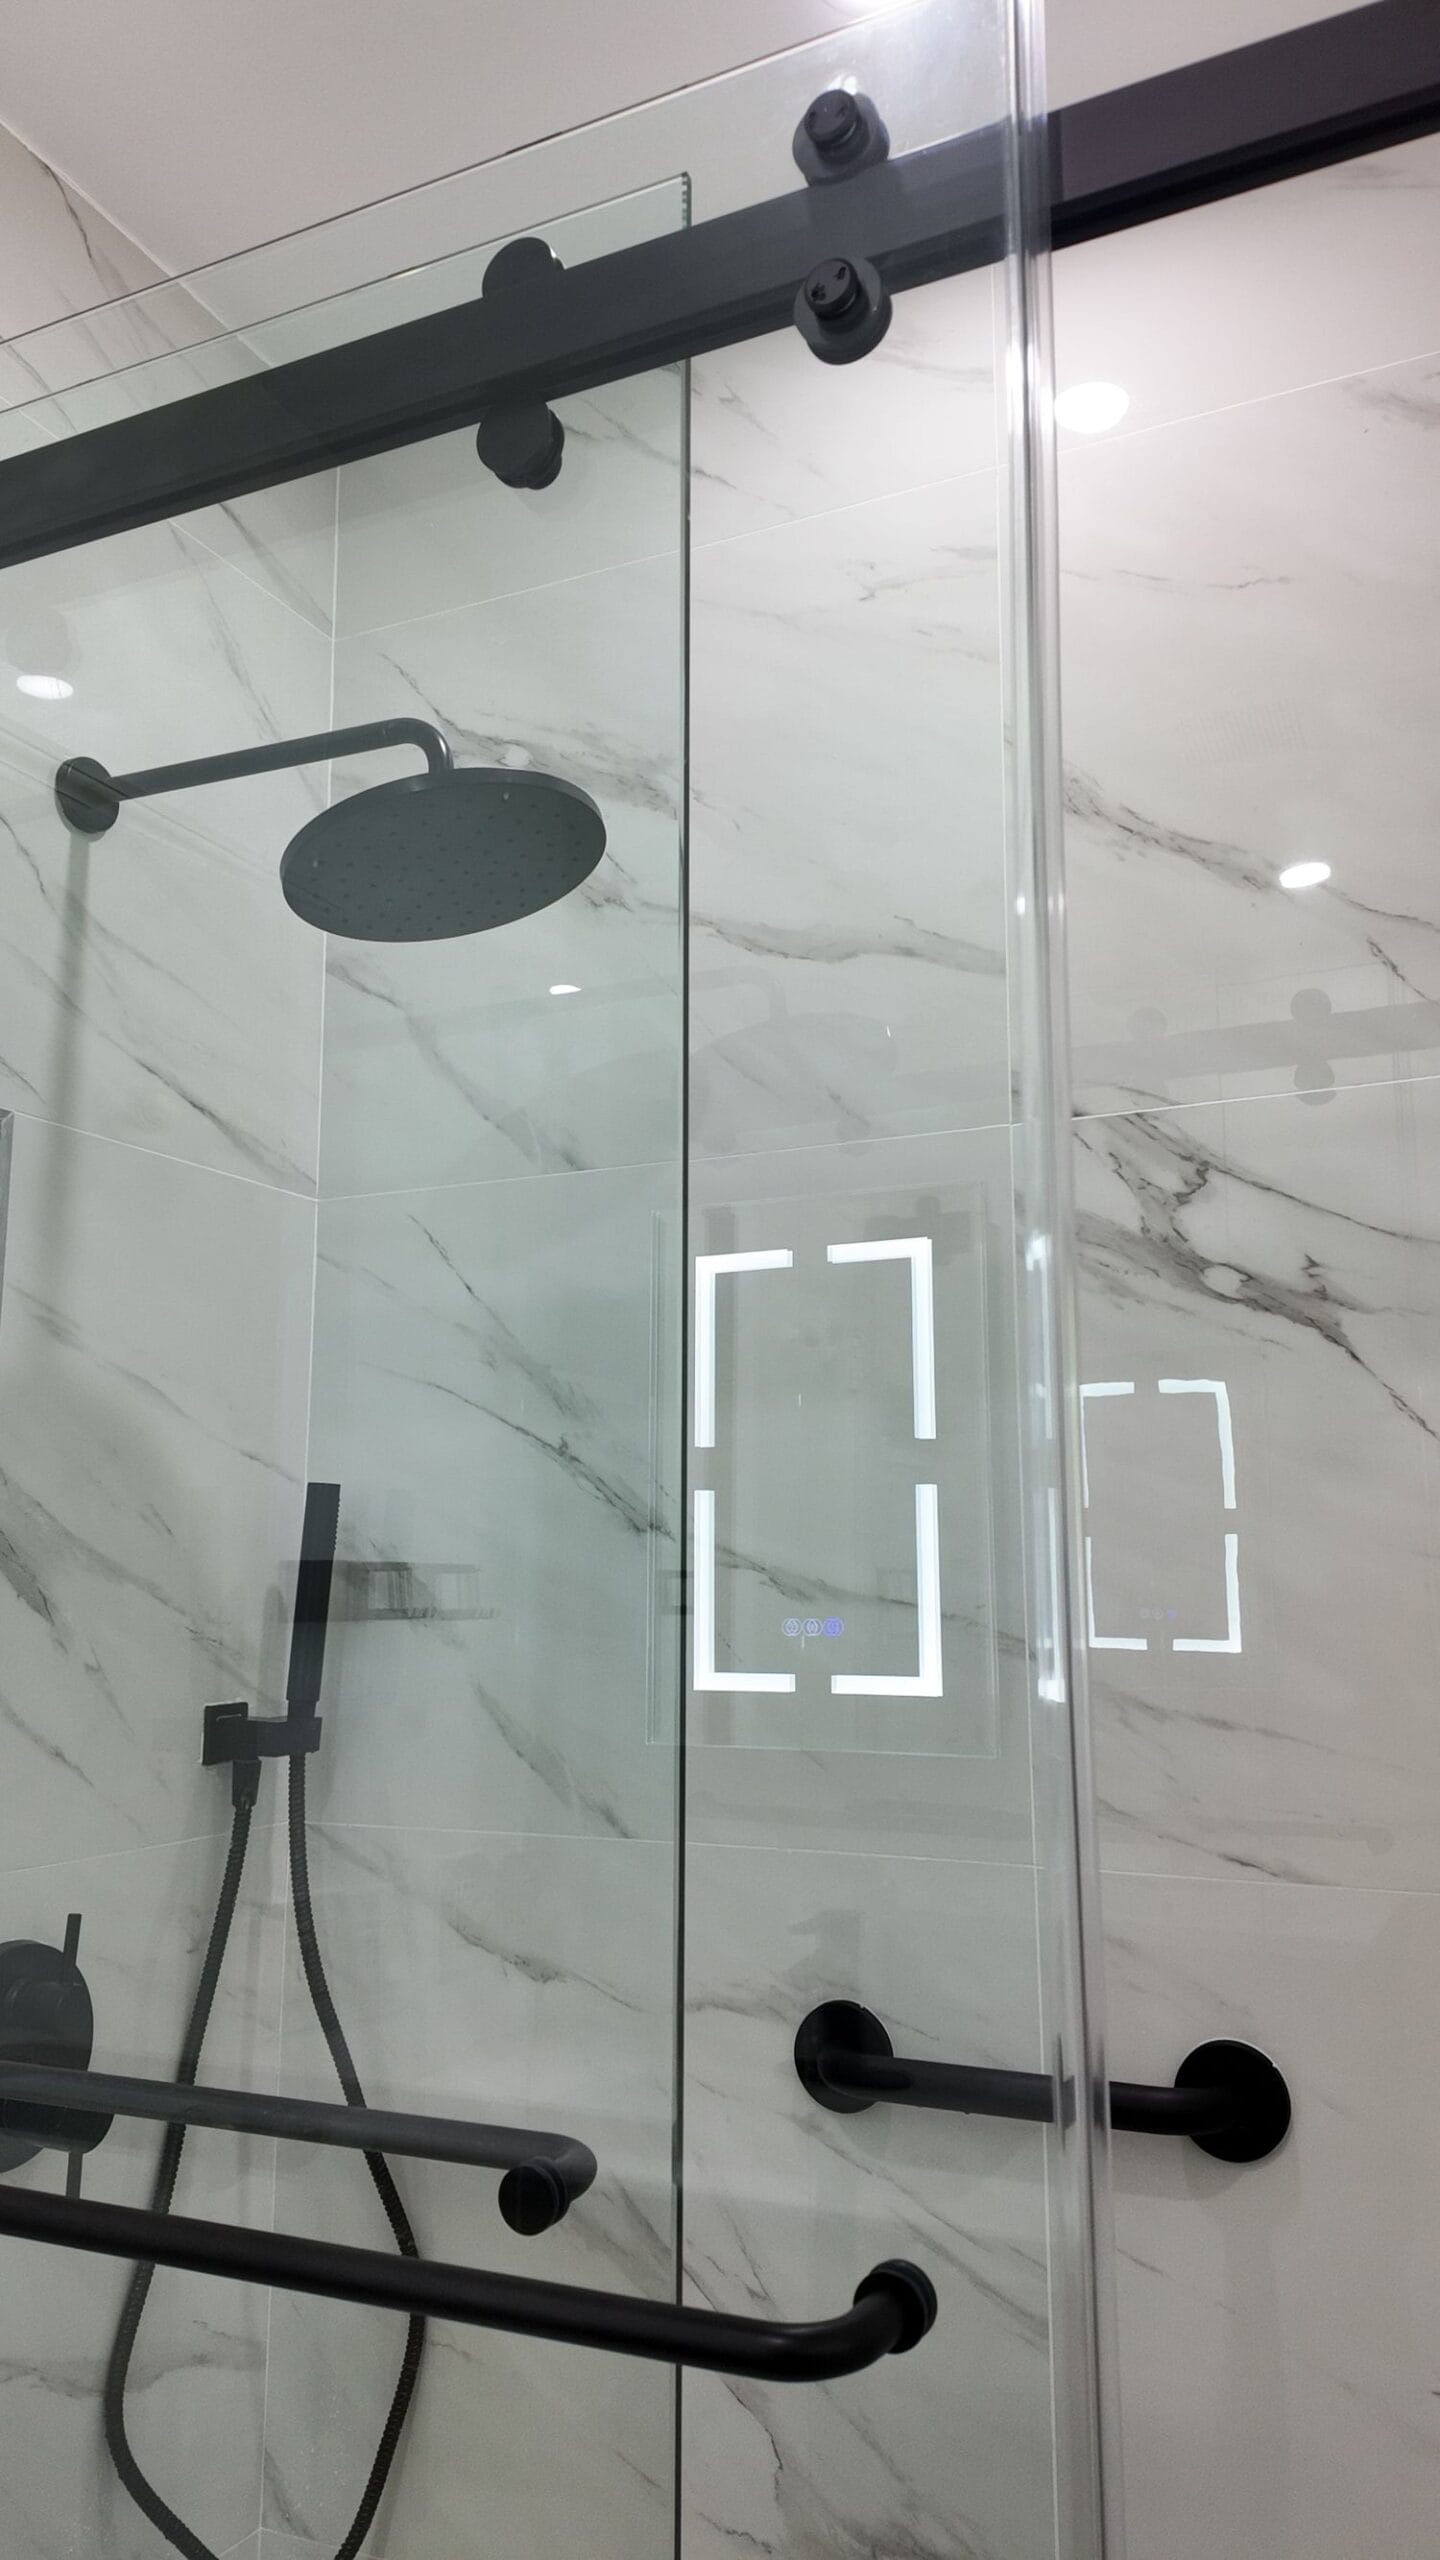
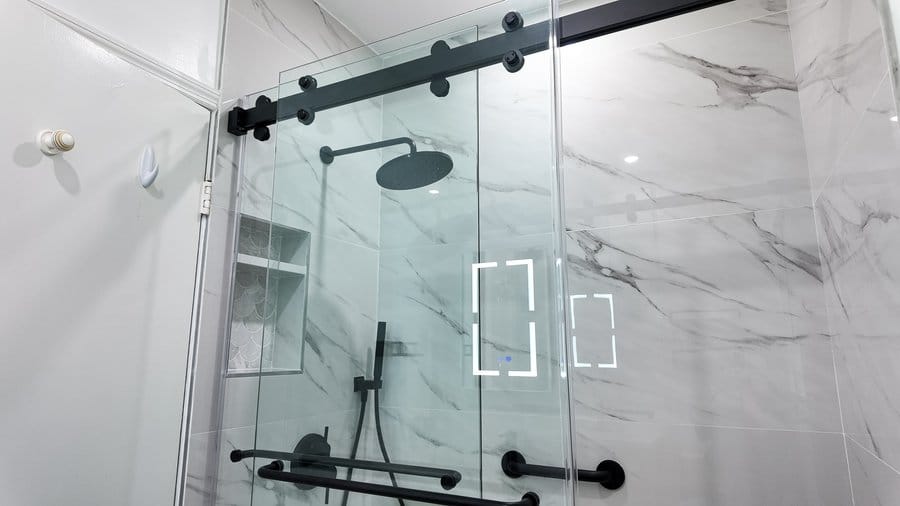
Project 03: sliding frameless glass on a black top track.
Stage 02 · Design
The five decisions that shape the build
Everything else is preference. These five change the construction, the sequence and what the inspector looks at — so they get decided before anything is ordered.
Threshold
How you get in is the decision everything else bends around. A curb is the simplest and most forgiving to build. A level, curbless entry looks the cleanest and is by far the easiest to walk into — but it moves all of the water control into the floor build-up, which means the slope, the drain position and the waterproofing have to be right first time.
- Curbless needs fall built into the floor — often a recessed or furred-up subfloor
- On a concrete slab, curbless usually means cutting and re-pouring around the drain
- A low curb is a genuine middle ground and is often the right answer
- Curbless pairs naturally with a linear drain set at one edge
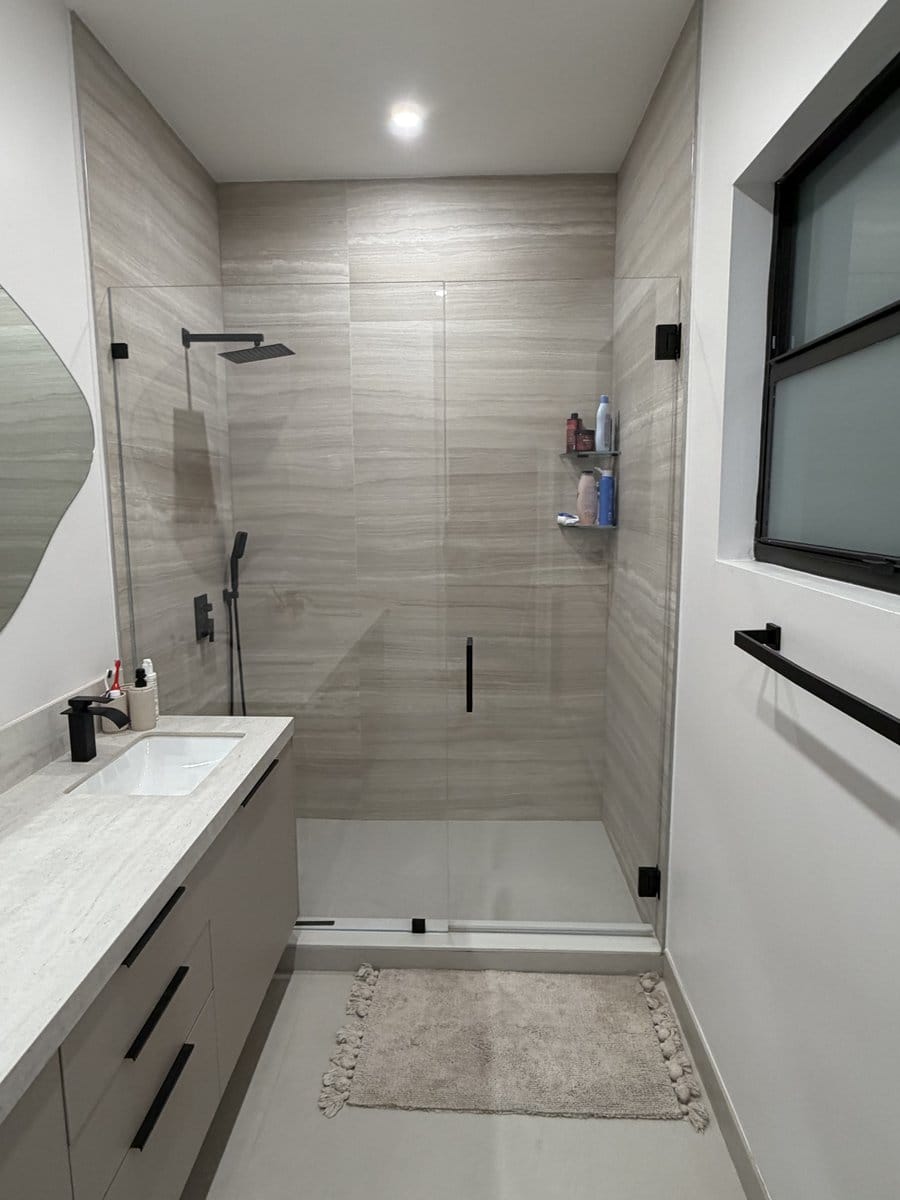
Project 02: a level transition from the bathroom floor into the shower.
Drainage
A centre point drain needs the floor to fall towards it from every direction, which is why point-drain floors are usually small mosaic — the sheets can follow a cone. A linear drain lets the whole floor fall one way, so it can be laid in large tile, and it is the reason a curbless shower can look seamless.
- Point drain: four-way fall, small-format floor tile, lowest cost
- Linear drain: single-direction fall, large-format floor tile possible
- A linear channel at the entry edge helps keep water off the bathroom floor
- Either way the drain body and the waterproofing membrane must be bonded as one system
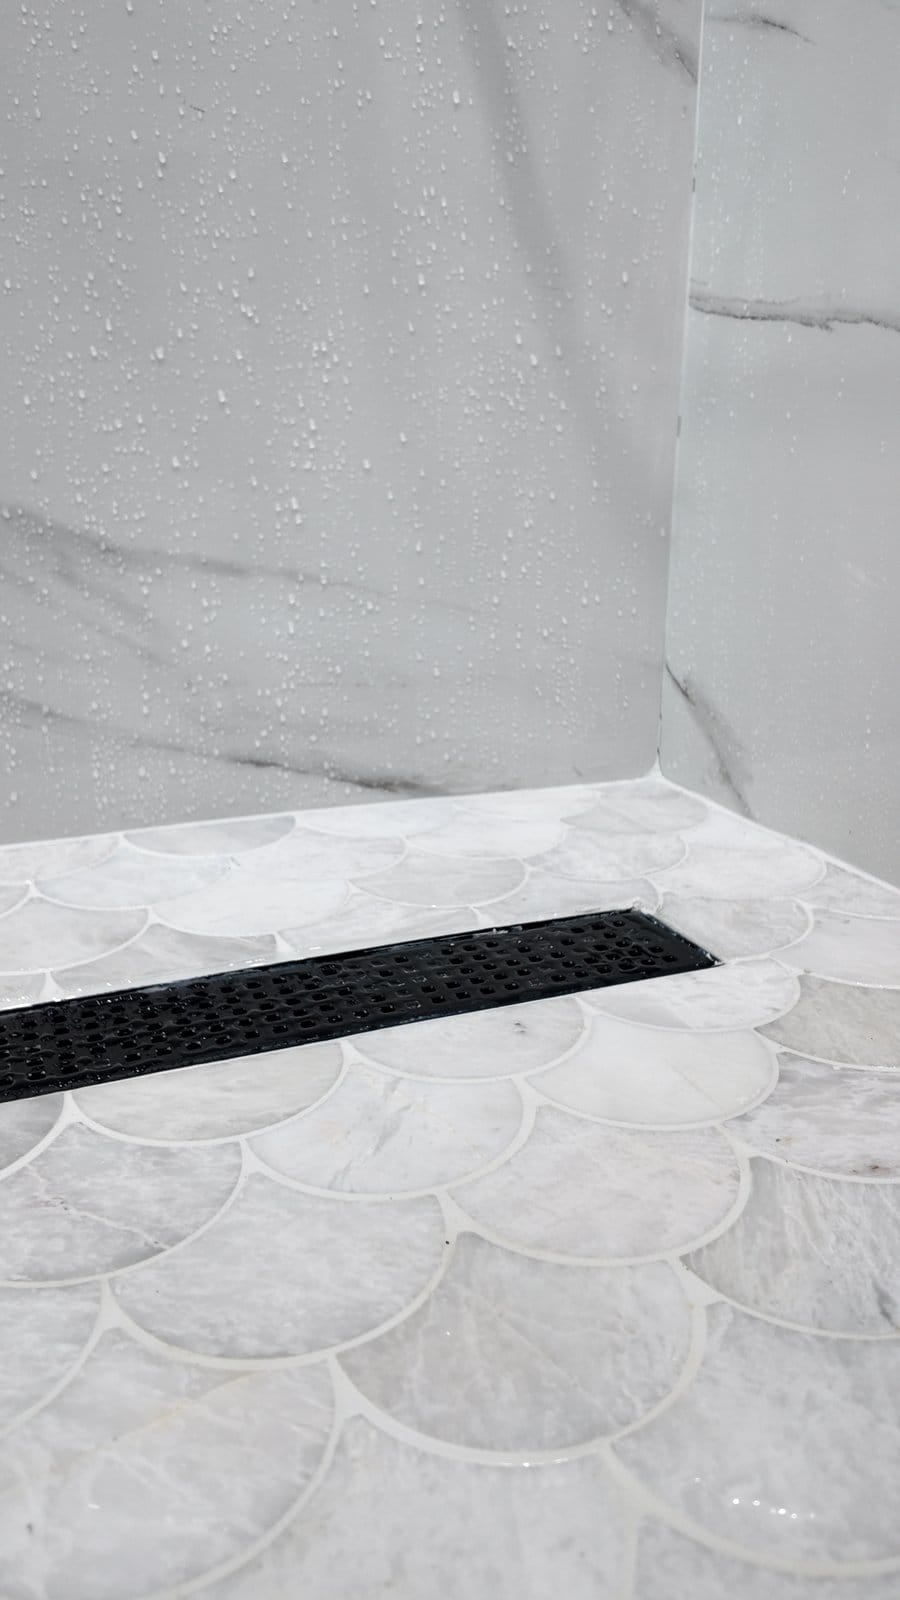
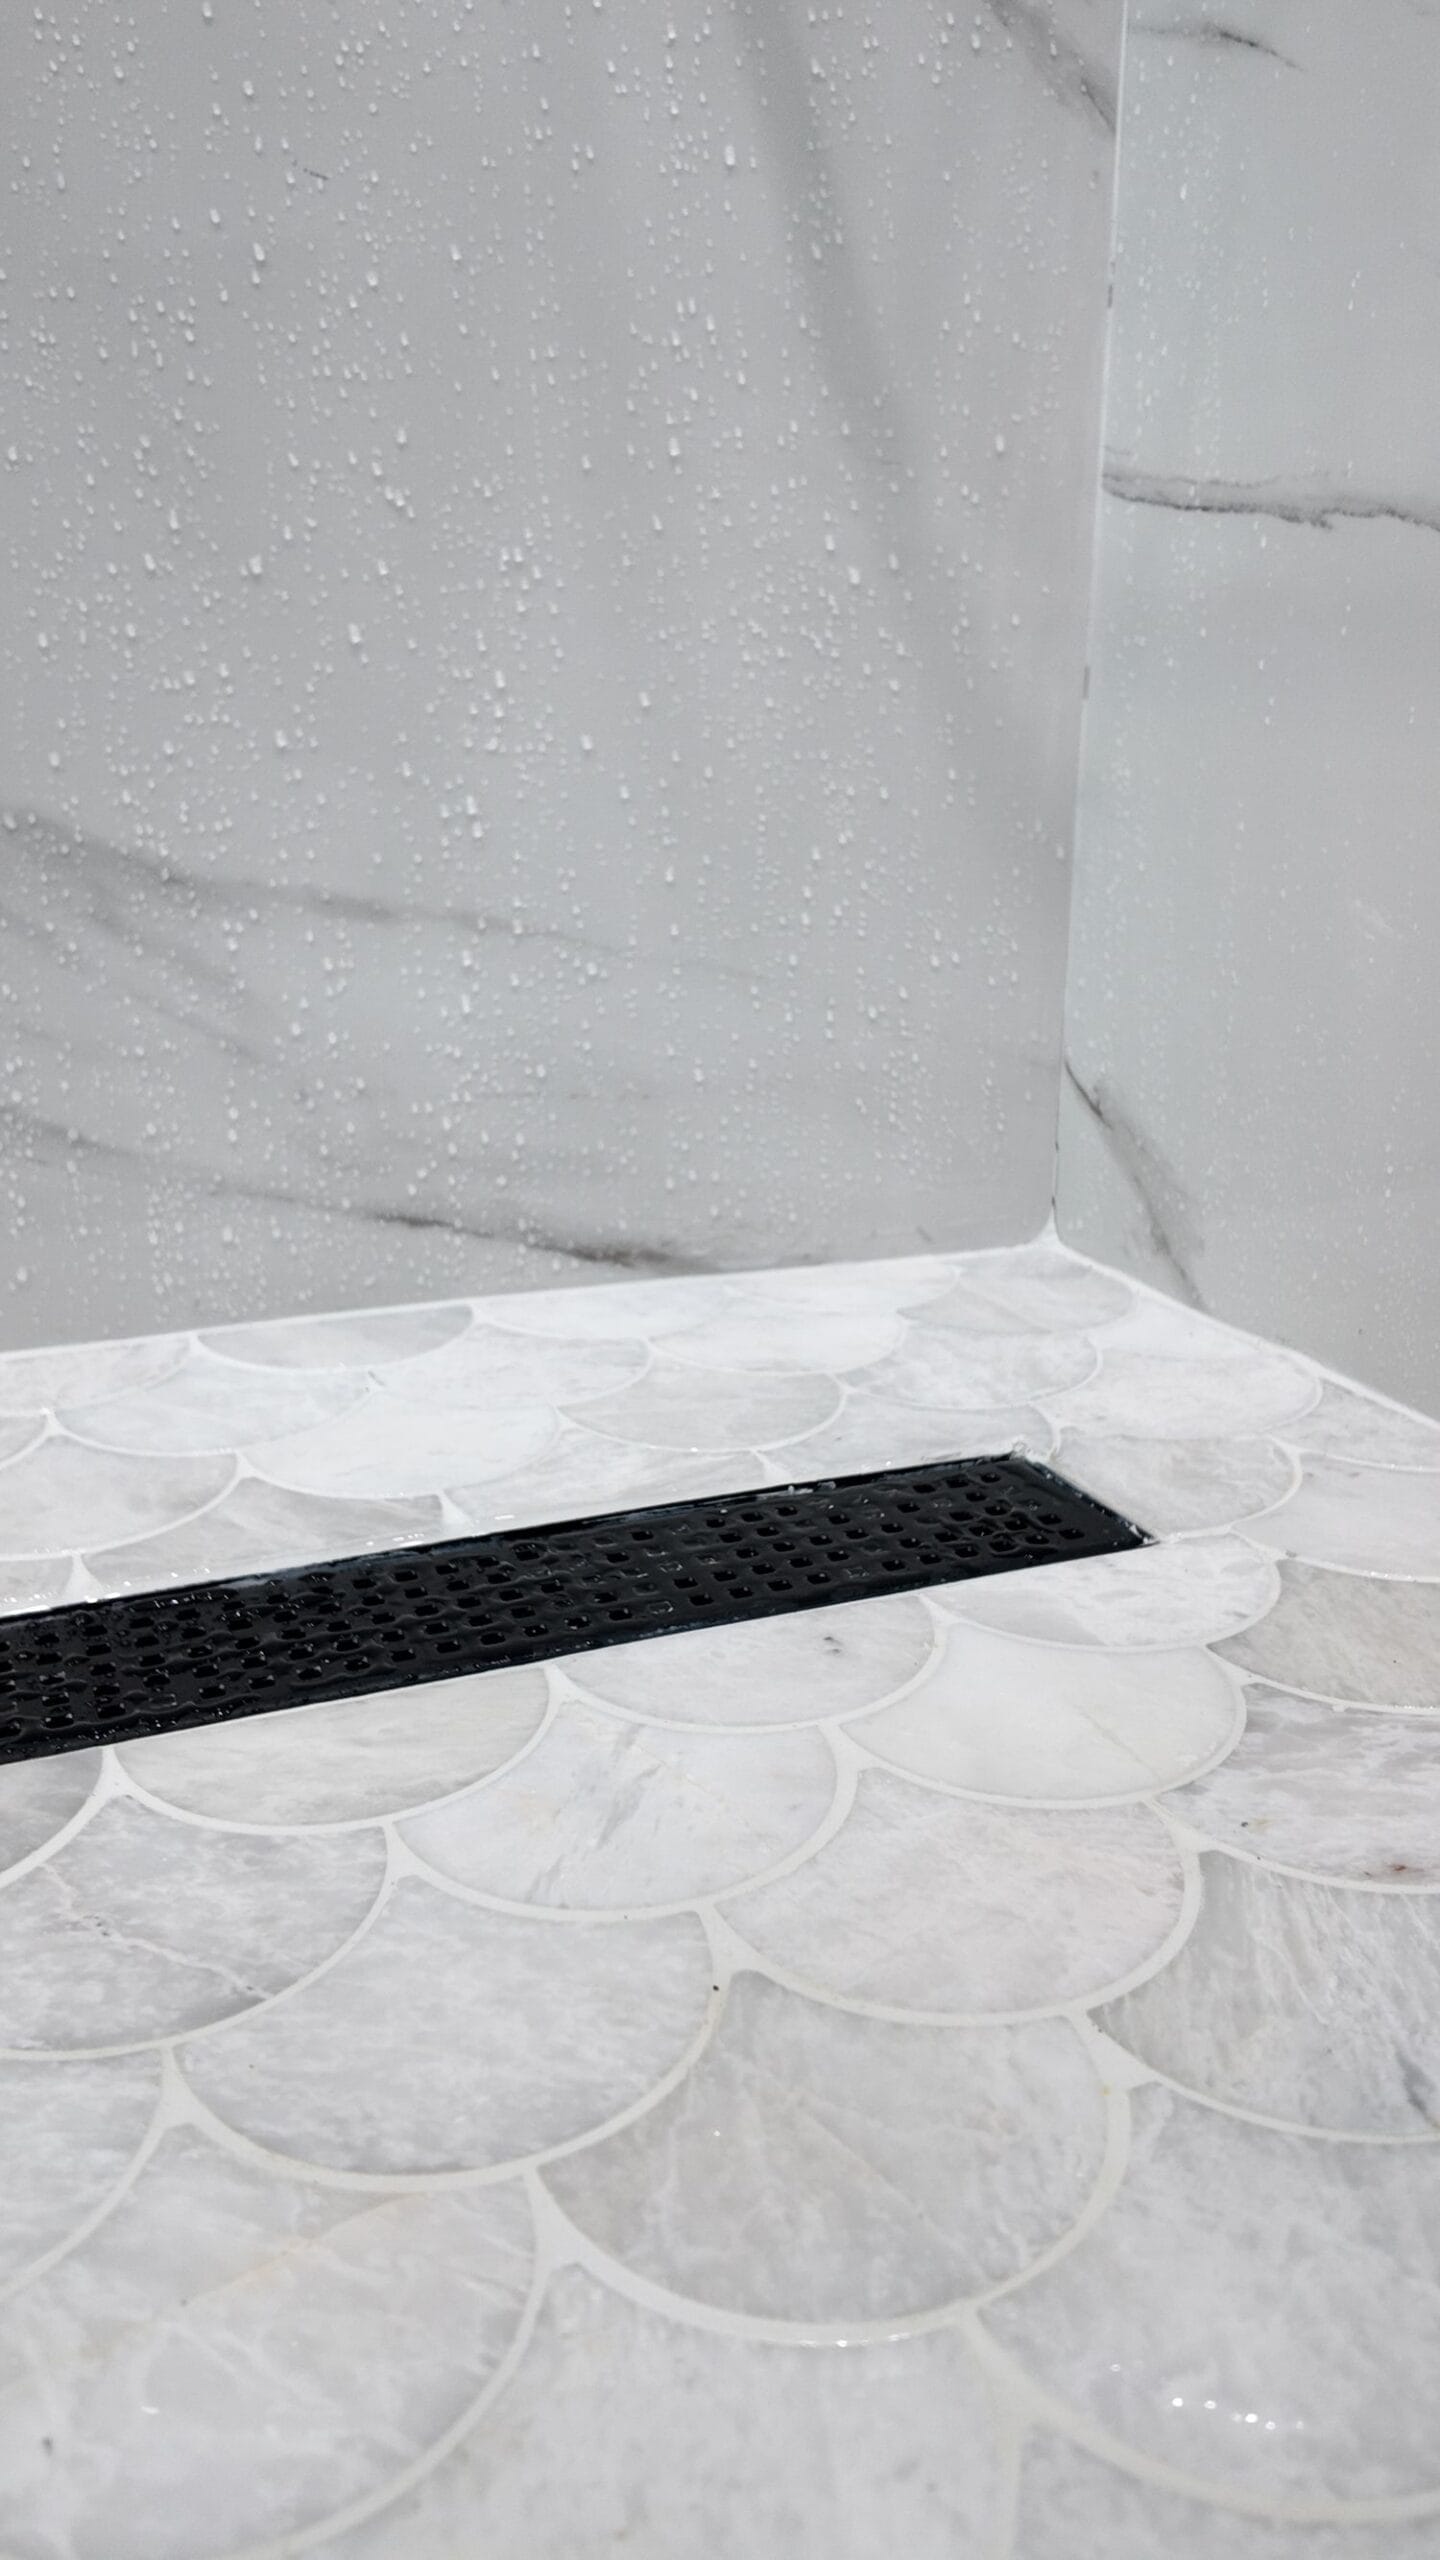
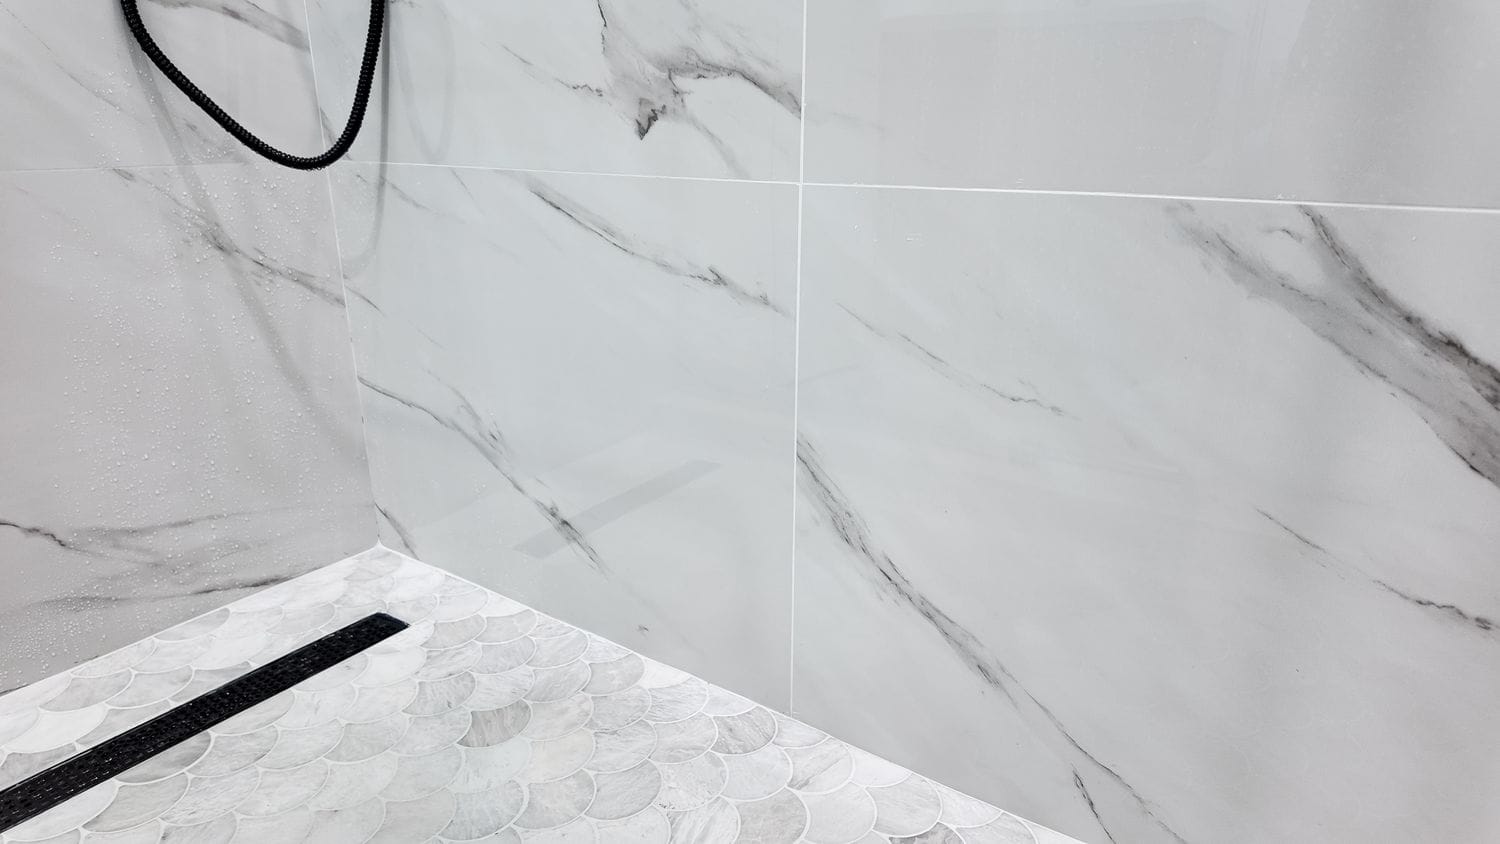
Project 03: a black linear drain set into the scallop mosaic floor.
Glass
Glass is measured and made after the tile is finished, not before — which is why it is one of the last things to arrive. The choice is mostly about the opening you have and how much you want to clean.
- Fixed panel: nothing to swing, nothing to seal, easiest to walk past
- Sliding on a top track: full-width opening without needing swing clearance
- Hinged door: the most contained, needs clear floor space to open
- Frameless means fewer channels for water to sit in — and fewer to scrub
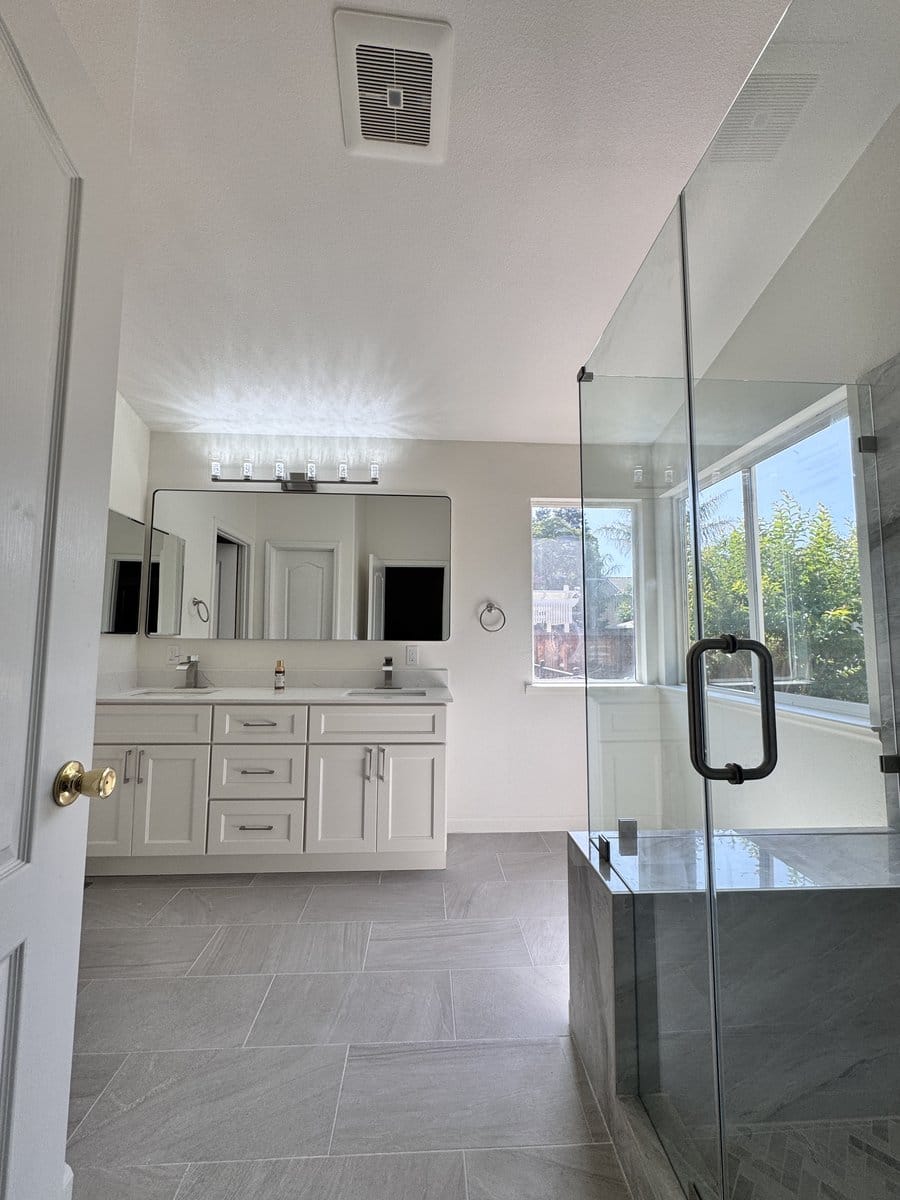
Project 01: a frameless hinged door beside the tiled bench return.
Tile and mosaic
Wall tile and floor tile are doing different jobs. Walls are about the look and how many grout lines you are prepared to live with. The floor has to be slip-resistant and able to follow the fall, which is what pushes it towards mosaic — hexagon, penny round, herringbone or scallop.
- Large-format walls: fewer joints, faster to clean, needs a flat substrate
- Mosaic floors: the sheets flex to the fall and the extra grout adds grip
- A niche is framed and waterproofed during the build — it cannot be added later
- Deciding the niche size early means the tile layout can be set out around it
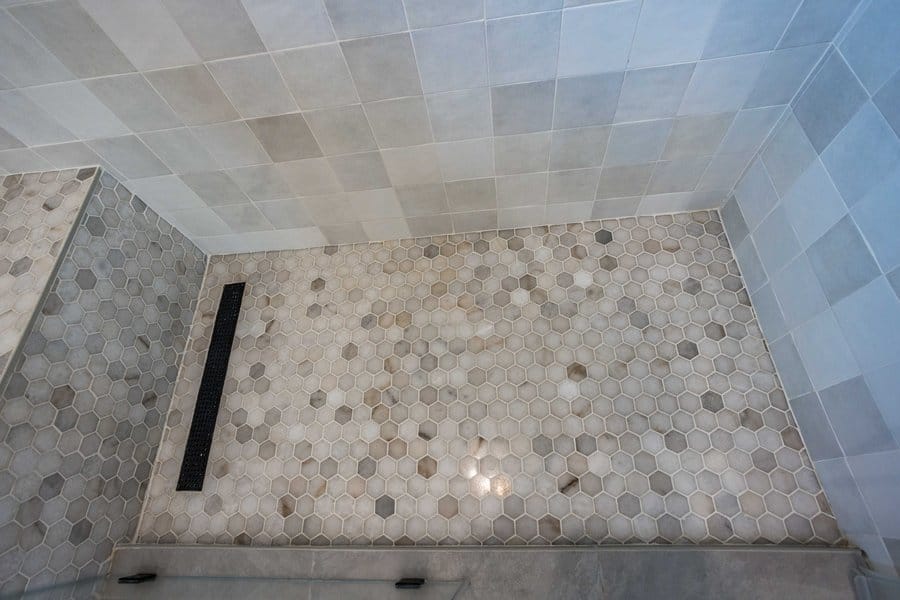
Finish option: hexagon mosaic floor with a linear drain, from another completed Elbaz bathroom.
Fittings and seating
Fittings are chosen before the walls close up, because the valve, the outlets and any blocking are all fixed in place at rough-in. Changing your mind after tile means opening tile.
- A fixed head plus a handheld covers standing, seated and cleaning the shower itself
- A masonry bench is built as part of the structure and waterproofed with the walls
- A fold-down seat keeps the floor clear in a narrow shower
- Even if you do not want grab bars now, blocking behind the tile costs almost nothing
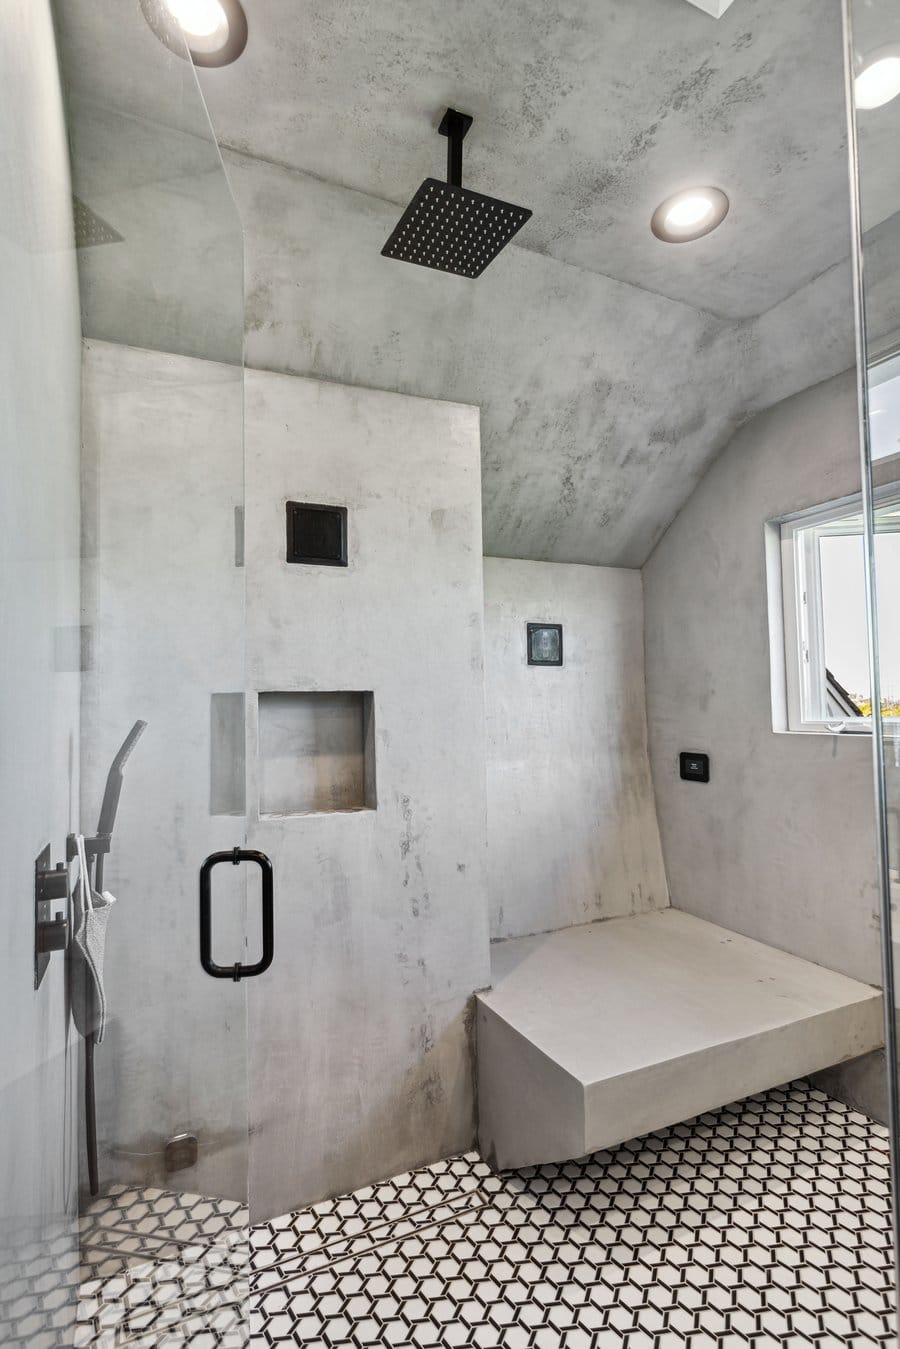
Finish option: a floating bench and seamless wall finish, from another completed Elbaz bathroom.
The photographs in this section are all real Elbaz work, shown as examples of what each option looks like built. They are drawn from several different bathrooms and are not all from one project.
Project gallery 01
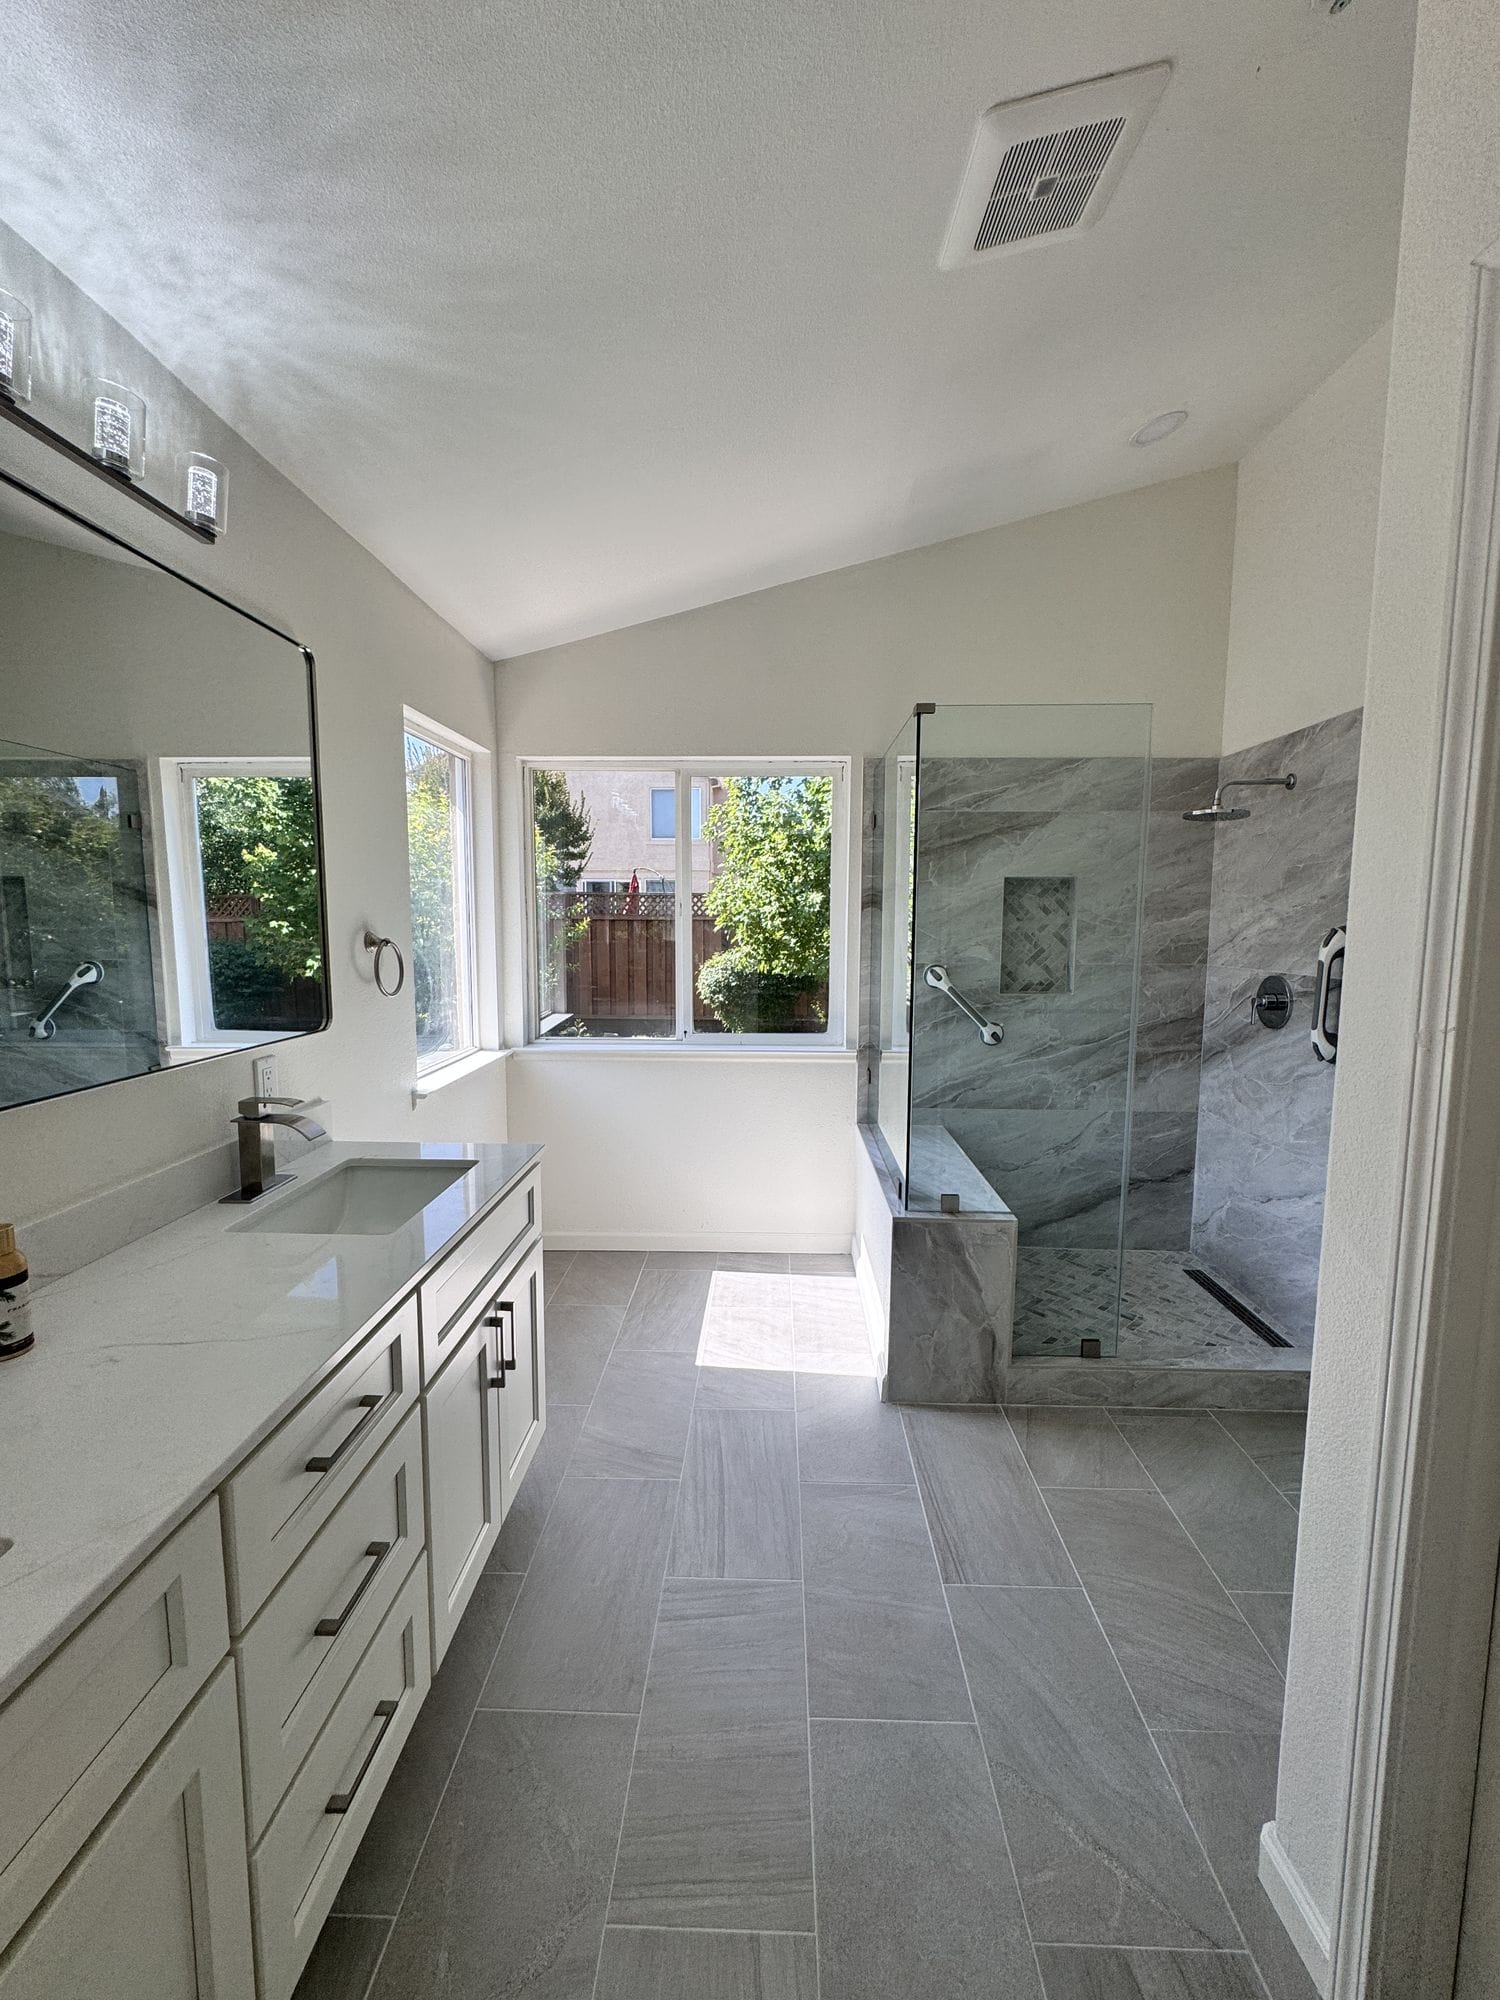
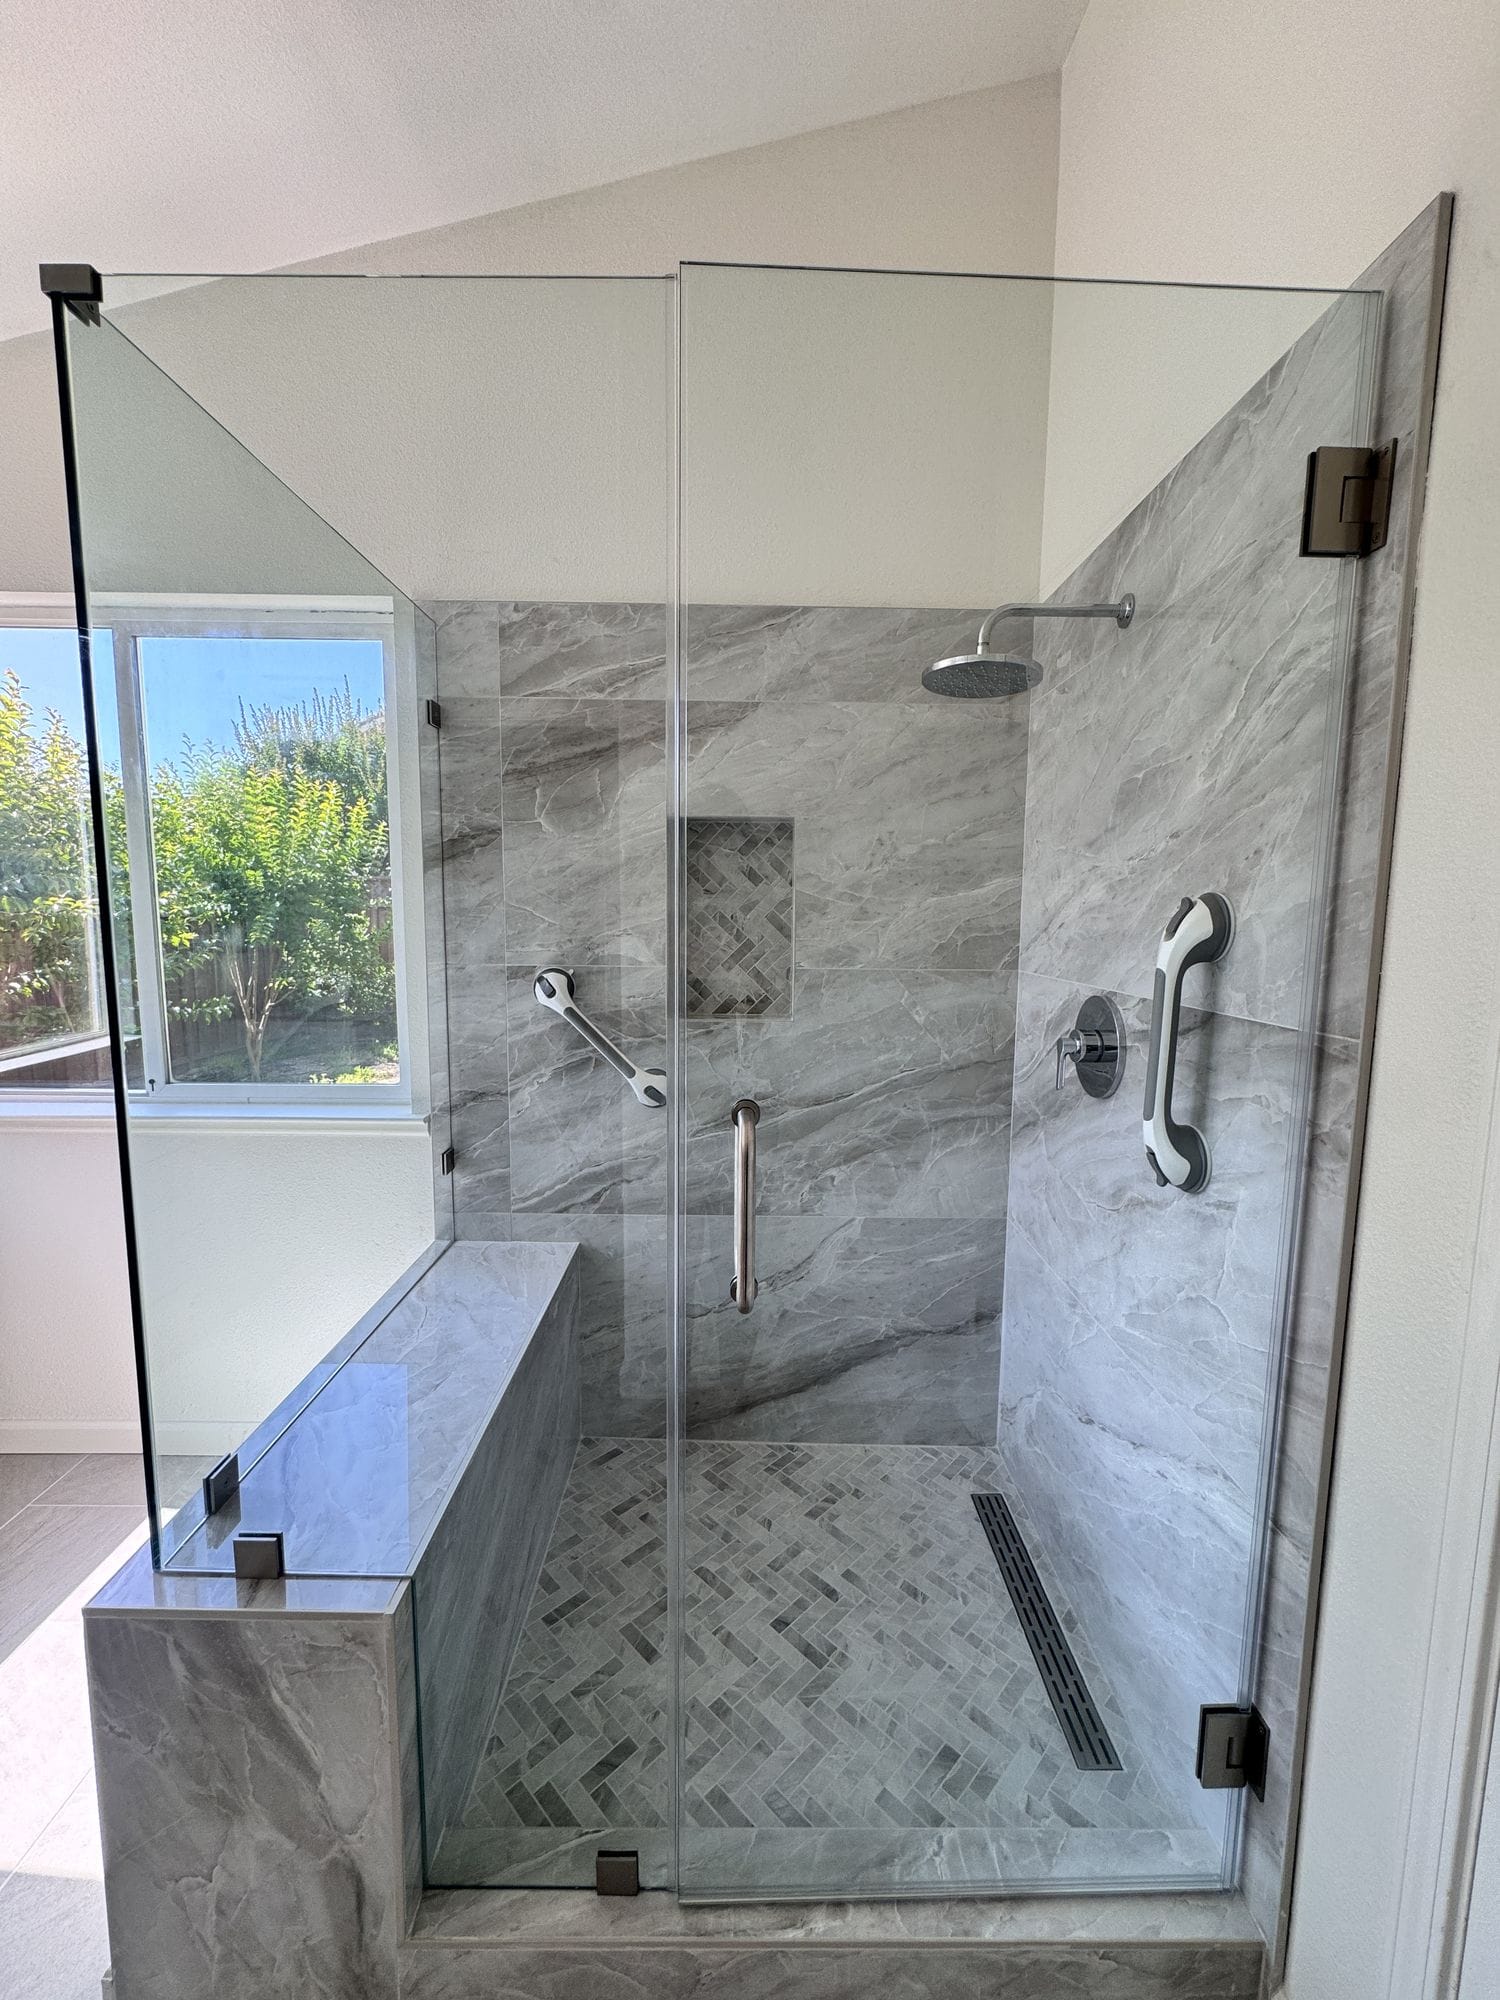
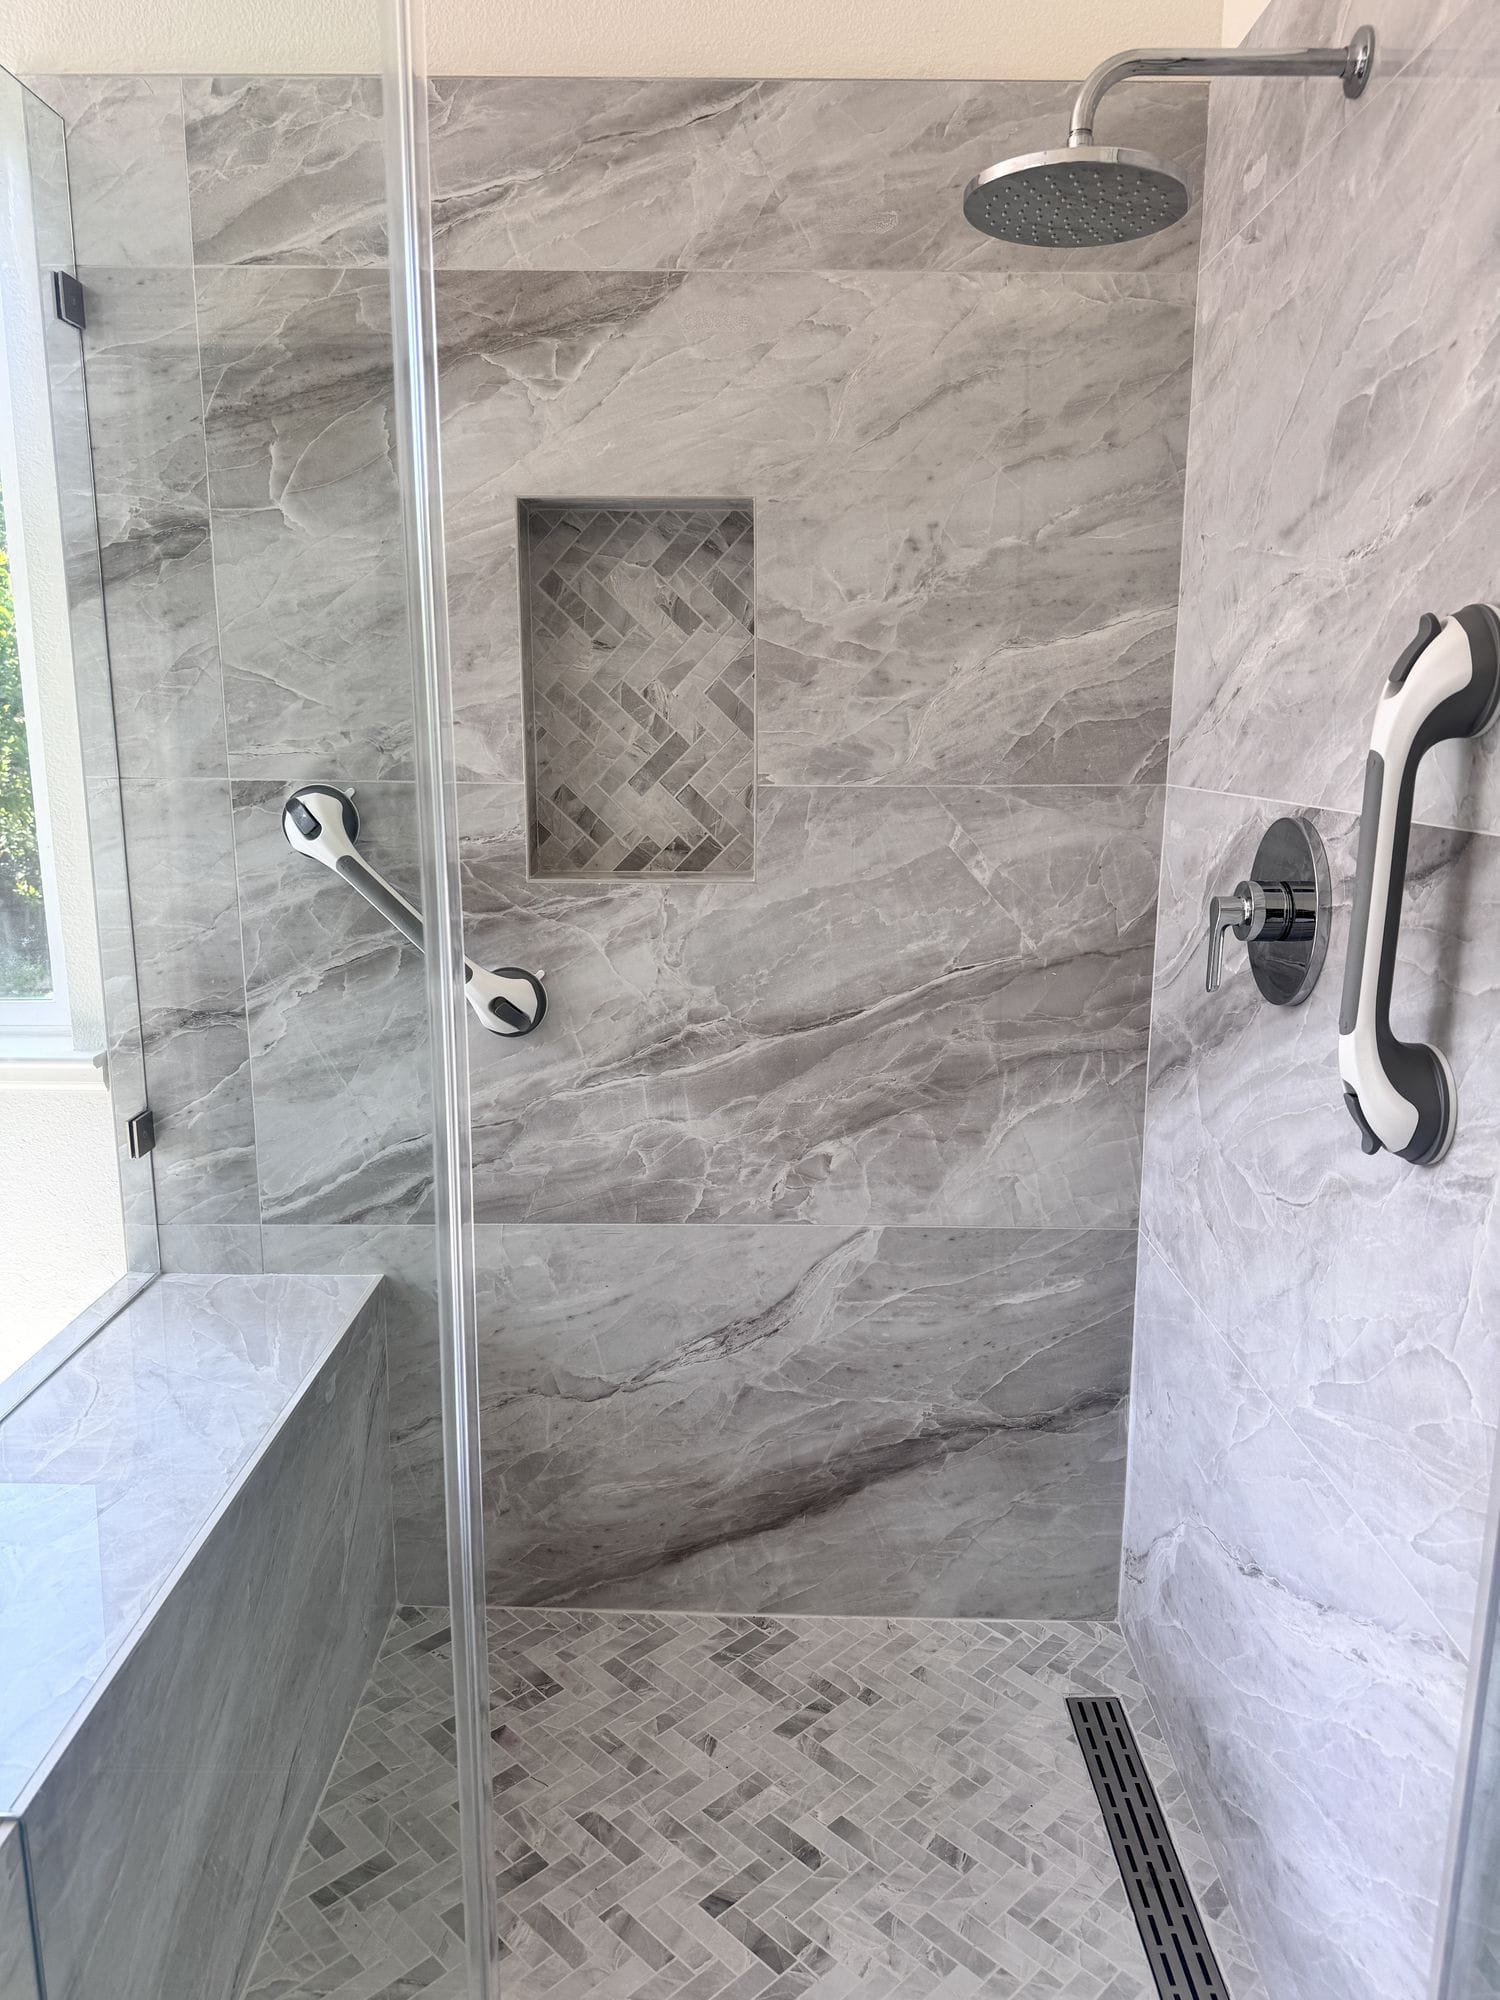
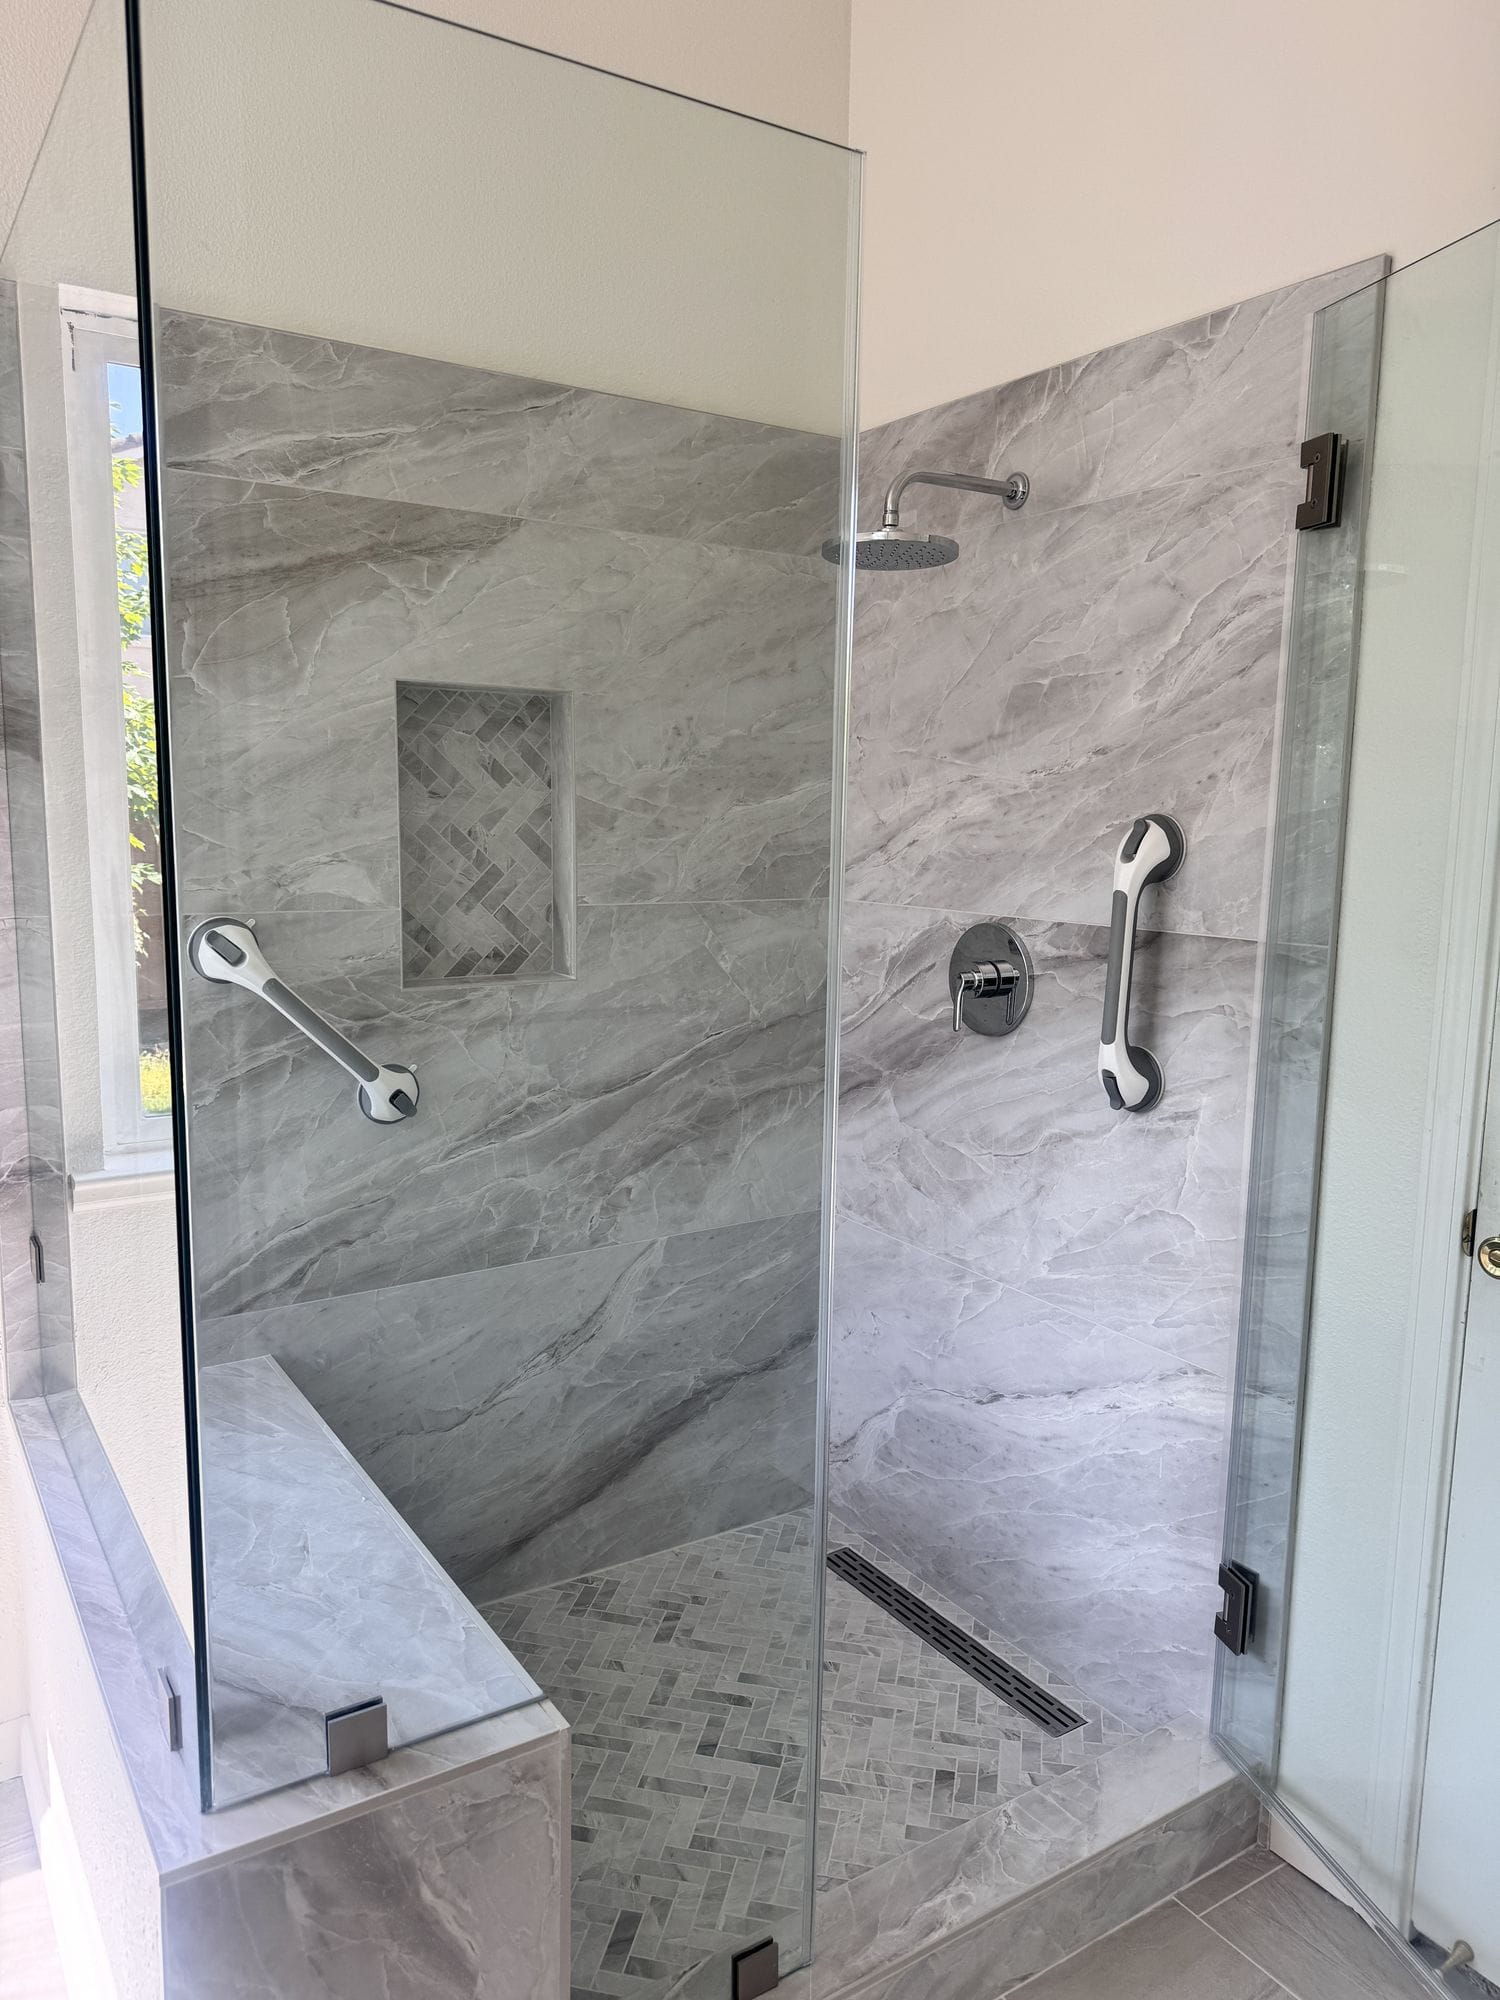
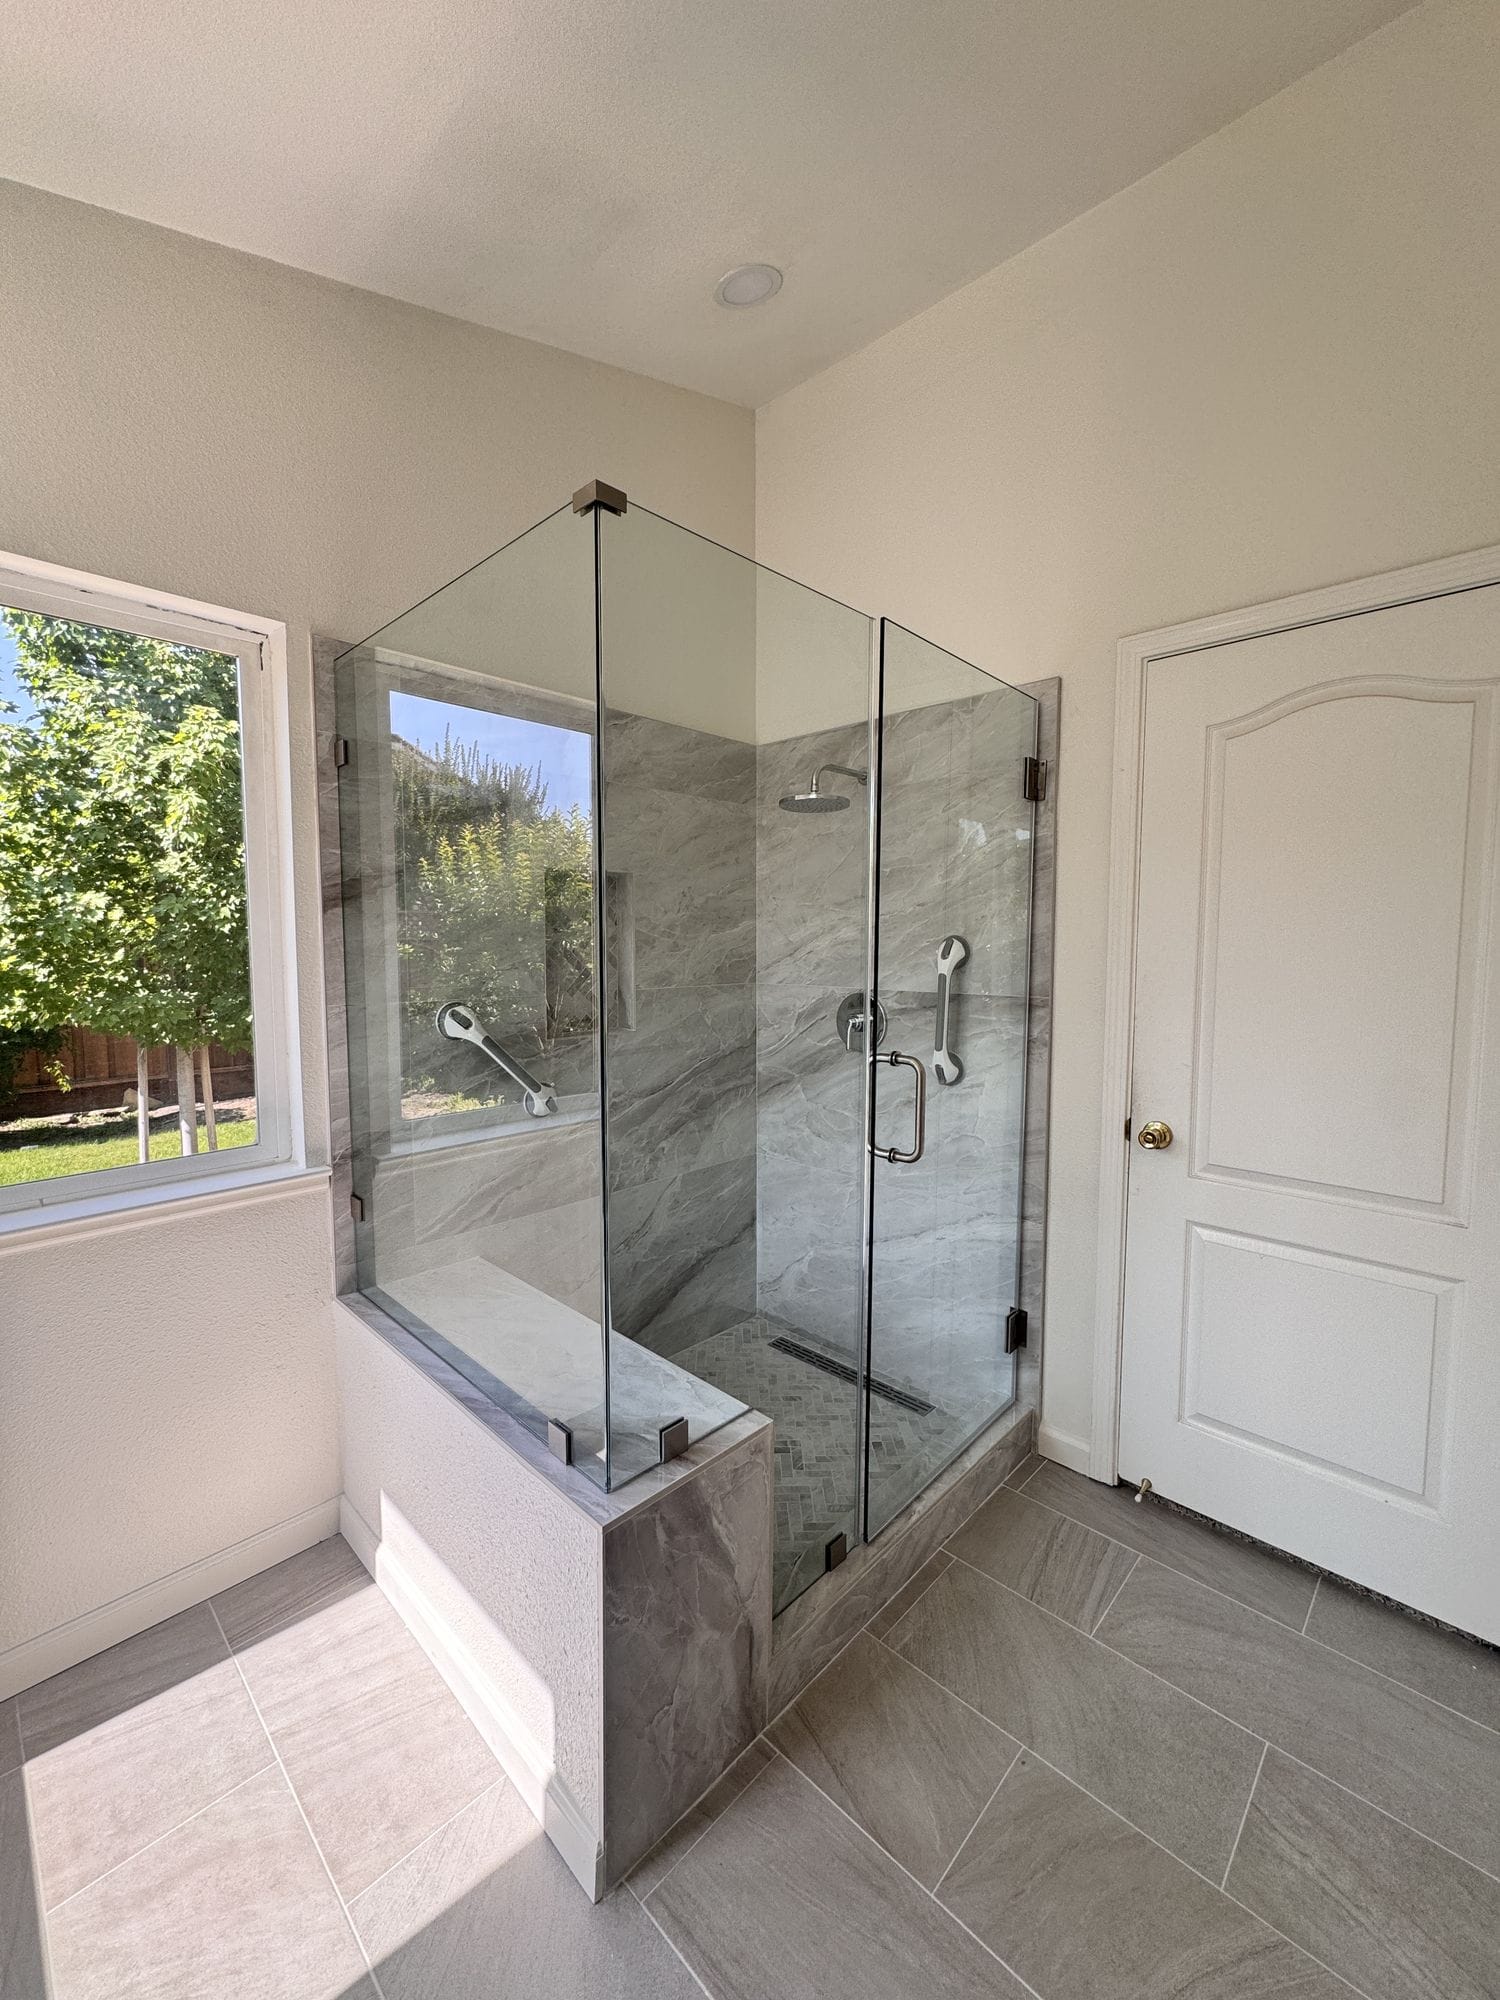
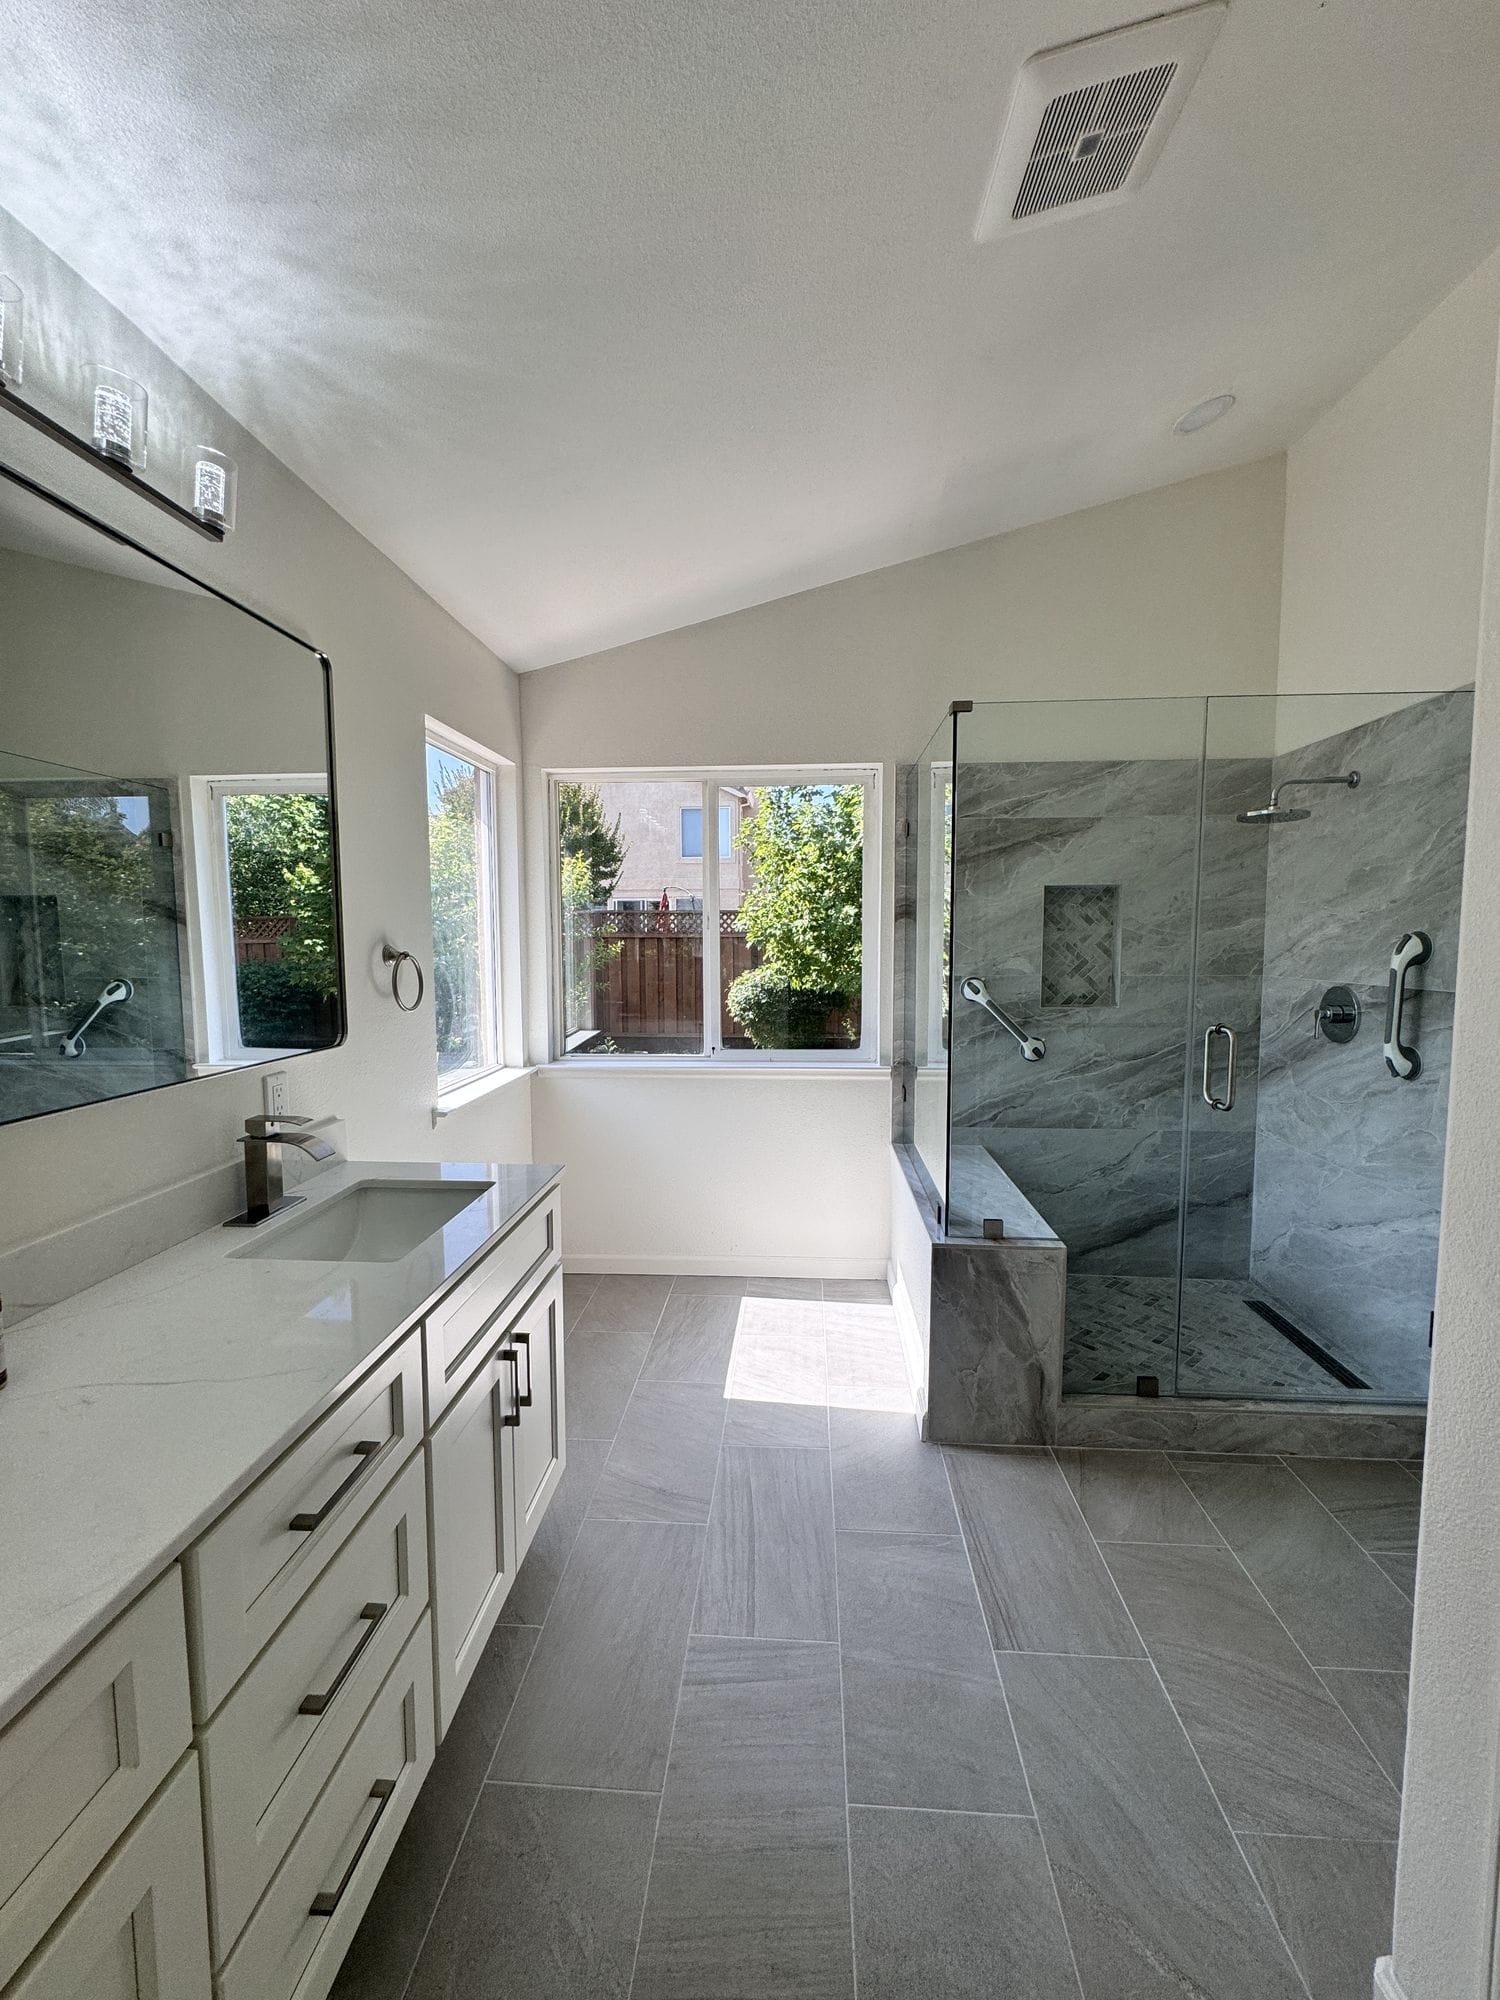
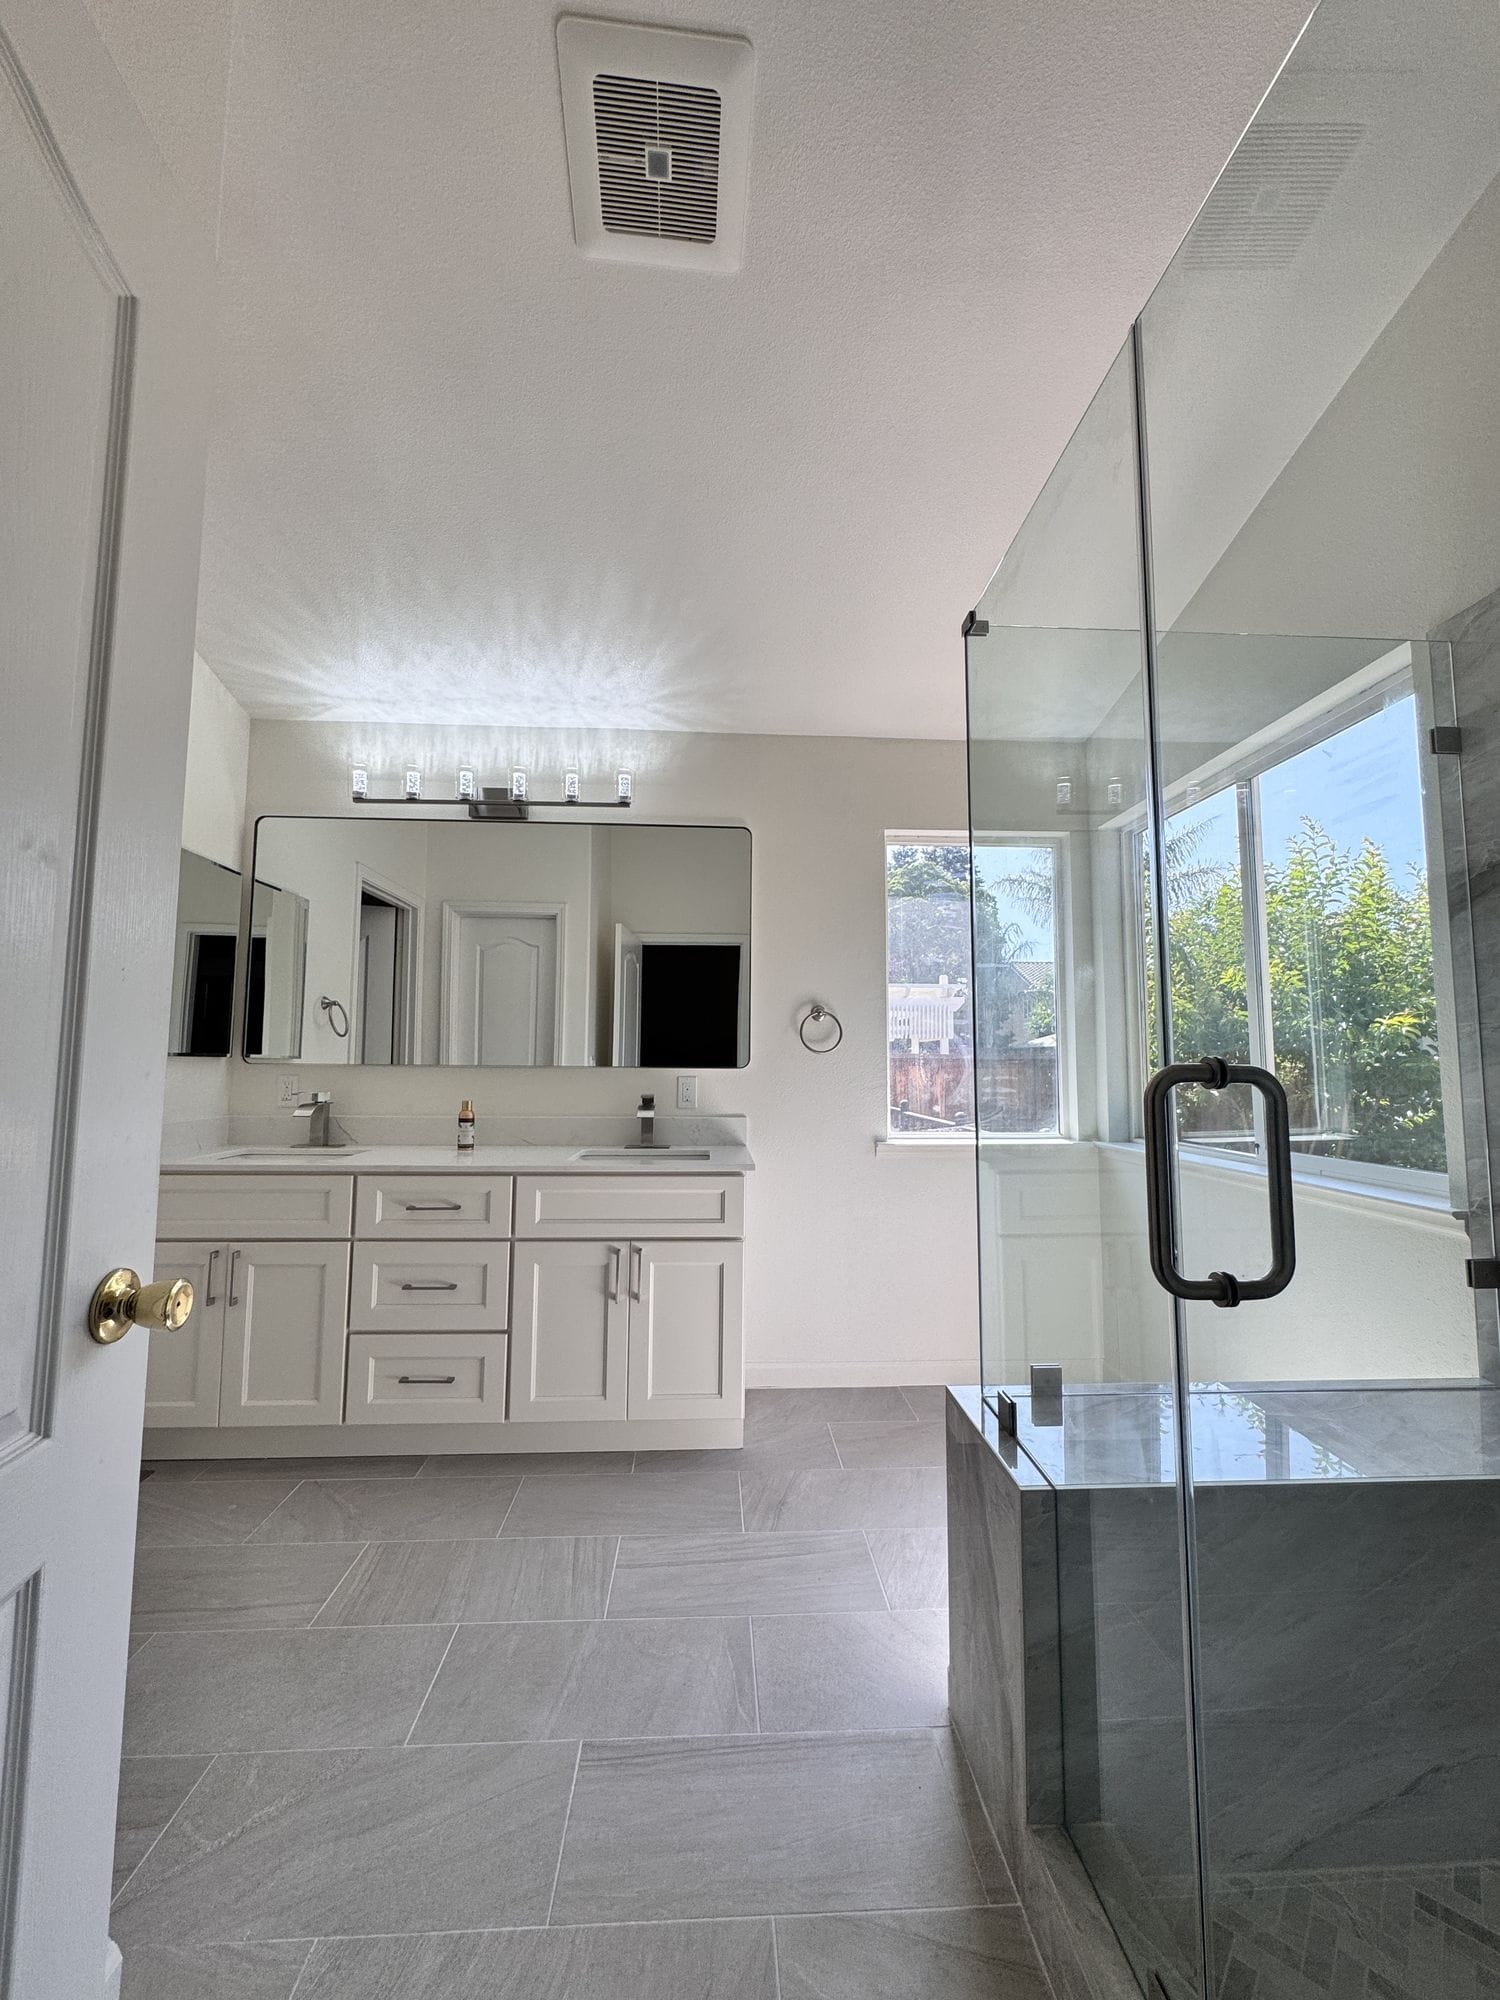
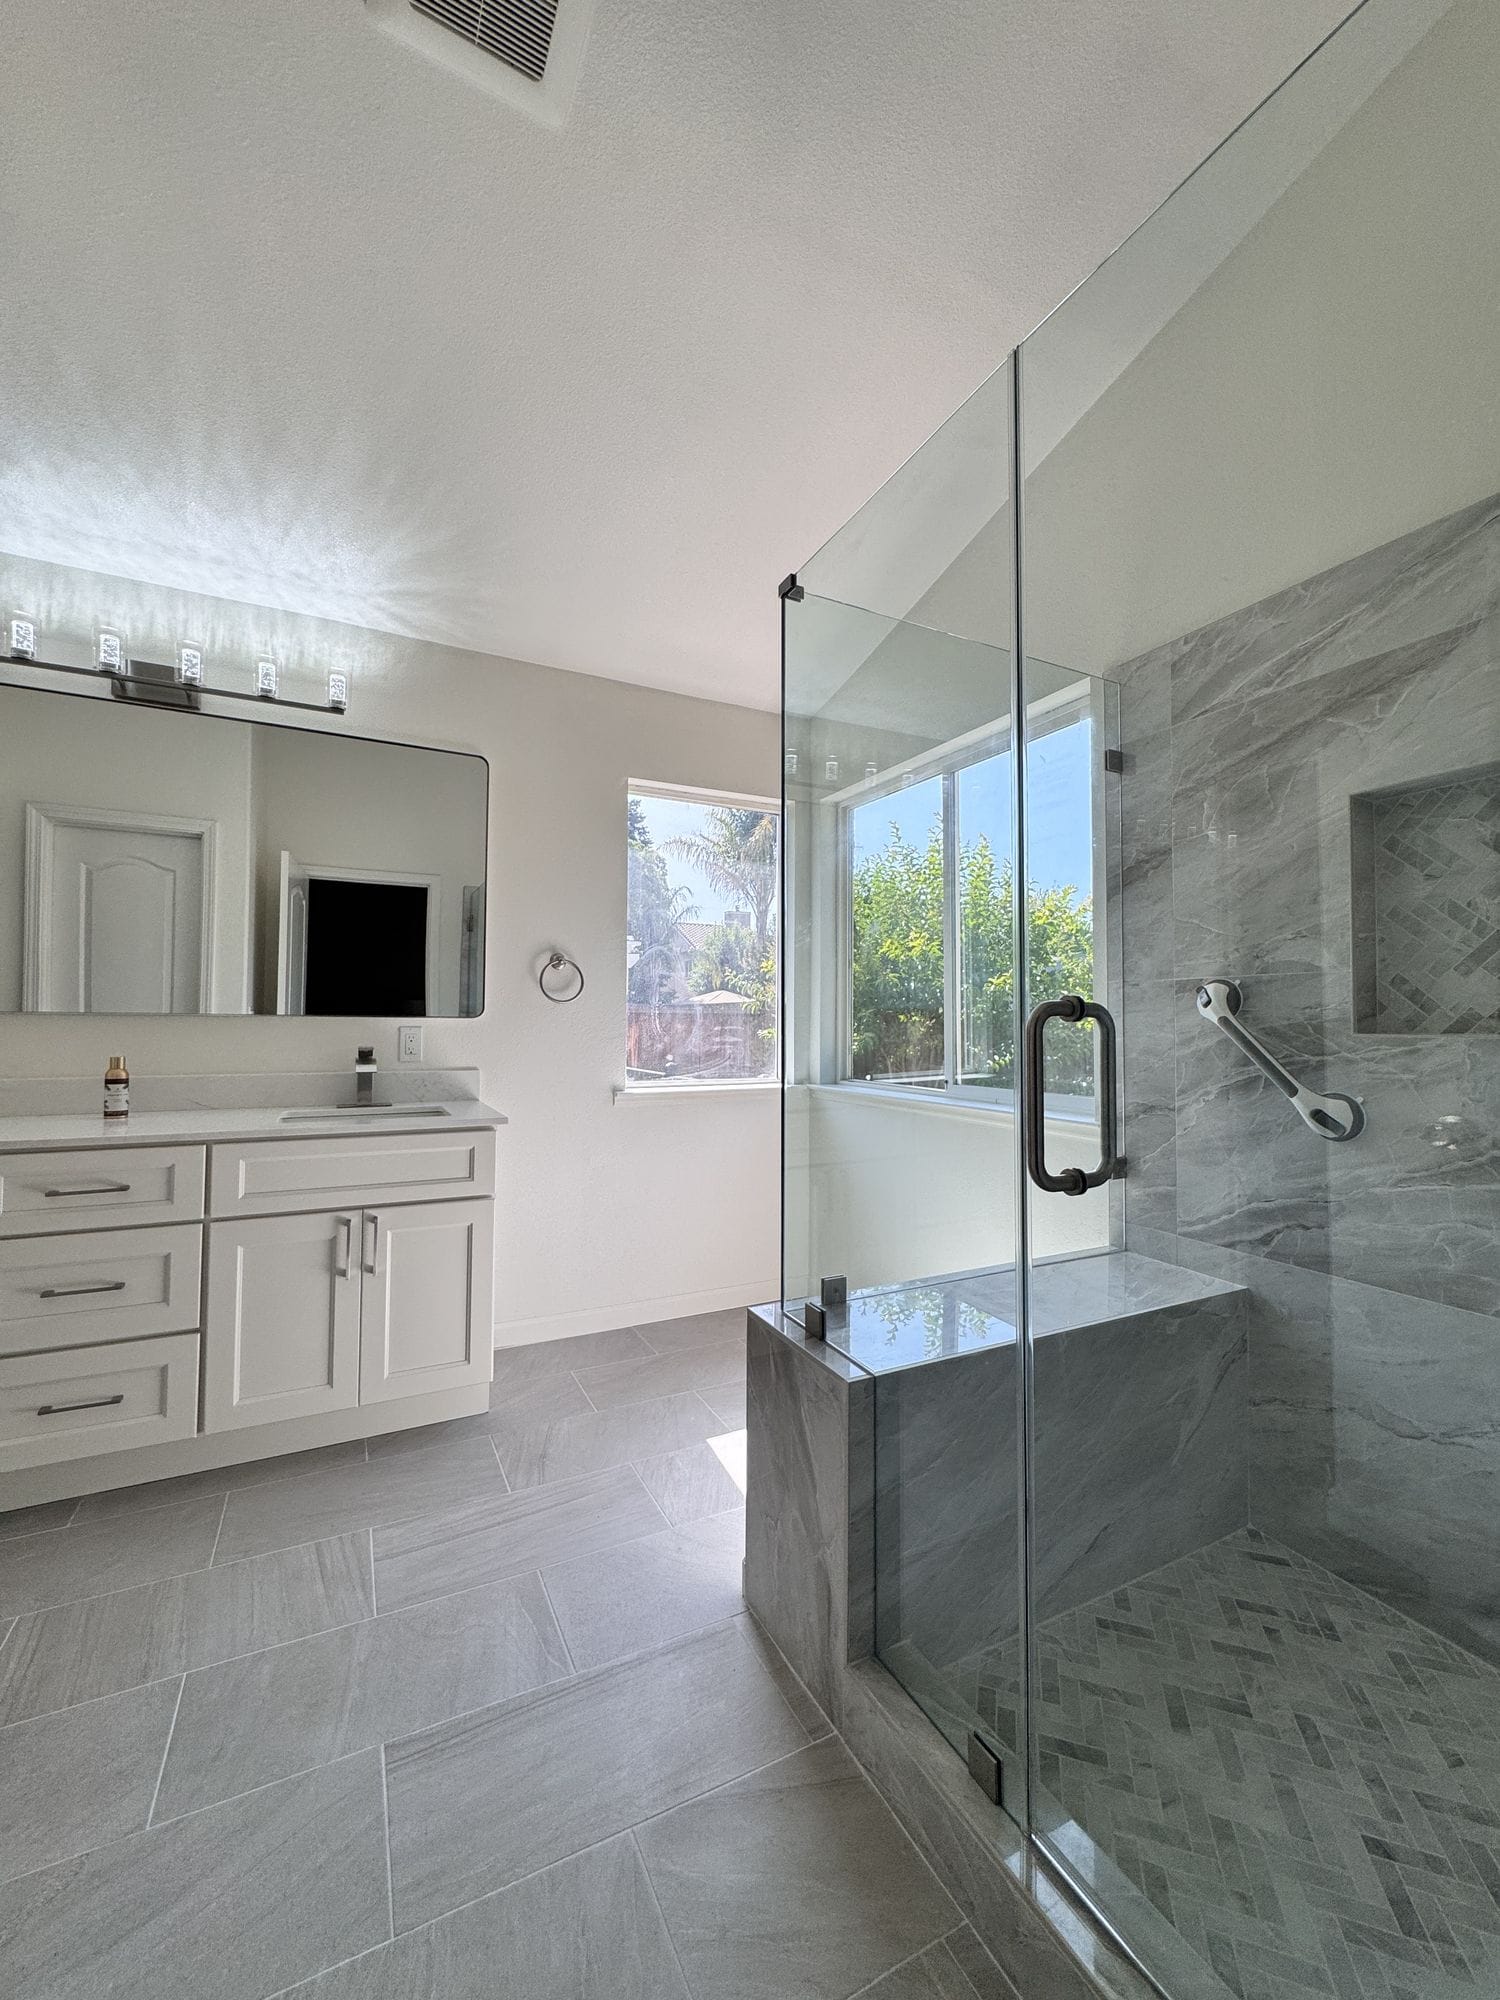
Project 01 — a marble-look walk-in with a bench and grab bars
Ten frames from one completed bathroom, in the order you would walk it. Everything described below is visible in these photographs.
Project 01, guided tour
Walking in
The vanity run sits to the left and the shower closes the far end of the room, behind a frameless glass panel.
Starting point
The photographs begin at completion, so we do not know what stood here before and will not guess. What the frames do show is a long, narrow primary bathroom with a vaulted ceiling and a window at the far end.
Design direction
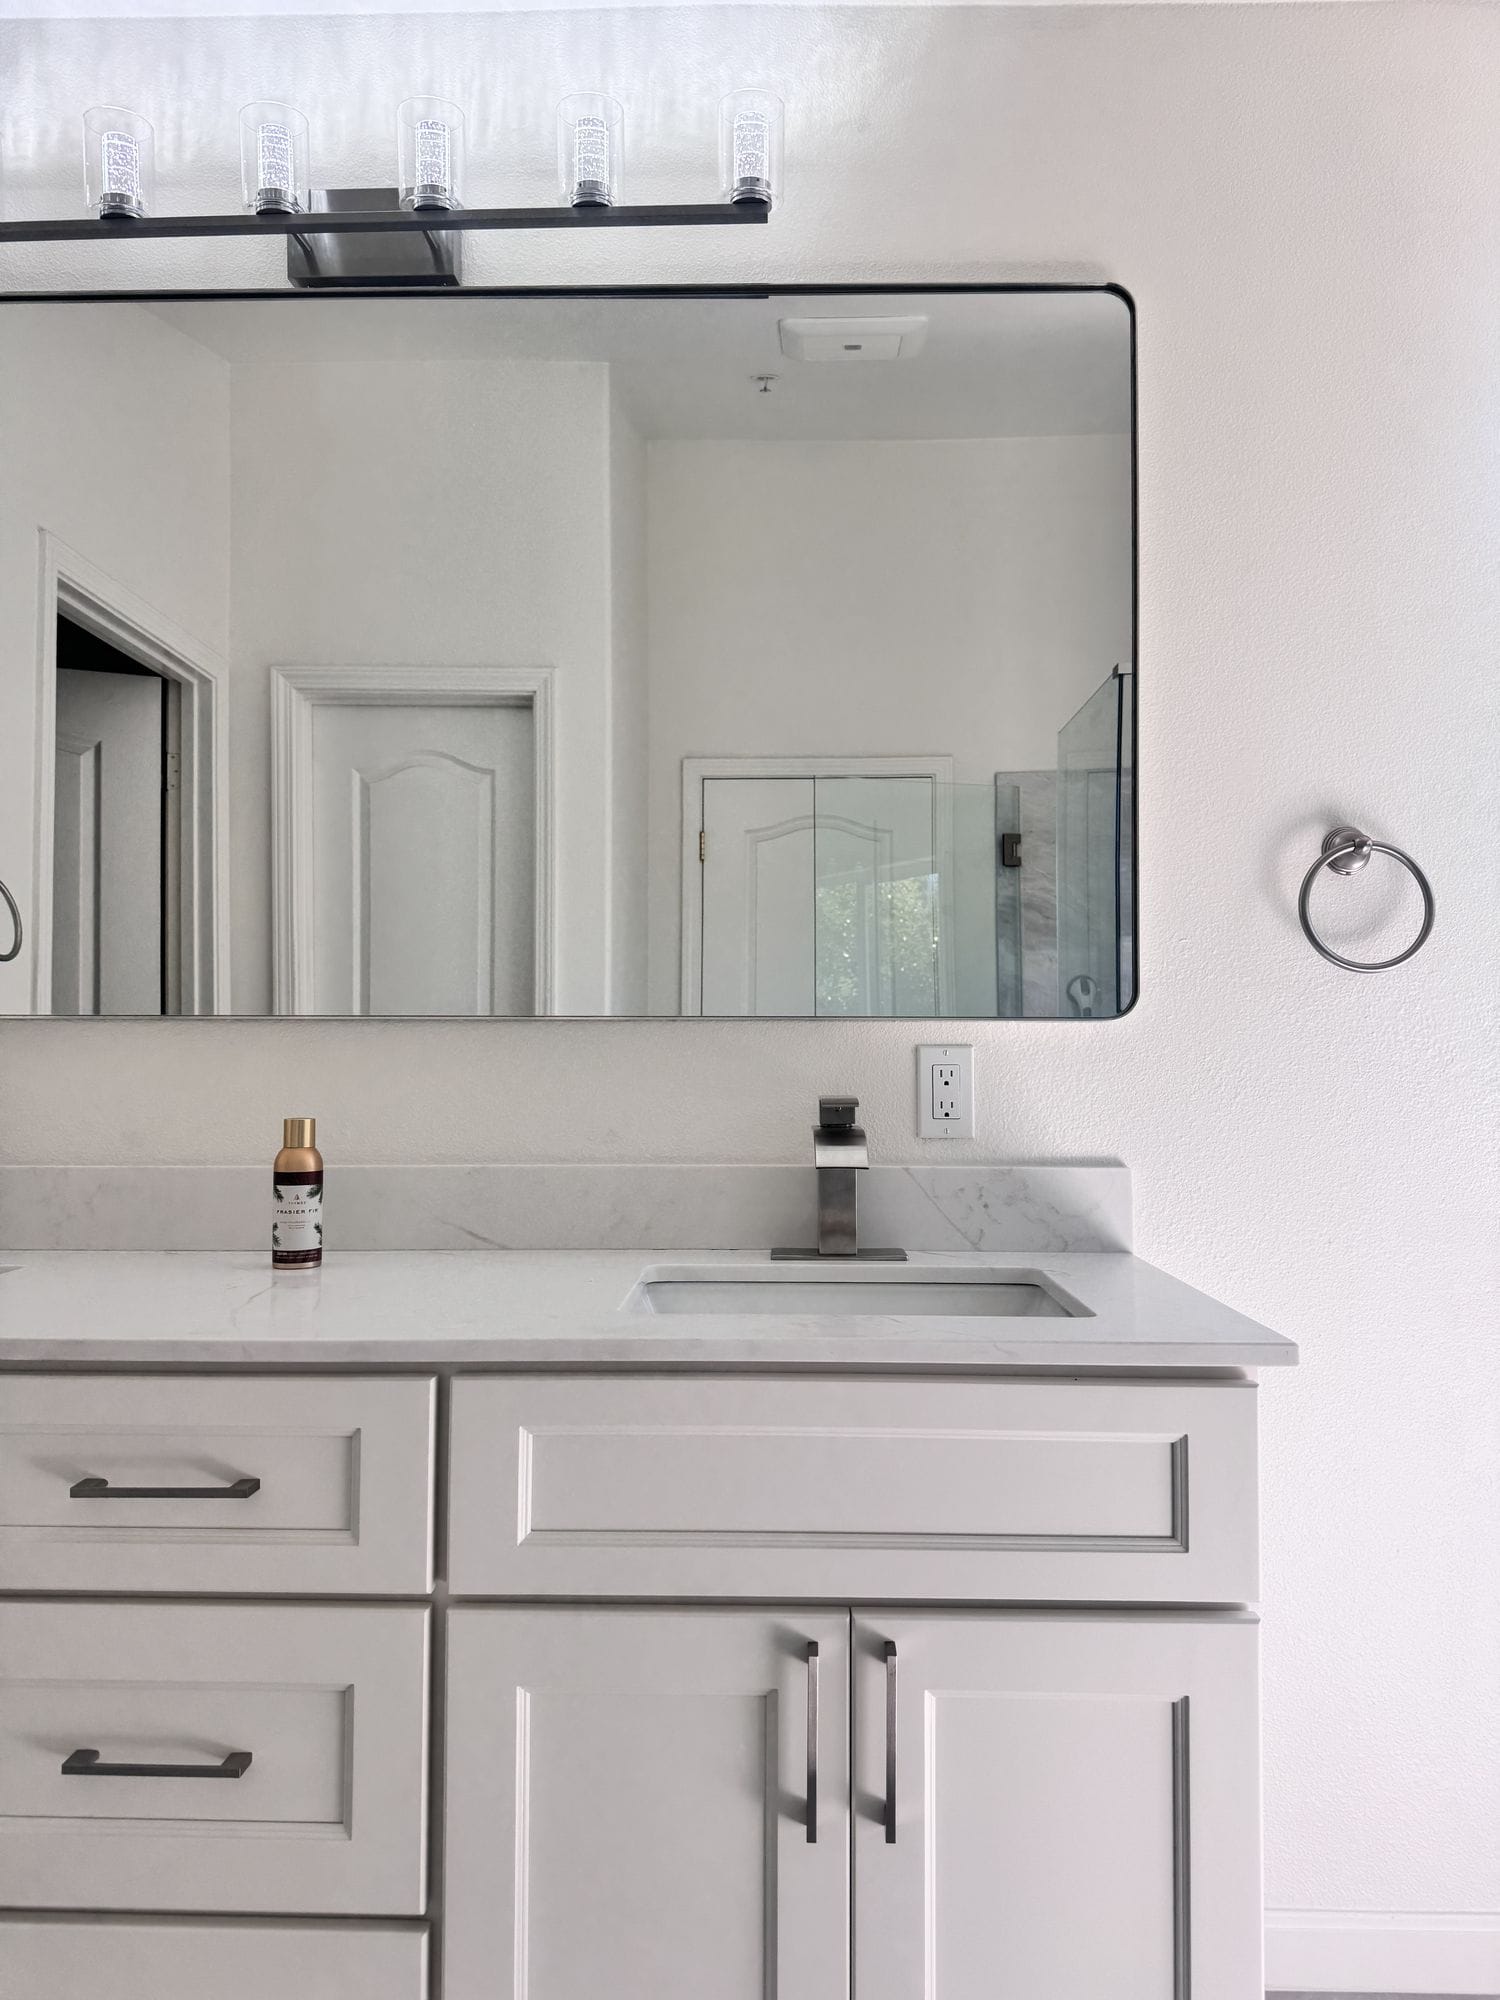
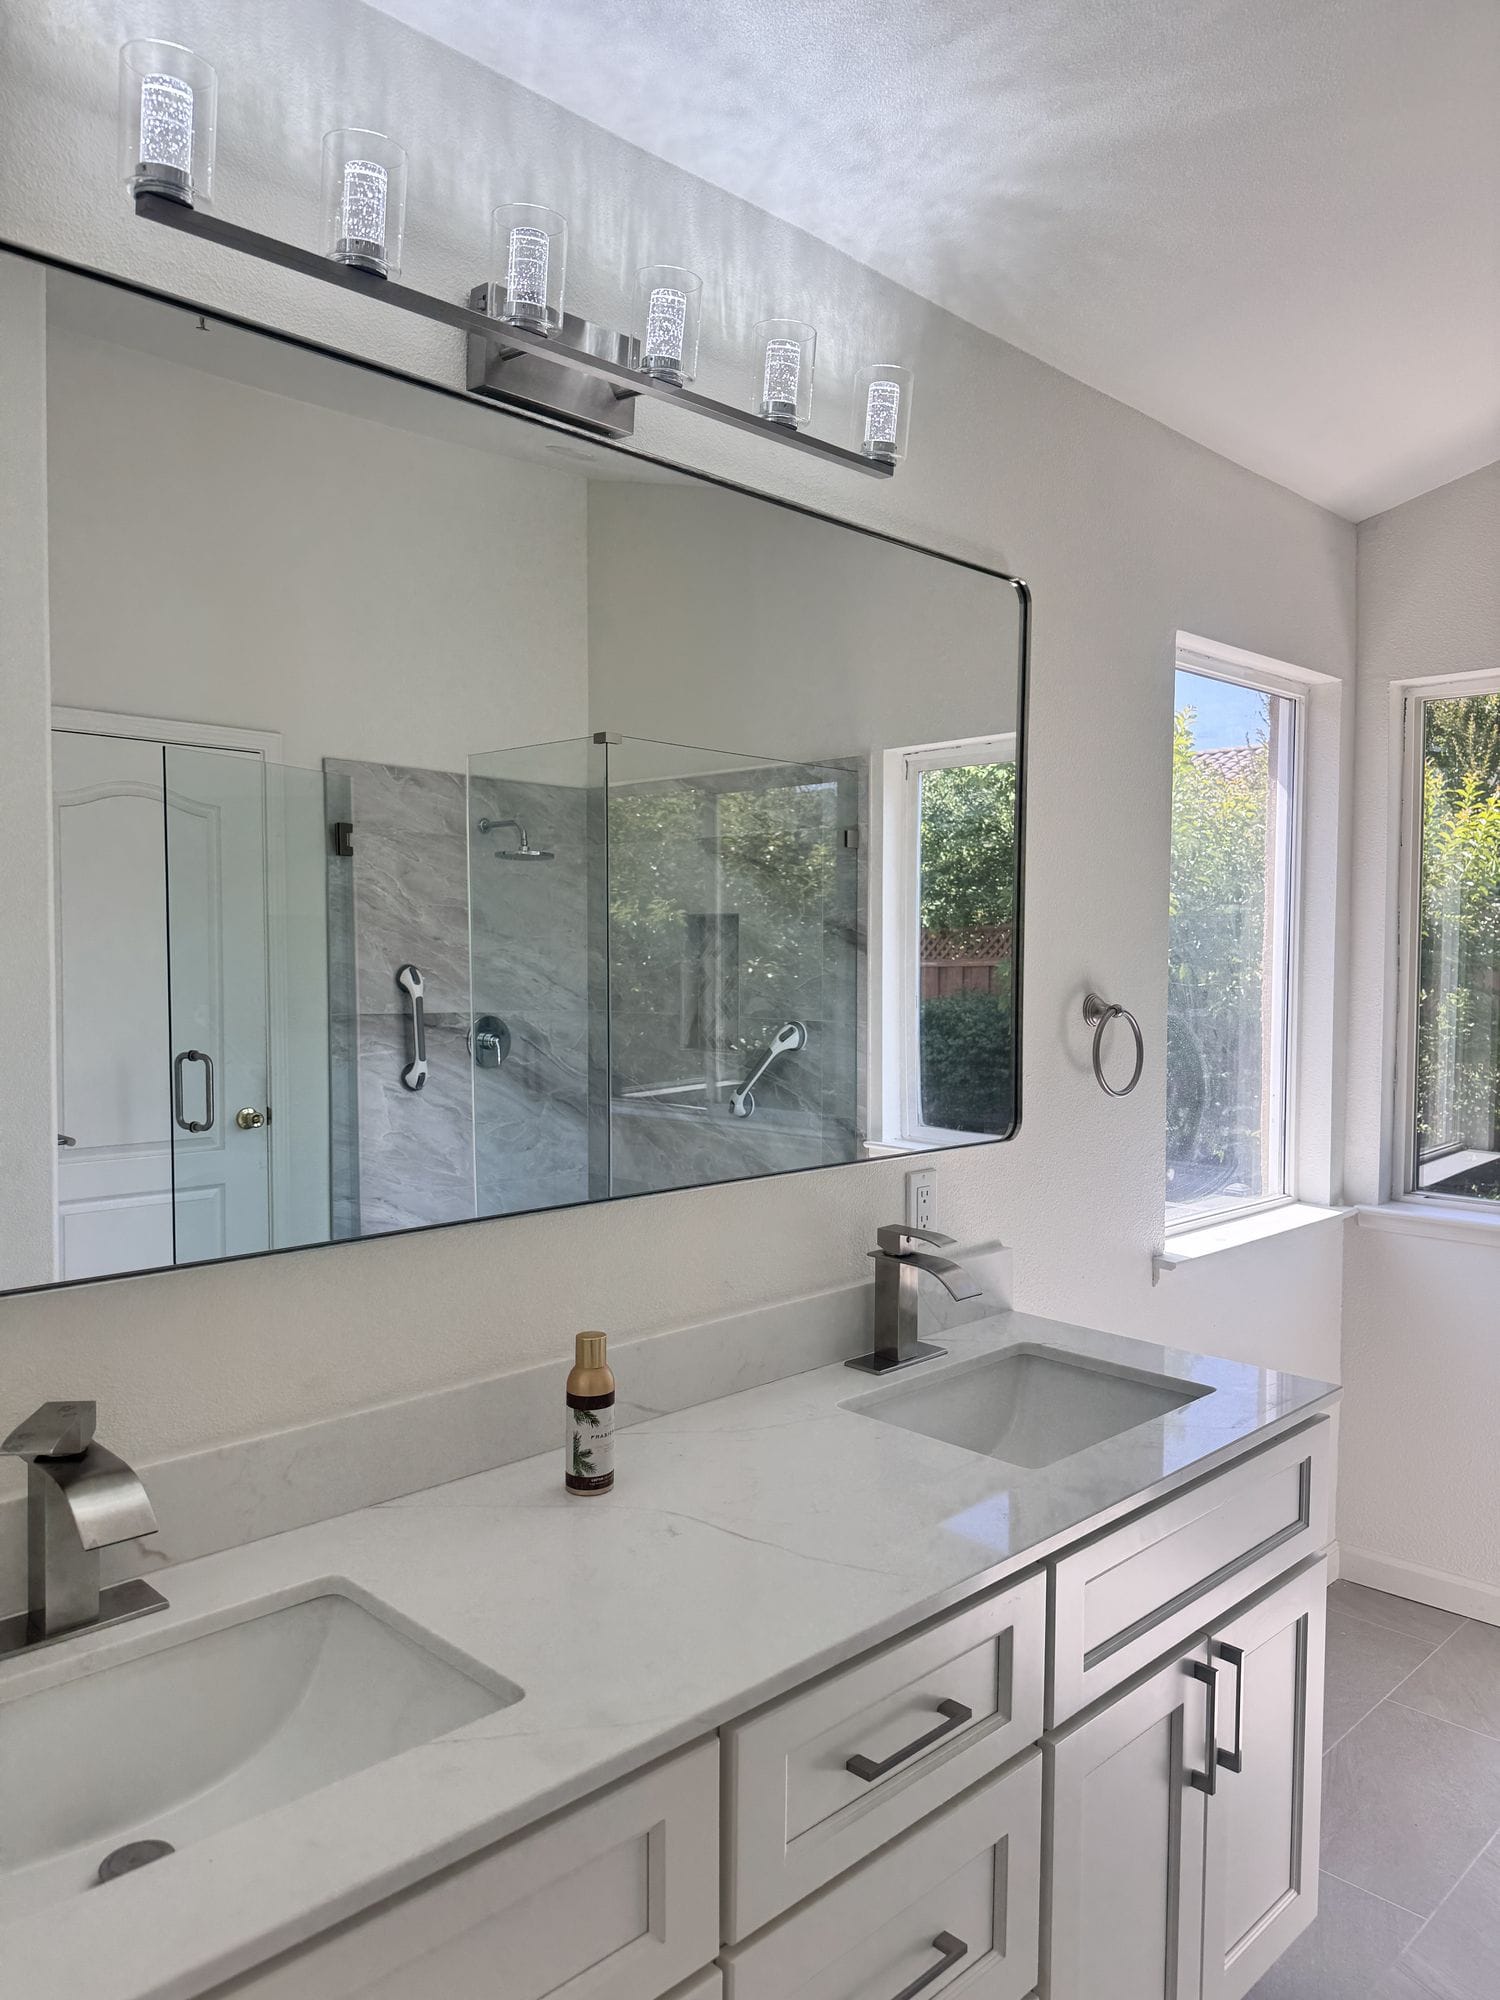
The room is treated as one continuous space rather than separate zones: the same marble-look porcelain runs across the shower walls and the same grey floor tile carries from the vanity through to the enclosure, with the glass kept frameless so nothing interrupts the view down the room.
Visible work
Full-height wall tile, a masonry bench built into the enclosure, a recessed niche, a linear drain at the low edge of a herringbone mosaic floor, and frameless glass with a hinged door and a fixed return panel.
Materials and features
Marble-look large-format porcelain to the walls, herringbone mosaic to the shower floor and the niche back, a quartz vanity top with undermount basins, brushed nickel fittings throughout, and a rain head paired with a handheld on a slide bar.
Functional improvements
Two grab bars are fitted either side of the opening, the bench gives a seated position with the controls in reach, and the step into the shower is kept low. The handheld can be used seated or standing.
Final result
A shower that is straightforward to walk into and to use sitting down, without looking like an accessible bathroom — the support is simply part of the design.
Stage 03 · Plan
Drawings, permits and approvals
Bathroom work in South Florida is permitted work once plumbing moves or a wet area is rebuilt. We handle this in-house, which is the main reason the sequence below does not stall.
We look at the room, not a photograph of it
What is under the floor, where the existing drain and valve sit, whether the wall is block or framed, and how the room drains now. This visit is what makes the rest of the numbers real.
Agreeing exactly what is being built
Threshold type, drain type, glass type, tile layout, fittings and whether the vanity and toilet are in scope. This is the point where changes are cheap.
Drawings that a plan reviewer will accept
For most conversions this is a plumbing plan and the fixture layout. Where a wall moves or the floor is being recessed, more is needed.
Only when the structure is actually affected
Recessing a framed floor for a curbless shower, or altering a load-bearing element, brings in a structural engineer. Most conversions do not need one.
Where a board sits between you and the work
Condominiums and many HOA communities require their own approval, and often have their own rules on work hours, lift use and floor protection. Boards meet on their own schedule.
Filing with the right authority
Submission goes to the municipal building department, or to the county where the property is unincorporated. Fees and portals differ by jurisdiction.
Answering the plan reviewer
Comments are normal and not a sign anything is wrong. They are answered, the set is resubmitted, and it goes back into review.
Work can legally begin
The permit is posted at the property and the inspection card starts. We schedule the first trades around the issue date, not before it.
Booked at the points the code requires
Typically a rough plumbing inspection while the walls are open, a shower pan or water test on the waterproofed pan, and a final. Your jurisdiction sets the actual list.
The permit is signed off
Final inspection passes and the permit is closed. An open permit follows the property and shows up when it is sold, so this step is not optional.
Requirements, review times and inspection sequences are set by your local building department, and they genuinely differ across Miami-Dade, Broward and Palm Beach and between the municipalities inside them. Nothing on this page is a guaranteed timeline or an assurance of approval — we will tell you what your jurisdiction requires once we know the address.
Stage 04 · Build
What actually happens in your home
In order, with the quality-control point that closes each phase. The bathroom is out of use from demolition until the glass goes in.
Protection
Before anything is opened
Floor protection down the route from the front door, dust barriers at the bathroom doorway, and the vanity and toilet either removed or wrapped. Neighbouring rooms should not be able to tell what is happening.
Quality check · Walk the route with us before we start
Demolition
Tile, tub and substrate out
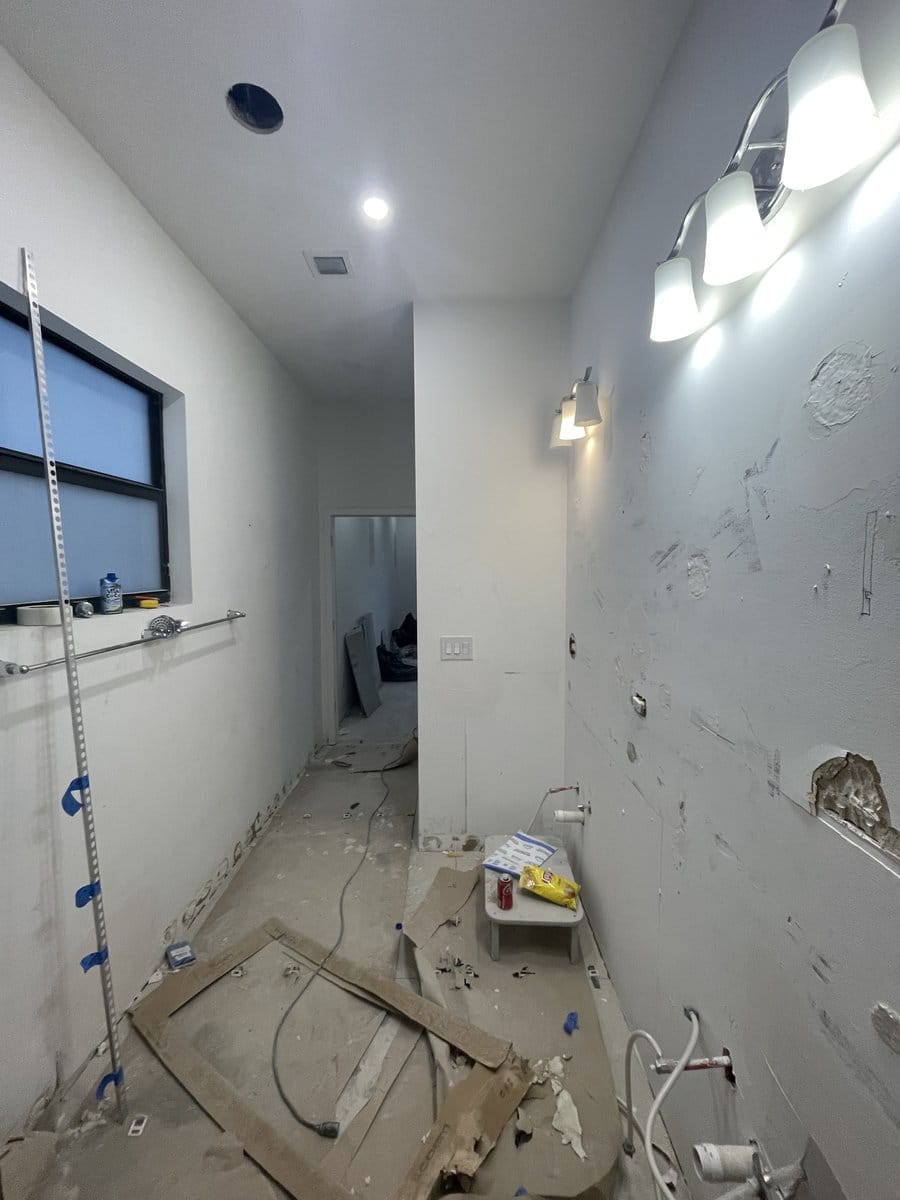
The old tub or base, the wall tile and the substrate behind it all come out. This is the noisy day. What is behind the tile is not known until it is open — that is normal, and it is why we look before we finalise anything.
Quality check · We photograph what is found behind the tile
Assessment
Looking at what was uncovered
Framing, subfloor and any previous water damage get assessed with the wall open. If the scope needs to change, this is when you hear about it — before new material goes in, not after.
Quality check · Nothing damaged gets covered back up
Rough-in
Plumbing set, blocking fitted
The drain is set to its new position, the valve is set to height, and blocking goes in behind the tile line for grab bars, the bench and any fittings. This is the last moment fittings can change without opening tile.
Quality check · Rough plumbing inspection, walls still open
Substrate
A flat, sound base
Backer board or a suitable panel system goes up, and the floor is built to the fall the drain needs. Flatness here decides whether large-format tile lies properly later.
Quality check · Flatness and fall checked before waterproofing
Waterproofing
The layer that does the actual work
A continuous waterproofing system goes over the pan, up the walls and into the niche and bench, bonded to the drain body so there is no break in it. Tile keeps water off it; it keeps water out.
Quality check · Water test — the pan is filled and held
Tile
Walls, floor, niche and bench
Set out from the niche and the drain so the cuts land where they should. Grout and then a colour-matched flexible sealant at every change of plane.
Quality check · Layout agreed before the first sheet is fixed
Fittings
Trim, seating and support
Heads, controls, grab bars and any seat are fitted to the blocking set at rough-in.
Quality check · Every fixing lands in blocking, not just tile
Glass
Measured after tile, not before
Glass is templated off the finished tile, then made and installed. It is the longest single lead time in the job and the reason the shower is finished last.
Quality check · Templated from the built room
Punch and handover
The last five per cent
Silicone lines, tile edges, trim, cleaning, and the walkthrough. The shower is not used until the sealant has fully cured.
Quality check · Final inspection and your walkthrough
Project gallery 02
Project 02 — stripped back, then rebuilt
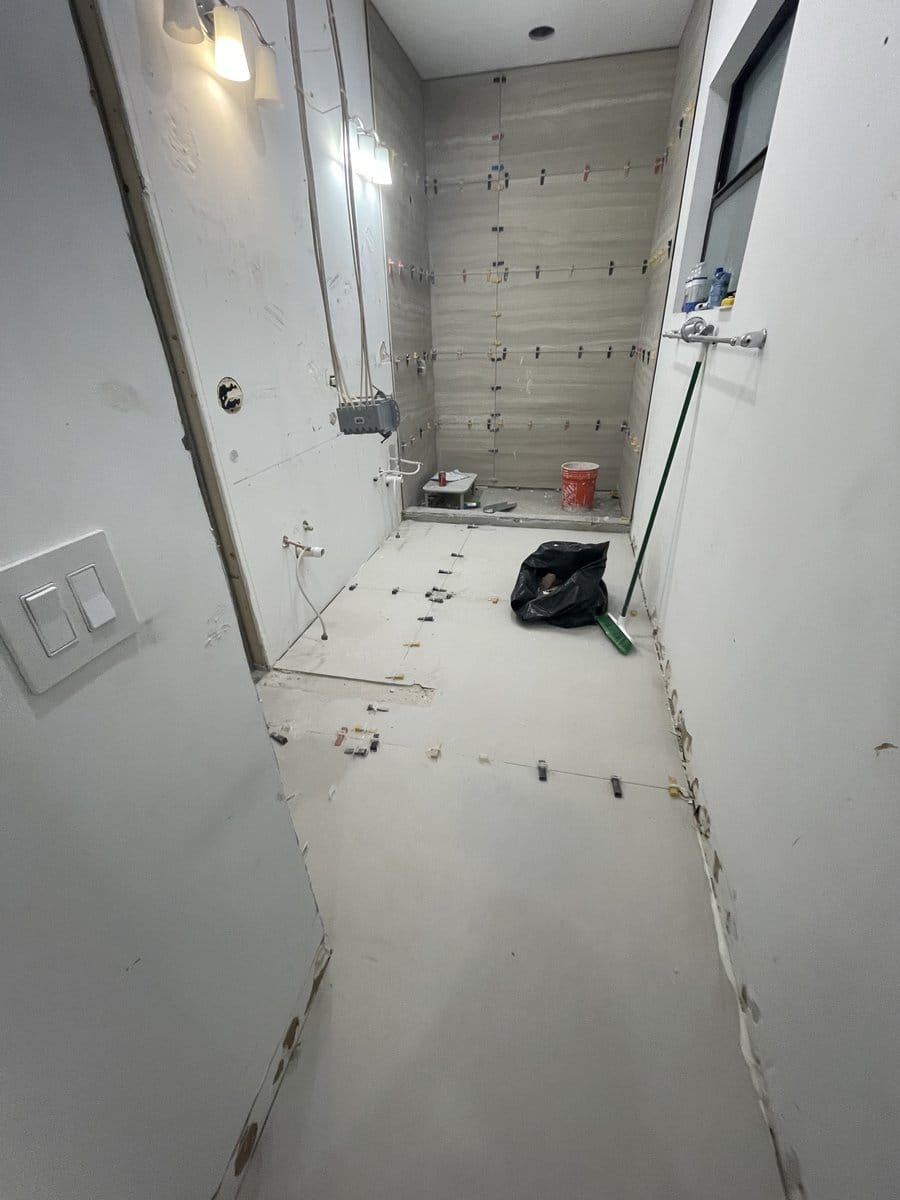
The same narrow bathroom photographed during construction and again once finished. The plank tile being set in the early frames is the tile you can see completed in the later ones.
There is no photograph of this bathroom before work started — the earliest frame we have is already mid-demolition. Rather than present something else as a “before”, this gallery runs from during to complete.
Project 02, during and complete
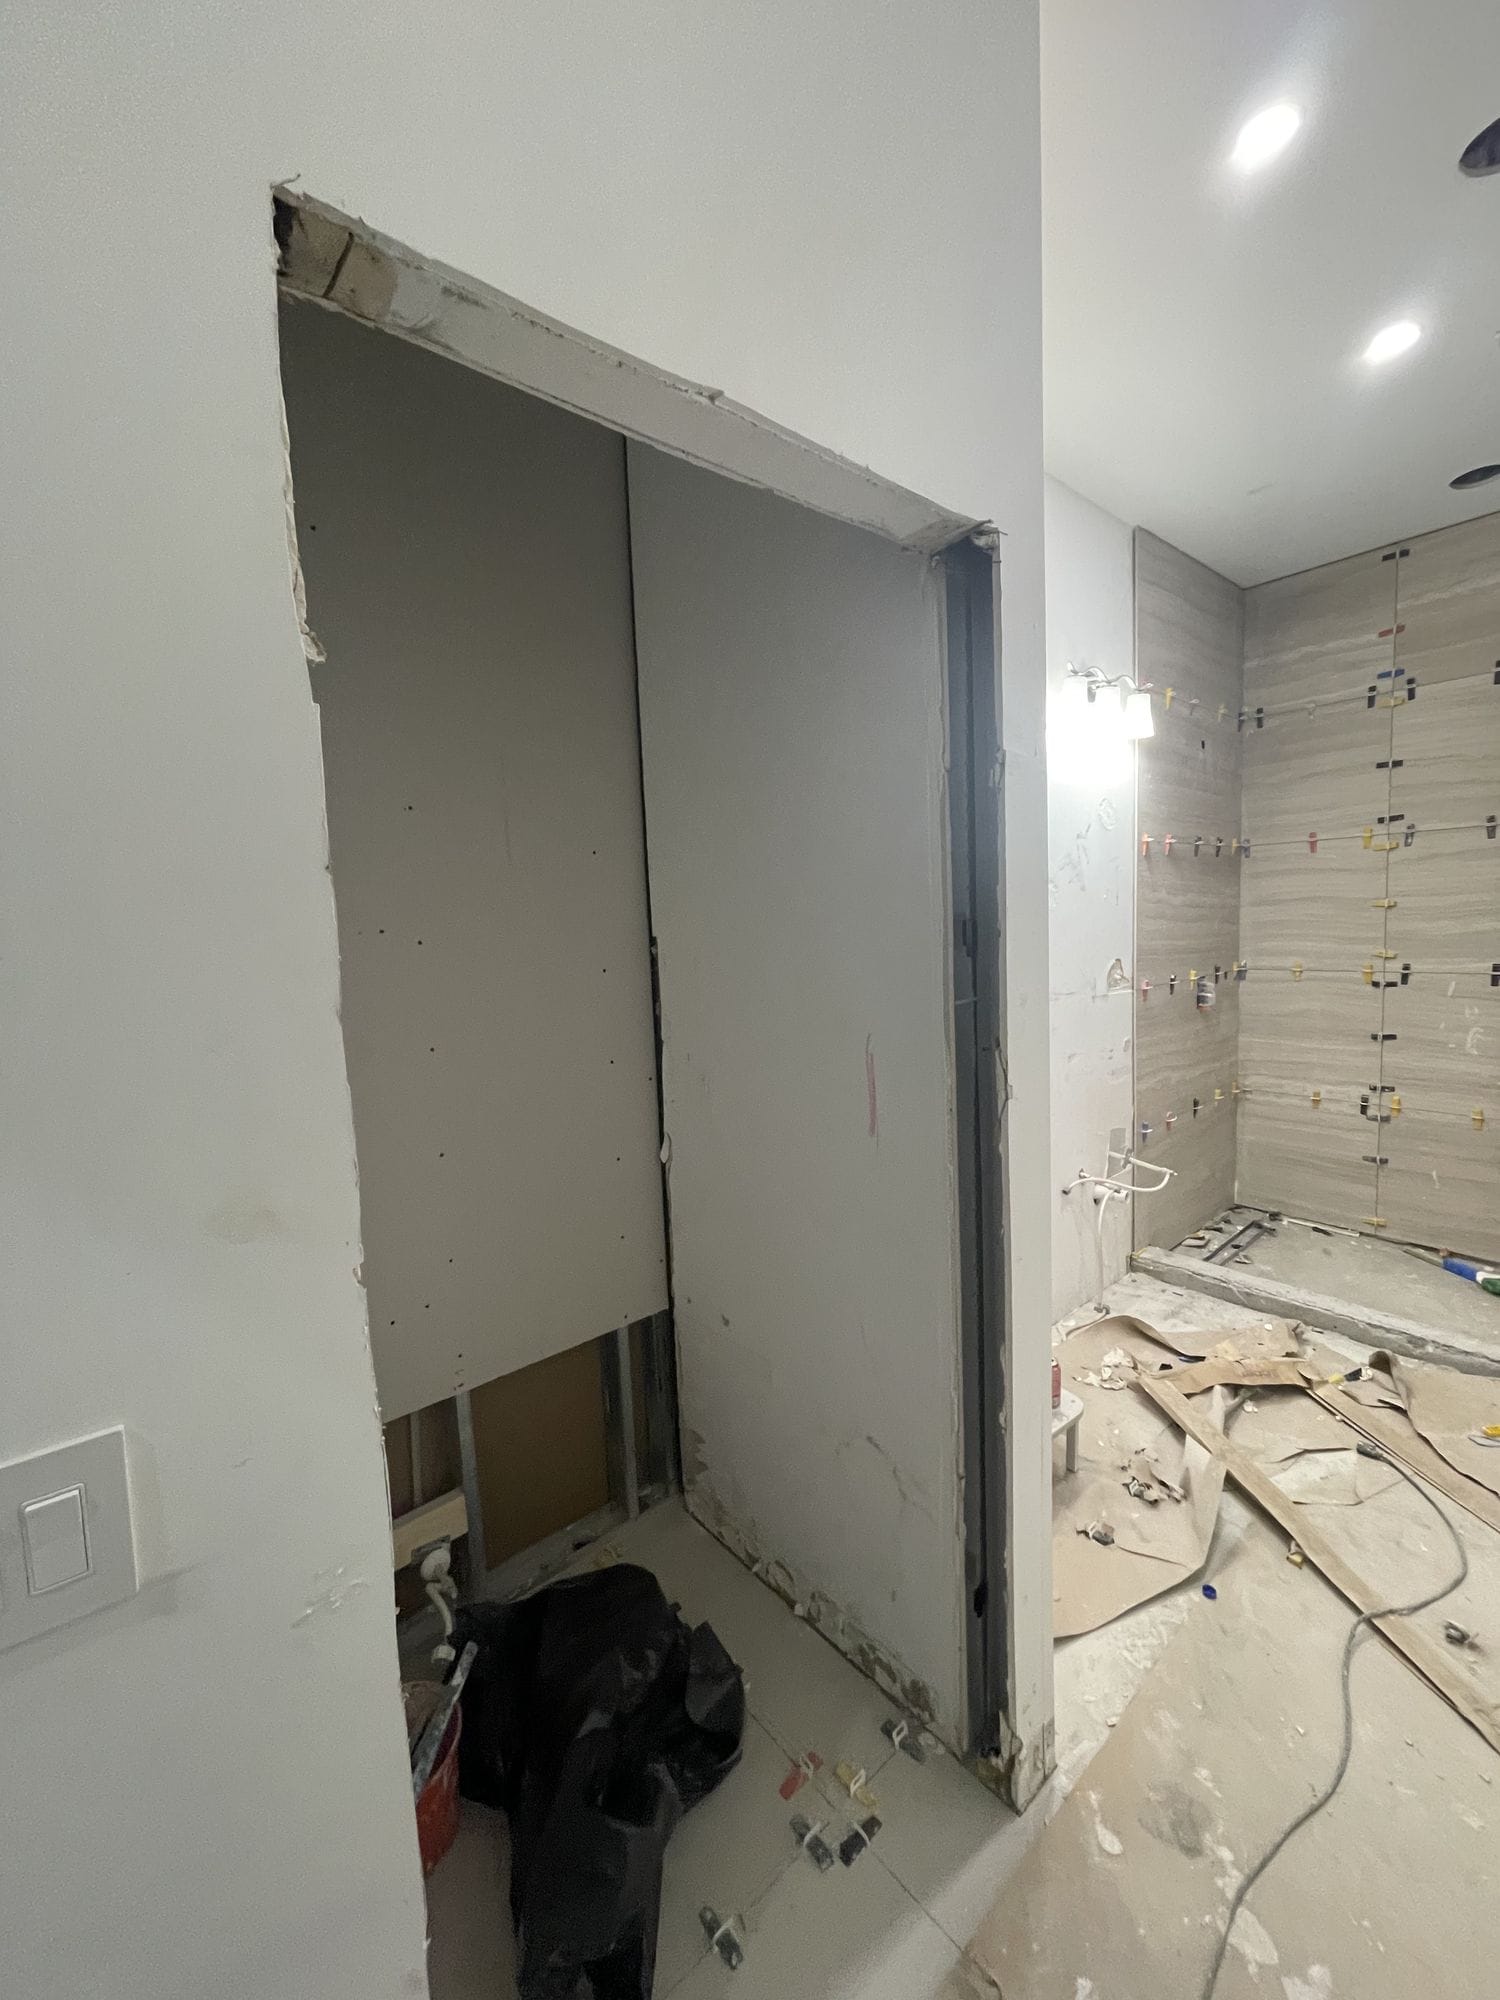
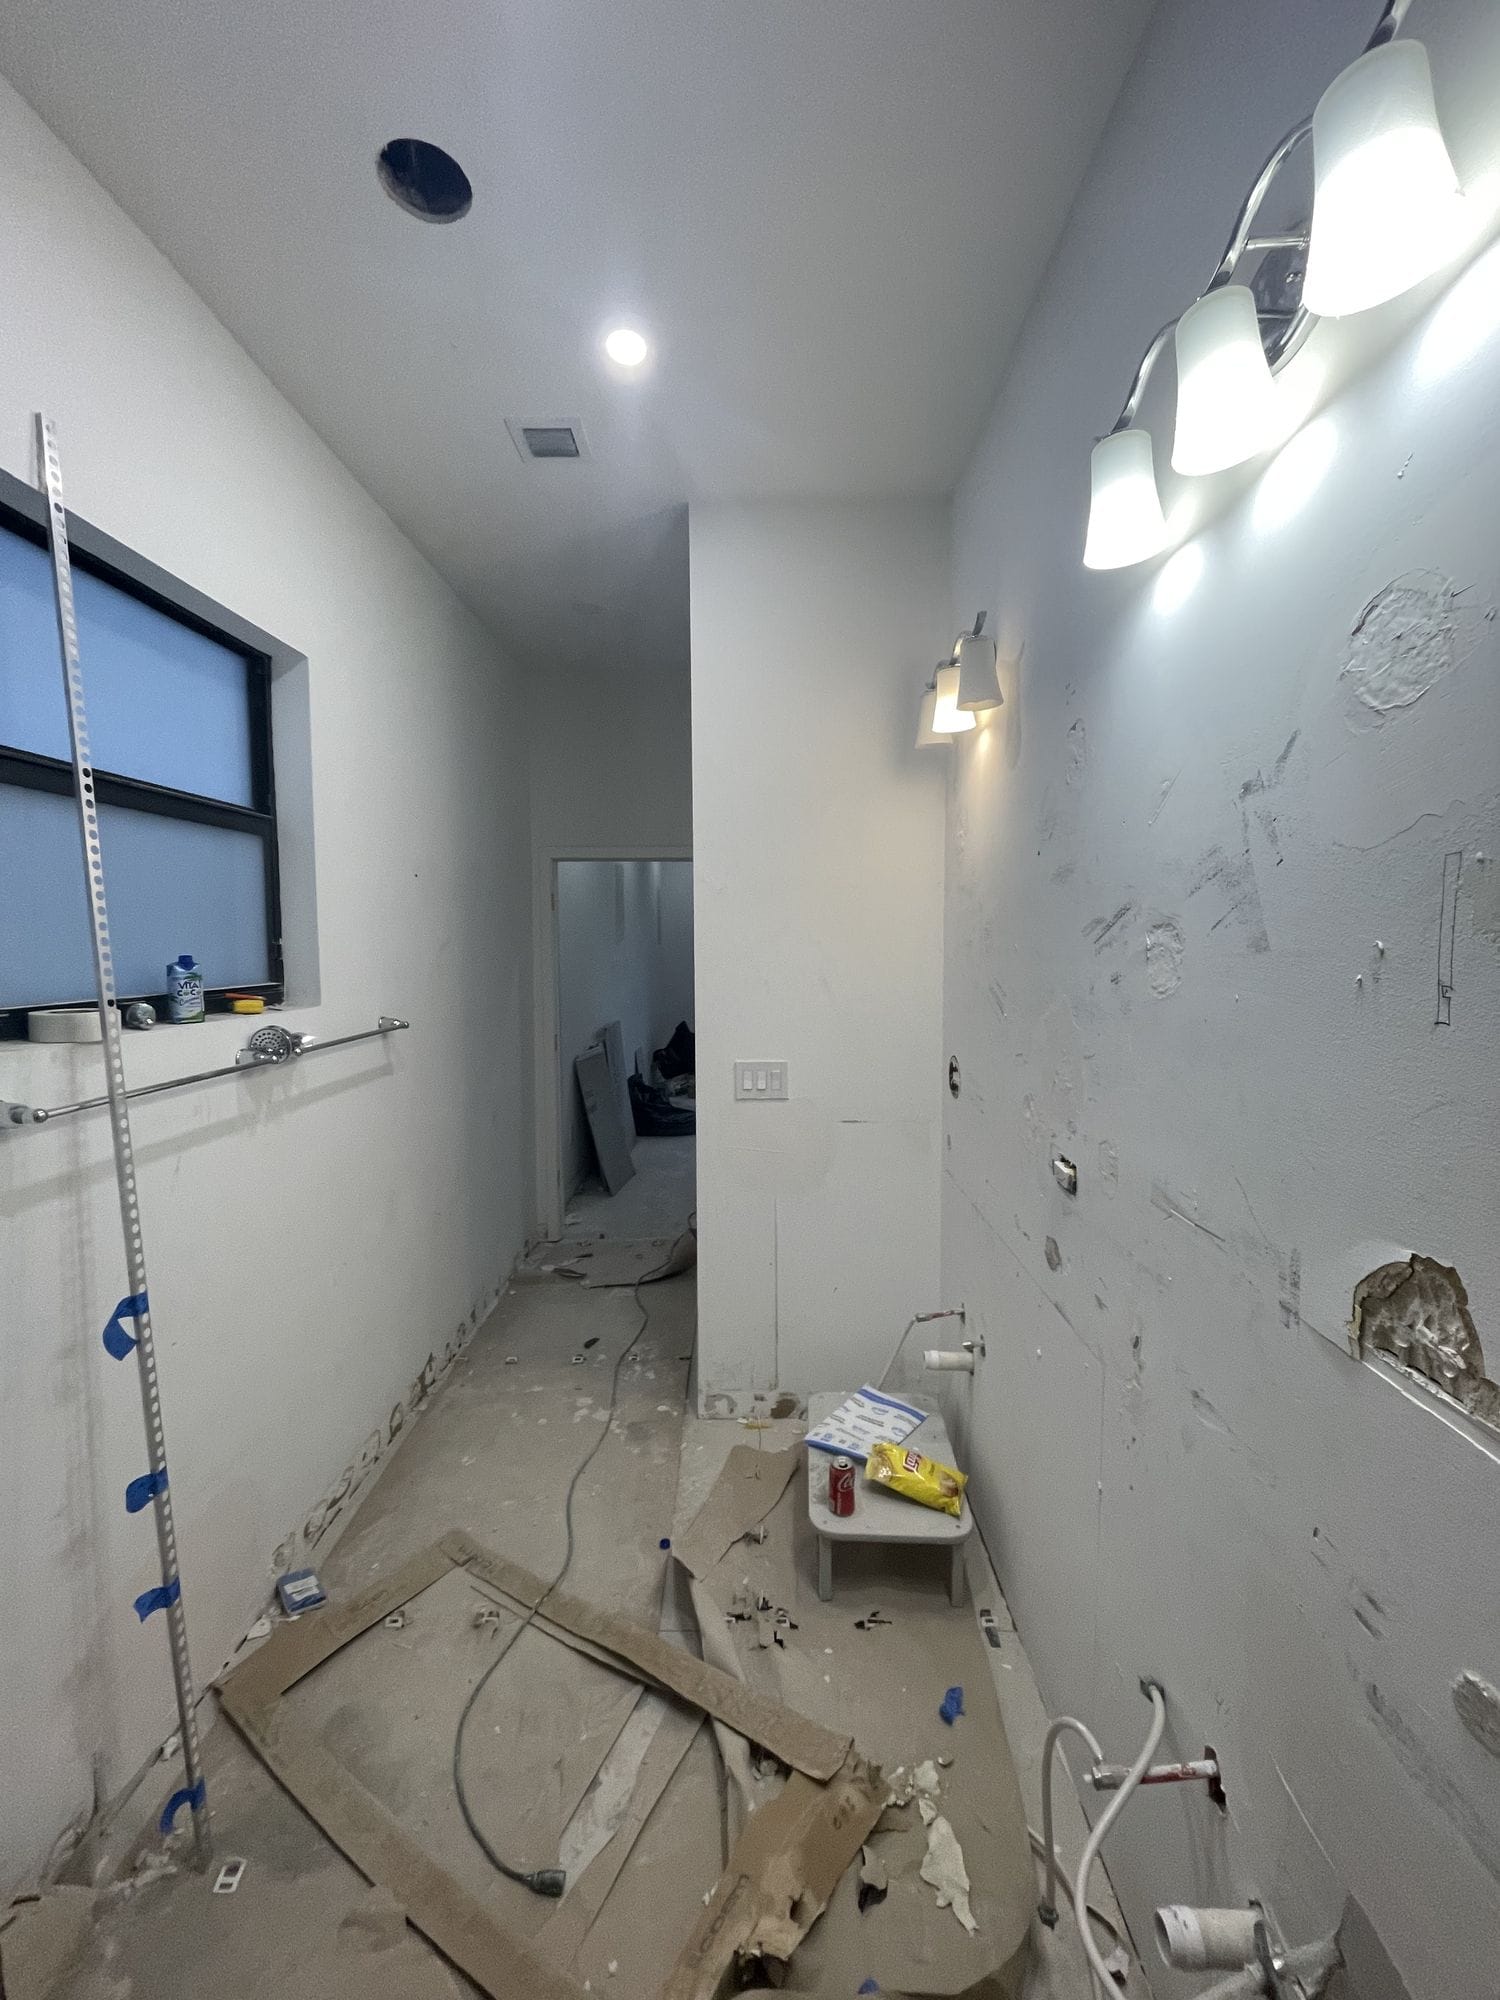
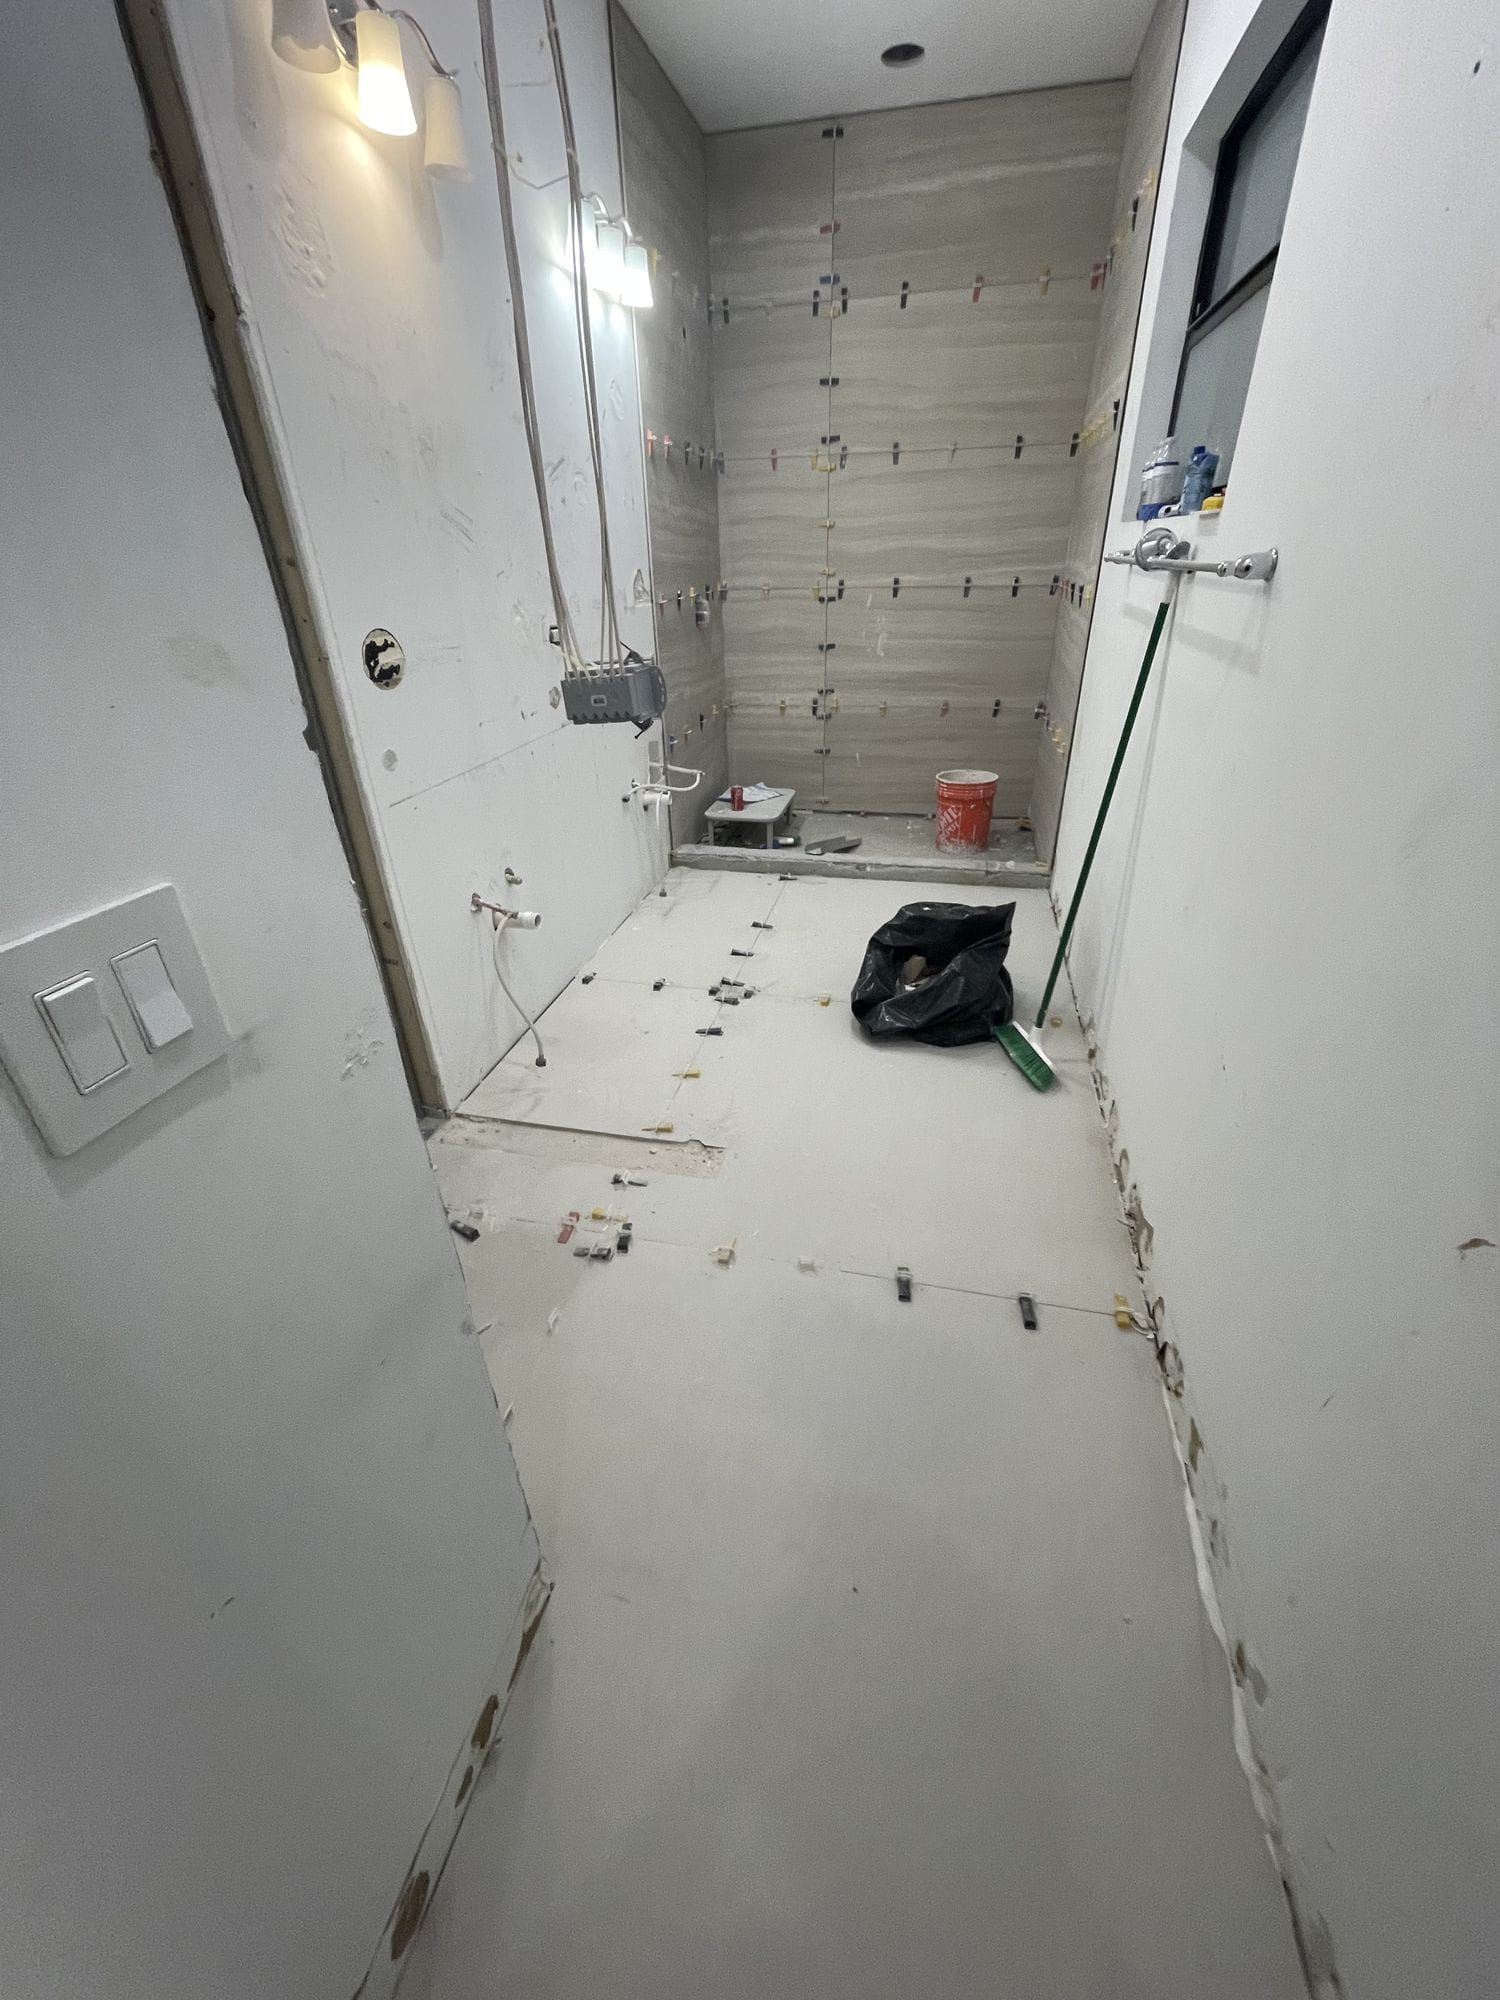
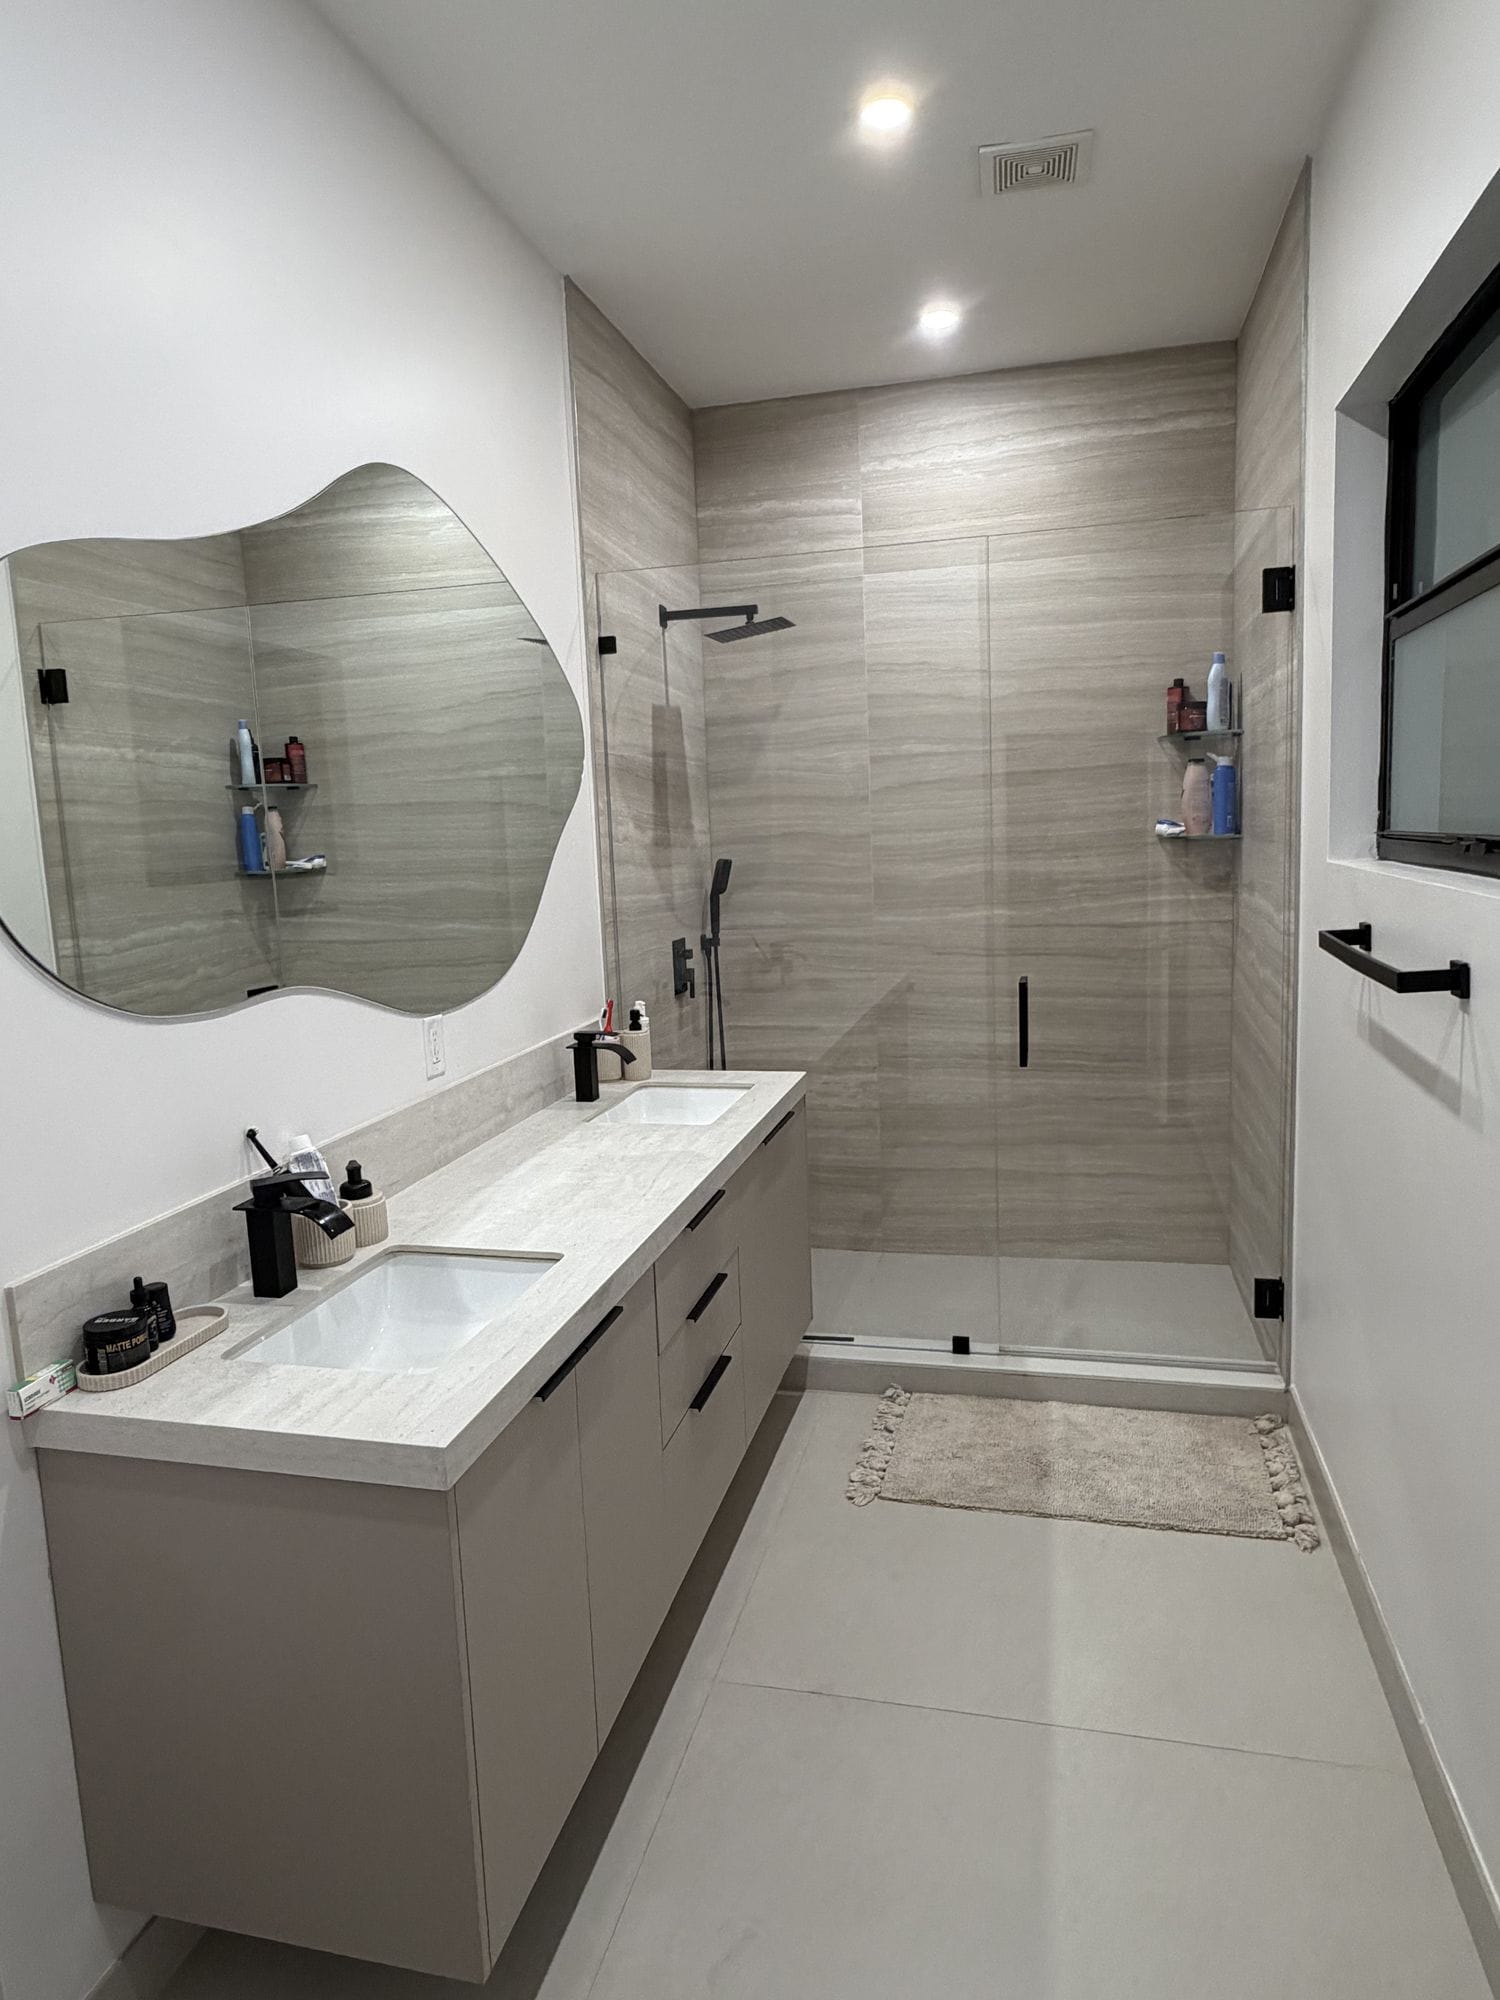
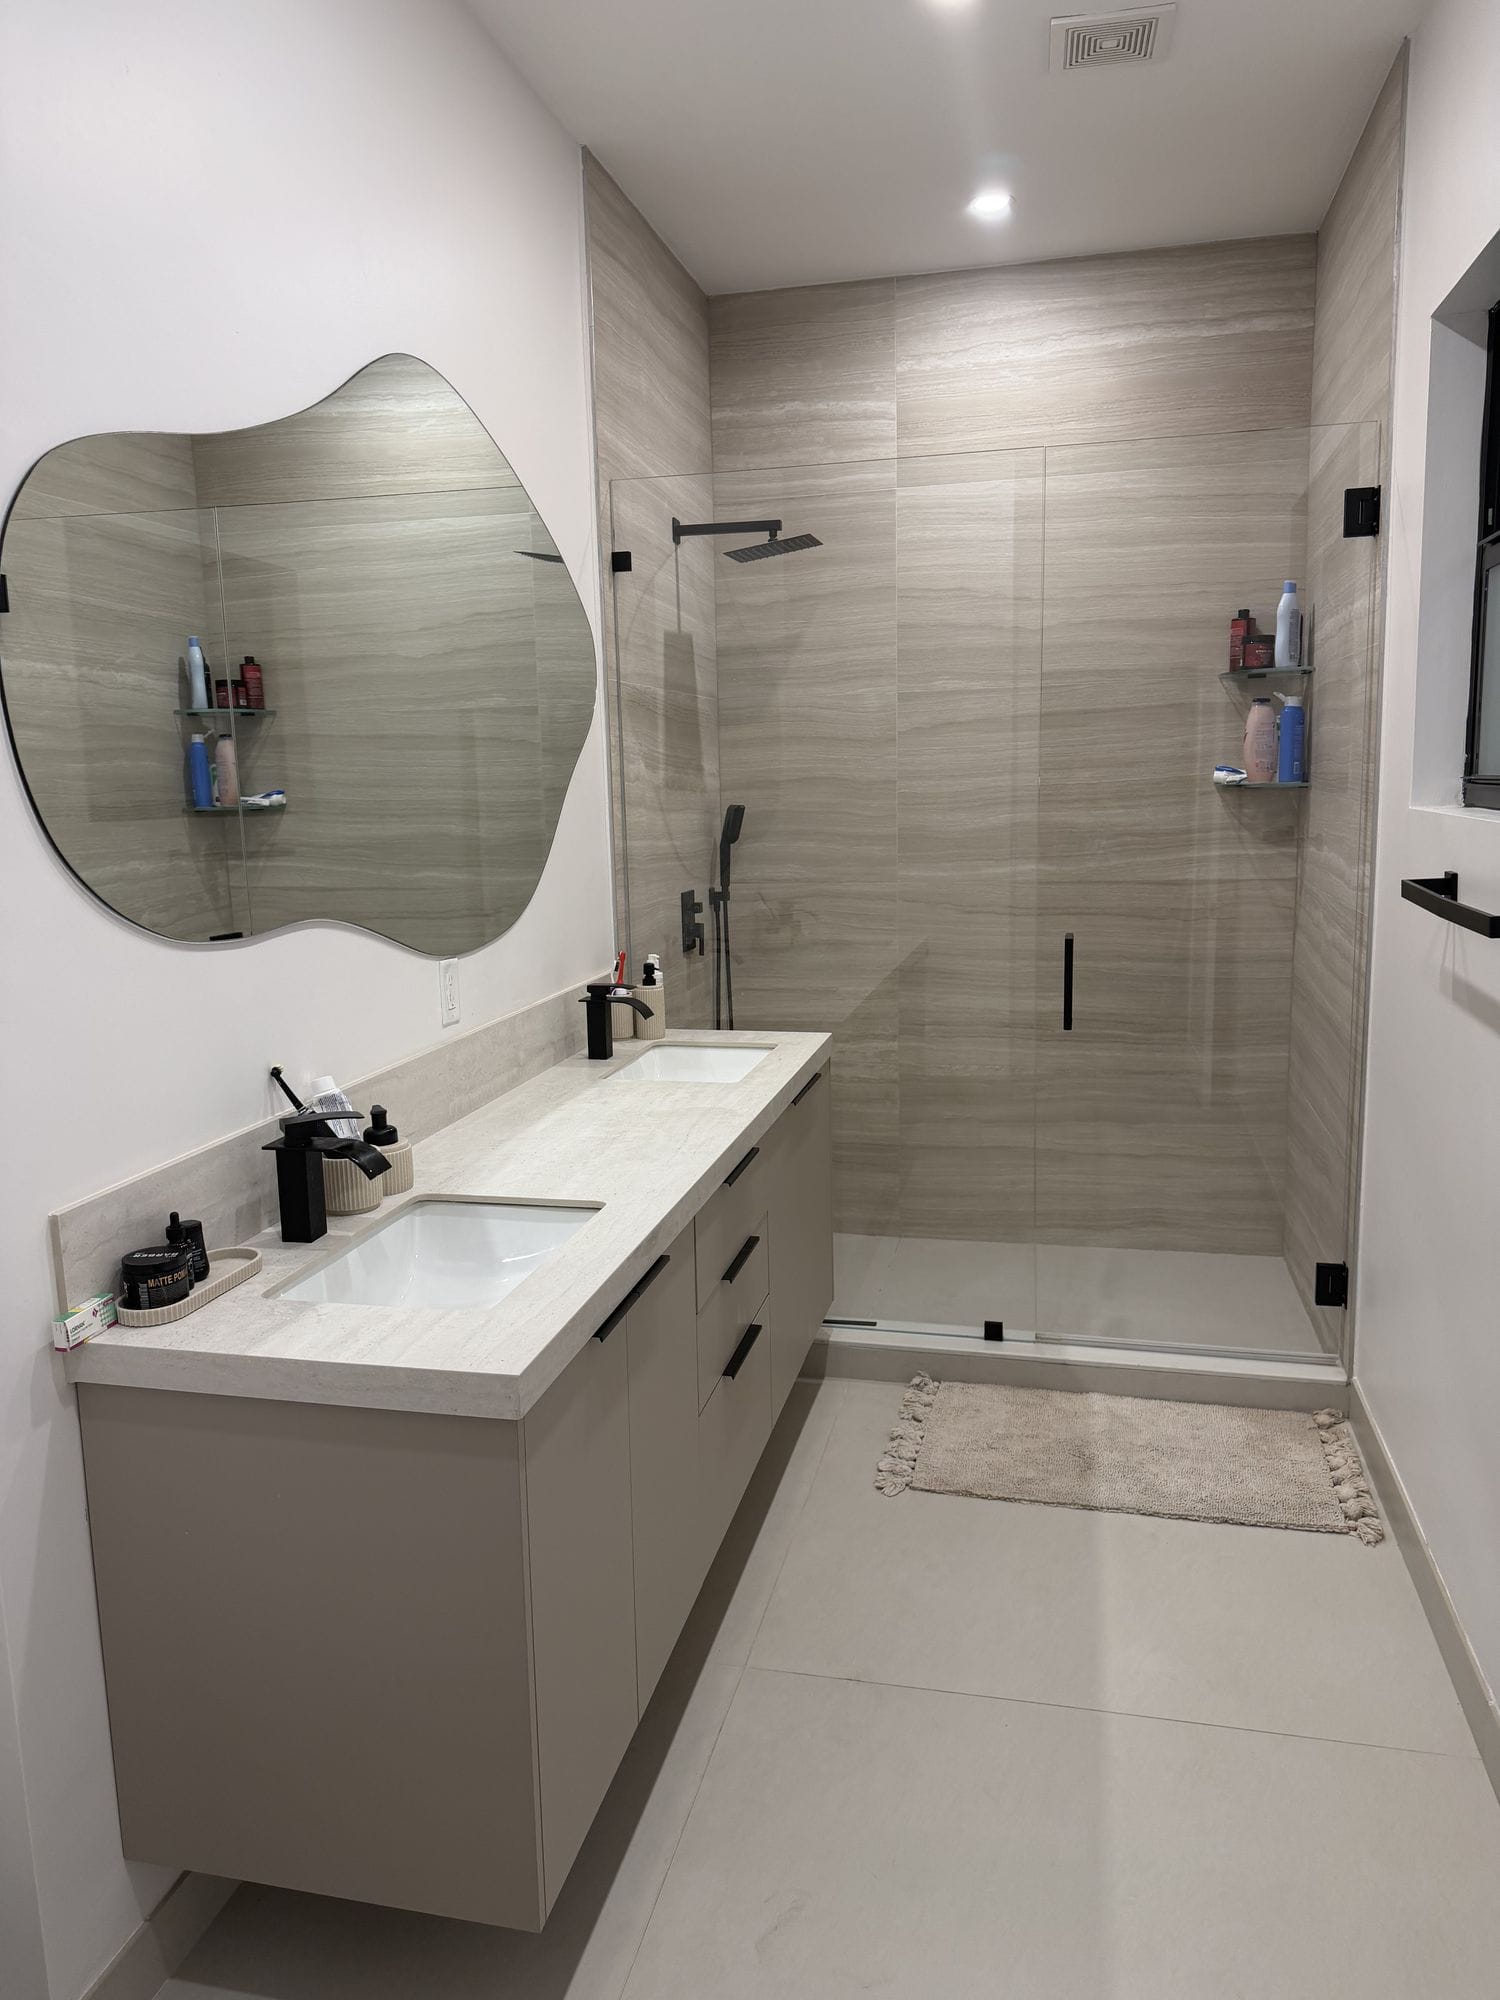
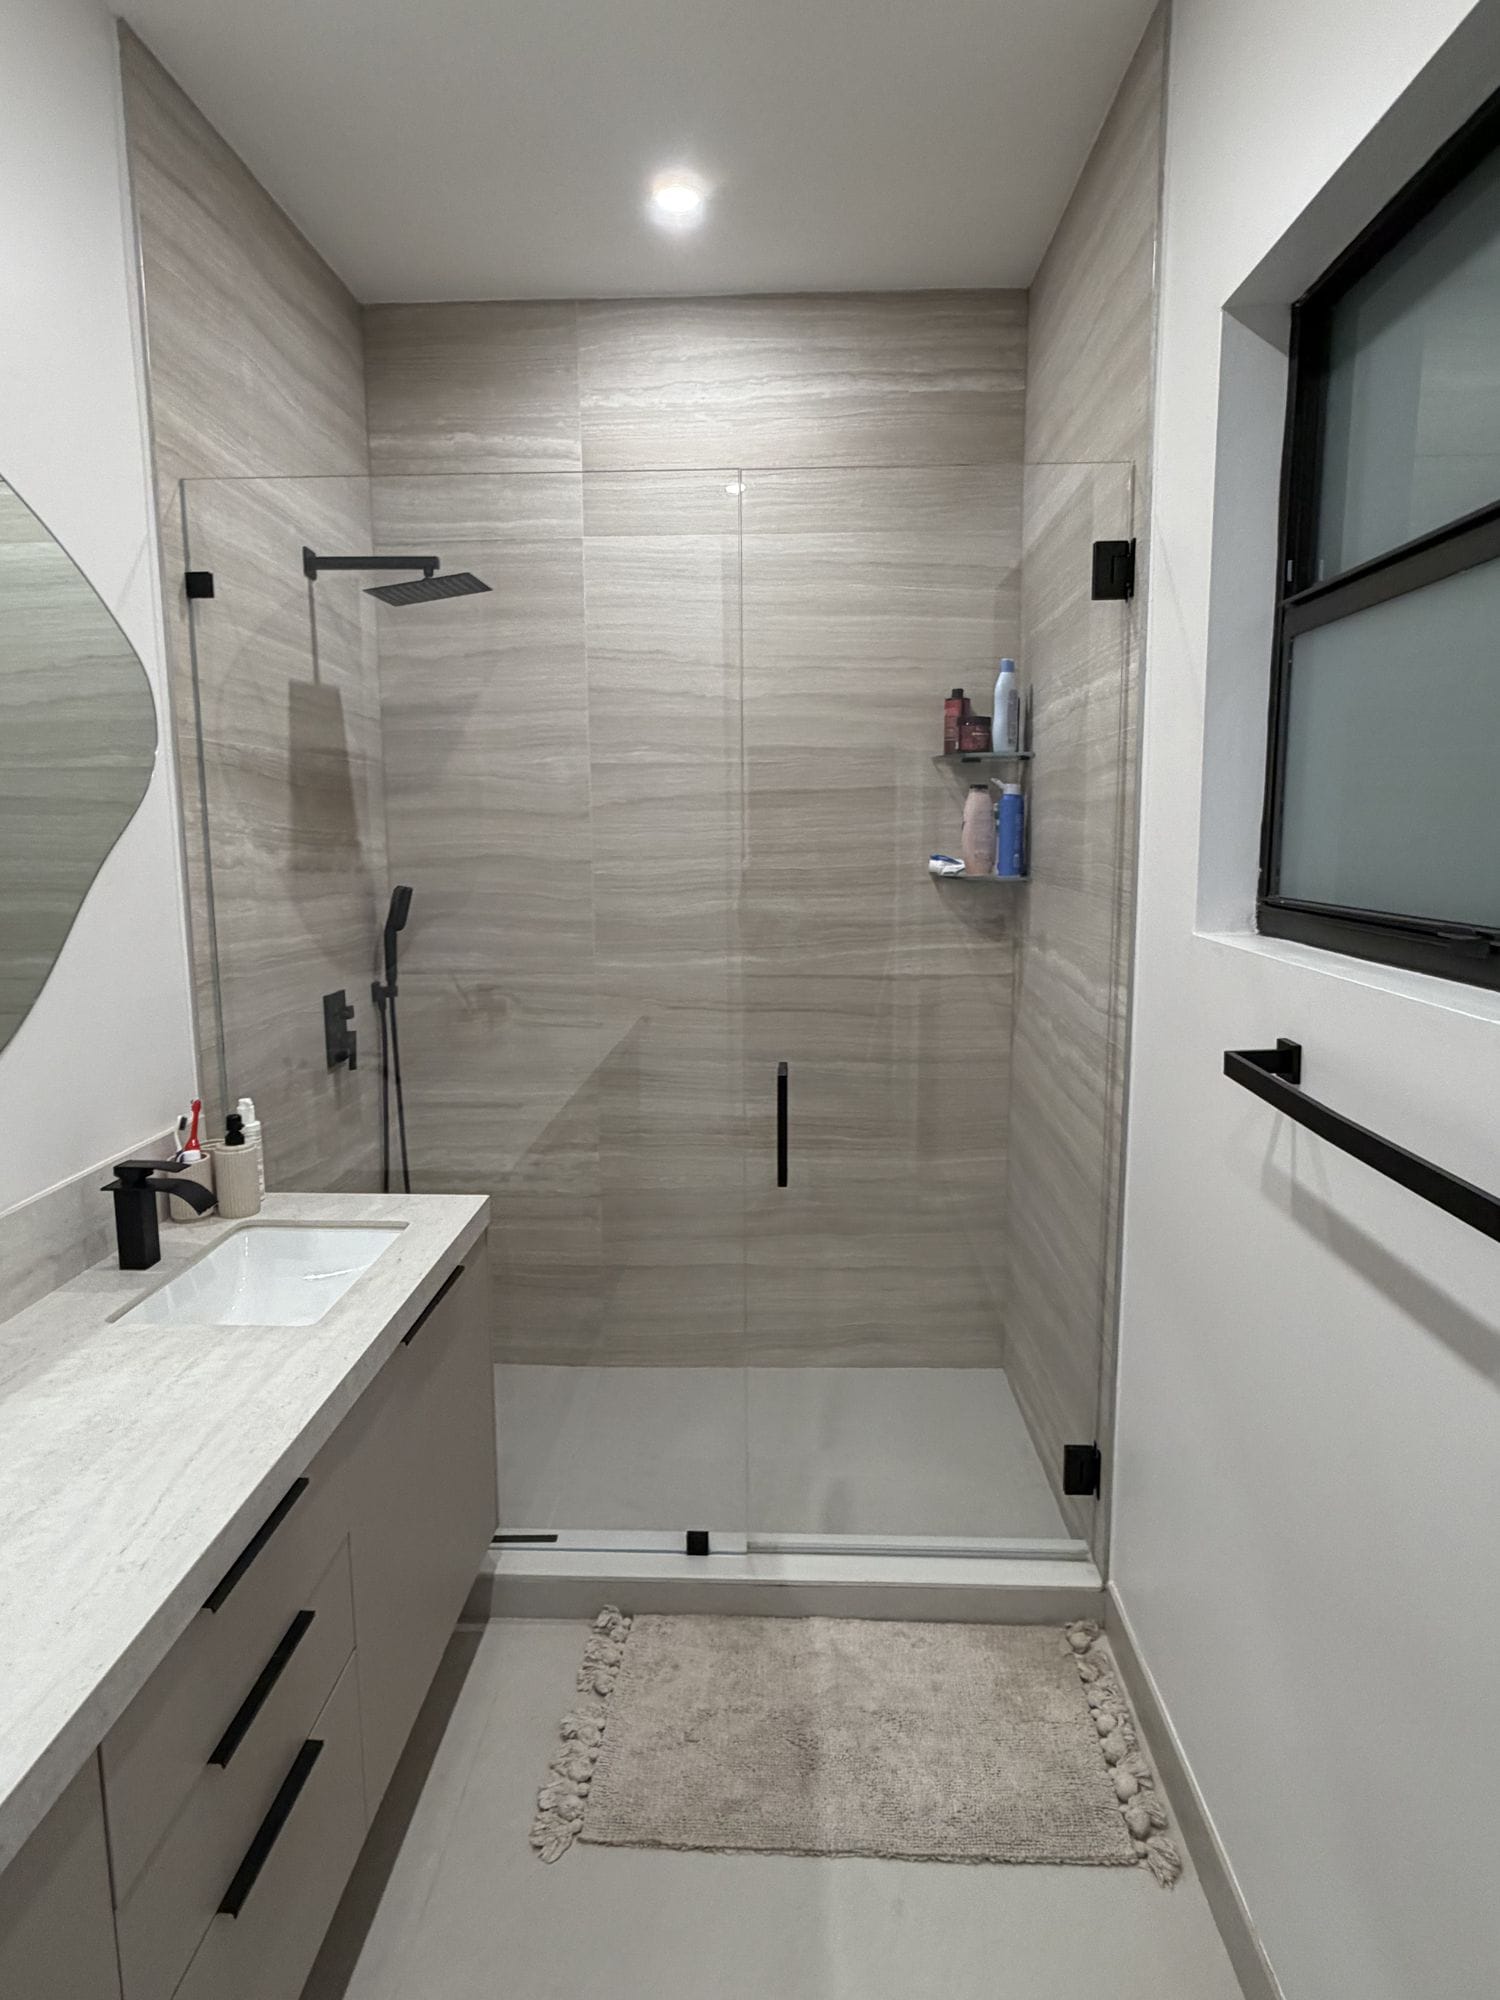
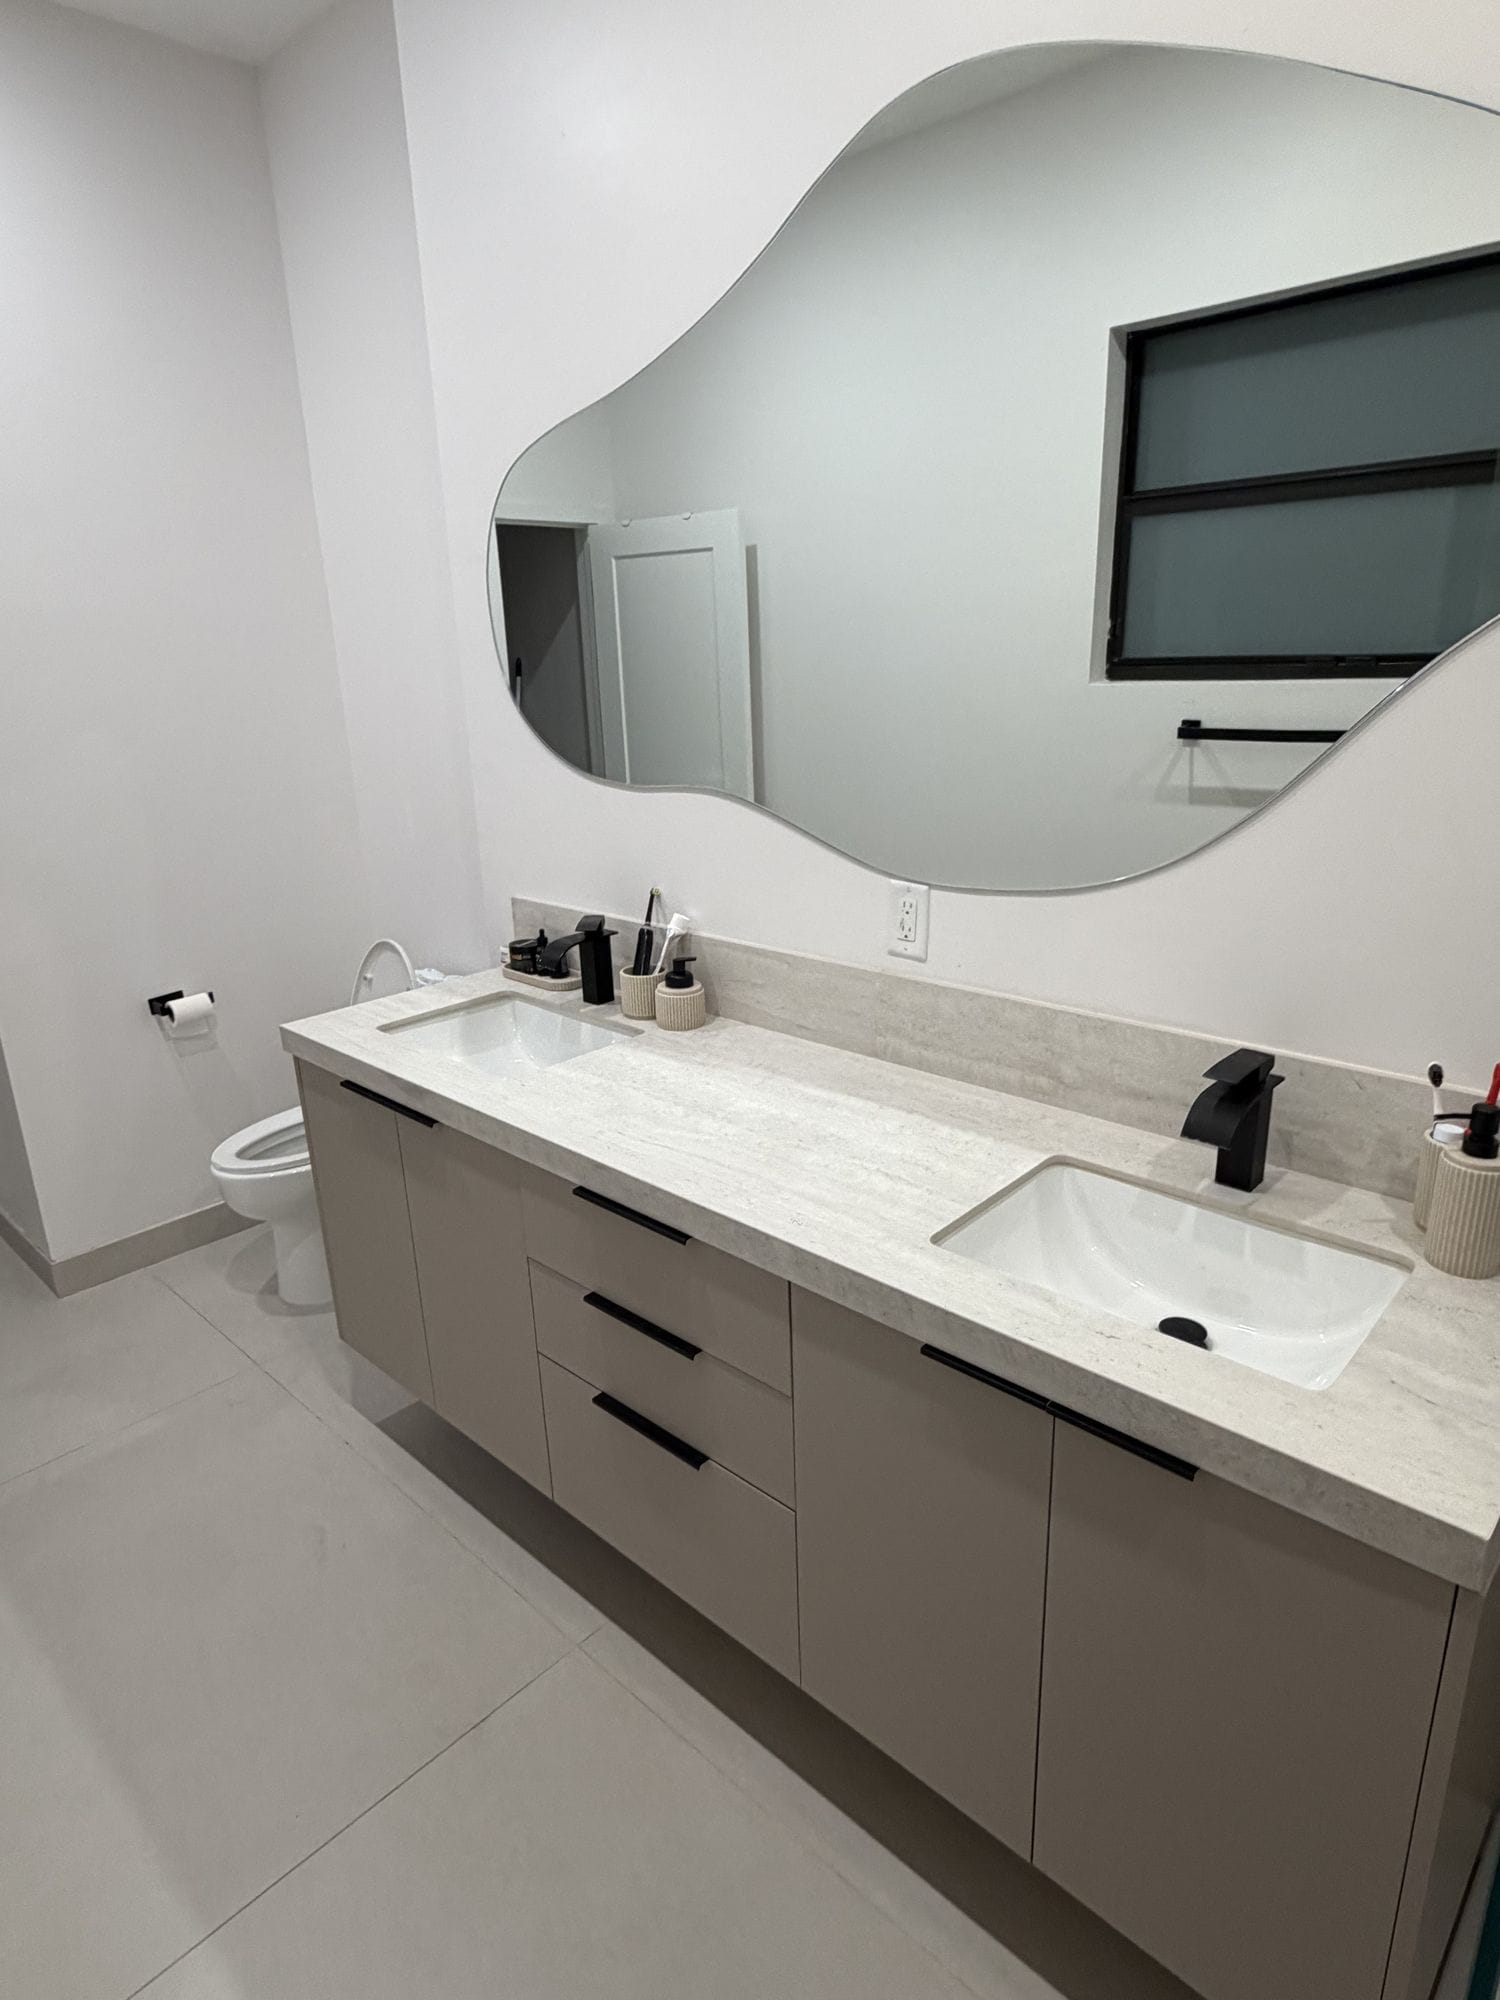
During · stripped
Walls taken back, the opening re-framed and tile backer board set and combed ready for tile.
Starting point
The earliest frames show the room already stripped: wall finishes off, an opening re-framed, plumbing rough-in exposed and the floor screeded. What the bathroom looked like before that is not documented, so it is not described.
Design direction
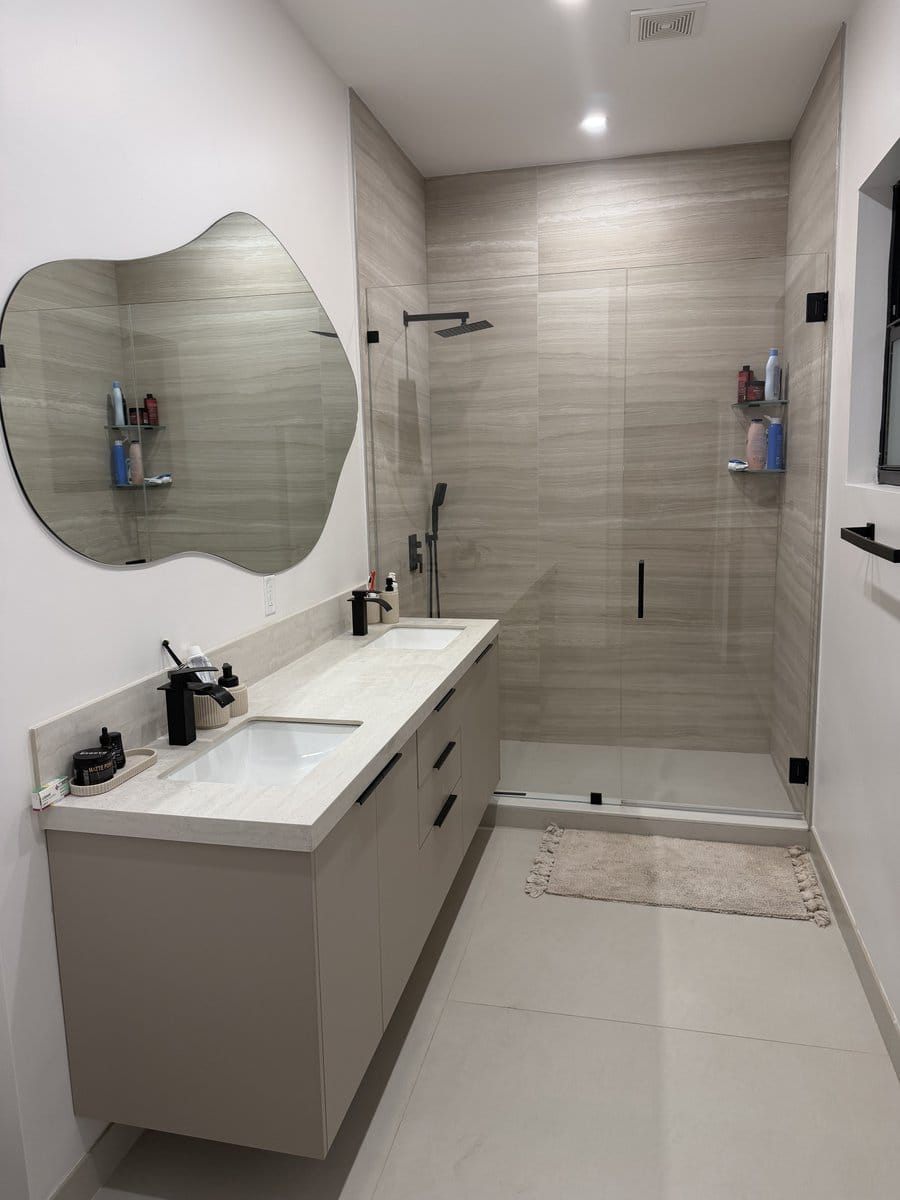
A narrow room treated as one space — the shower runs the full width of the far end behind a single fixed glass panel rather than a door, so nothing swings into the floor area.
Visible work
Re-framing at the opening, tile backer board set and combed, plumbing rough-in, a screeded floor, then vertical stacked plank tile to the shower walls and large-format porcelain to the floor.
Materials and features
Vertical stacked plank tile, large-format floor porcelain, a floating vanity with twin basins, an organic-edge frameless mirror, and matt black fittings throughout.
Functional improvements
A level transition into the shower with no curb to step over, a fixed glass panel instead of a door or curtain, and a wall-hung vanity that keeps the floor clear in a narrow room.
Final result
The same footprint, reading as a considerably wider room than the during-construction frames suggest.
Stage 05 · Inspect
The three decisions people find hardest
Balanced both ways. There is no universally correct answer to any of these — the right one depends on your floor, your room and who is using it.
Low curb
A built-up edge retains the water
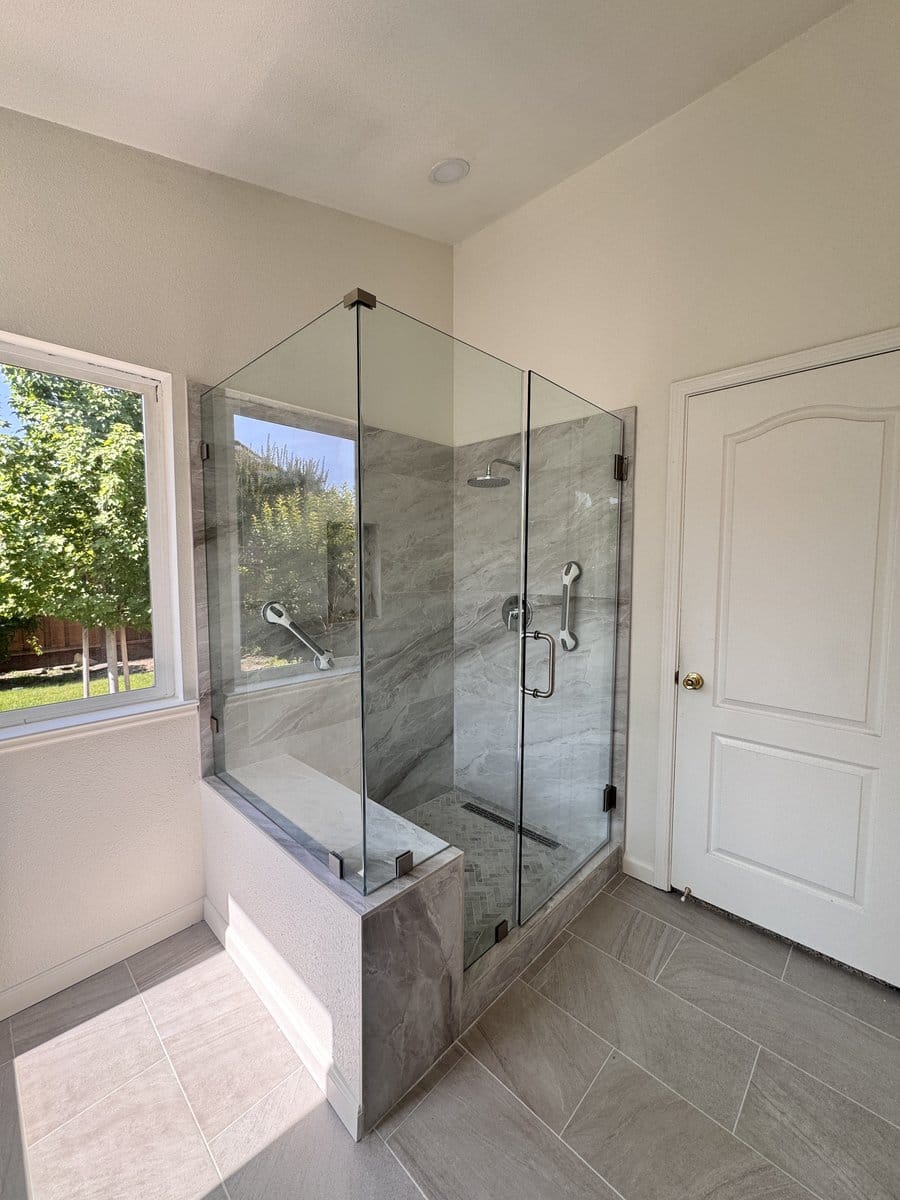
- How
- A waterproofed curb is built at the opening and tiled over.
- Benefits
- Simplest to build correctly, forgiving of small errors in floor fall, works on almost any floor construction, lowest cost of the two.
- Limits
- There is still an edge to step over, and it is a visual break across the room.
- Upkeep
- The sealant line where the curb meets the floor needs occasional attention.
- In South Florida
- On a concrete slab this avoids any cutting or re-pouring, which is usually the cheaper and faster route.
Curbless
The floor runs straight in
- How
- The shower floor is set into or level with the bathroom floor and the fall is built into the substrate.
- Benefits
- Nothing to step over, the room reads as one space, by far the easiest to walk or roll into, large-format floor tile can run through.
- Limits
- All of the water control lives in the floor build-up, so slope, drain position and waterproofing have to be right first time. Costs more and takes longer.
- Upkeep
- Less sealant to maintain, but wet floor beyond the glass line is more likely without a linear drain at the entry.
- In South Florida
- On a slab this usually means cutting and re-pouring around the drain — very achievable, but it is real work and needs to be in the scope from the start.
Which oneIf getting in and out easily is the reason you are doing this at all, curbless is worth the extra work. If the room is sound and the driver is appearance or a failed shower, a low curb does the same job with less risk and less cost.
Point drain
One drain, four-way fall
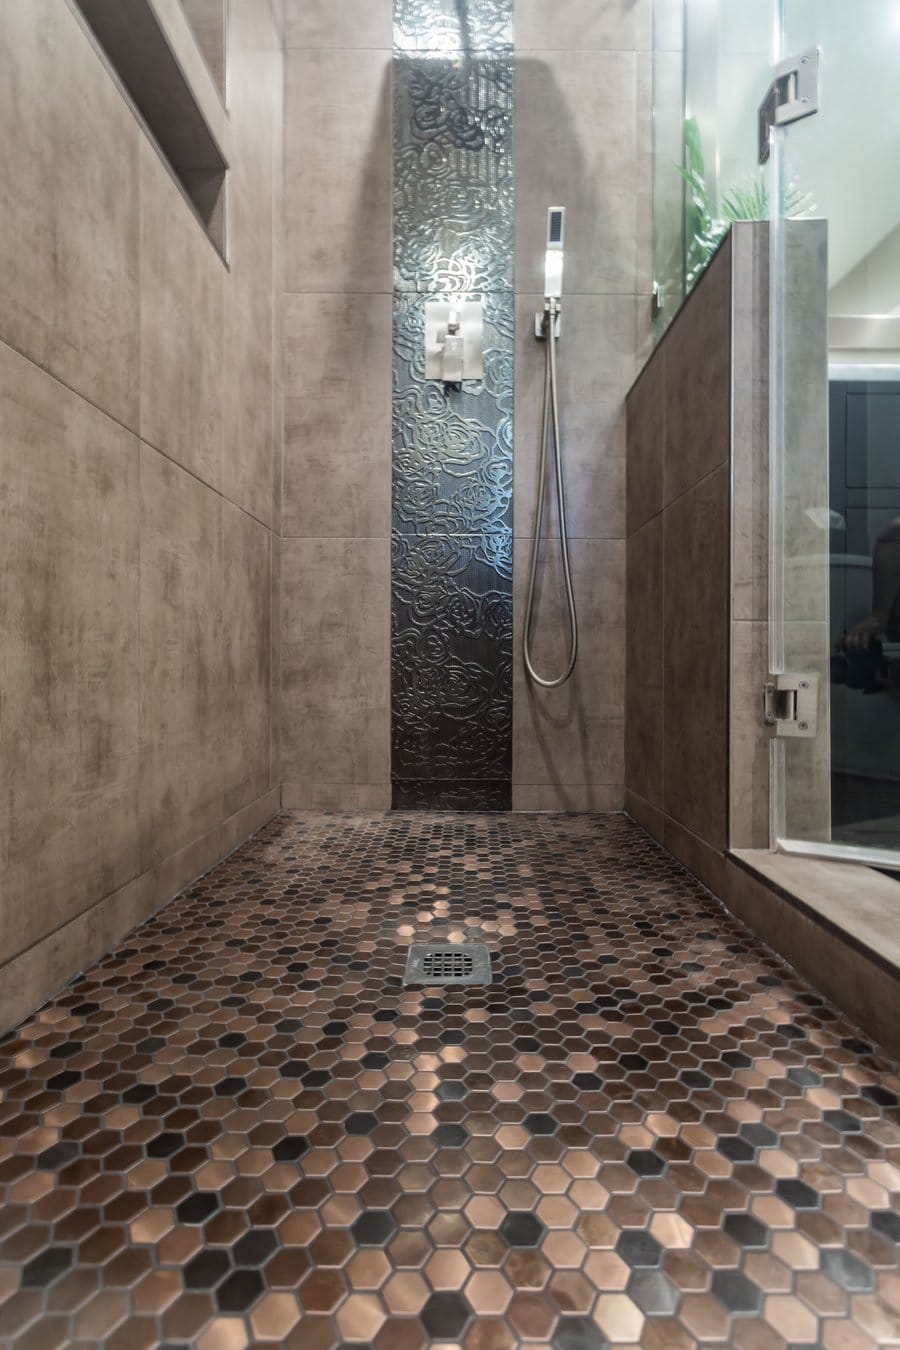
- How
- A single centre drain with the floor falling towards it from every side.
- Benefits
- Least expensive, well understood, works with any threshold, very reliable.
- Limits
- Because the floor slopes four ways, the floor tile has to be small enough to follow it — mosaic, penny round or hexagon rather than large format.
- Upkeep
- More grout in the floor, so more to clean; the trap is easy to reach.
- In South Florida
- The default for a straightforward tub-to-shower swap that keeps the existing drain position.
Linear drain
A channel, one-way fall
- How
- A channel along one edge or wall, with the whole floor falling in a single direction.
- Benefits
- Large-format floor tile becomes possible, the floor plane is calmer, and a channel at the entry edge helps keep water inside the shower.
- Limits
- Costs more, needs more accurate setting out, and the channel position has to be decided before the floor is built.
- Upkeep
- The channel and its grate lift out for cleaning, and it does need cleaning.
- In South Florida
- The usual partner to a curbless shower, and what makes a seamless floor look seamless.
Which onePoint drain unless you want large-format tile on the shower floor or you are going curbless — in which case a linear drain is not really optional.
Fixed panel
No moving parts
- How
- A single fixed screen with a walk-in gap beside it.
- Benefits
- Nothing to swing or slide, nothing to seal along an opening edge, the least to clean, and the easiest to walk into.
- Limits
- The opening is permanently open, so the shower runs cooler and more spray can reach the floor if the layout is wrong.
- Upkeep
- The least of any option — one pane, no track.
- In South Florida
- Suits the wide, shallow shower that a removed tub usually leaves behind.
Sliding or hinged door
A shower that closes
- How
- Sliding glass on a top track, or a hinged frameless door on pivots.
- Benefits
- Keeps heat and spray inside, and sliding needs no swing clearance in a tight room.
- Limits
- A track or pivot to keep clean, seals that eventually need replacing, and a hinged door needs clear floor to open into.
- Upkeep
- Tracks collect residue; seals are a consumable.
- In South Florida
- Worth it where the shower is narrow, or where spray would otherwise reach a vanity or doorway.
Which oneIf the opening is generous, a fixed panel is the lower-maintenance and more accessible answer. If the shower is narrow, or it sits opposite a vanity, glass that closes will keep the rest of the room drier.
What moves the cost and the calendar
Tick whatever applies. This will not produce a price — no honest one can be given without seeing the room — but it will show you which parts of your job are the ones that carry the cost and the time.
What this points to
We do not publish figures or ranges for this work, because the same shower can differ several-fold depending on what is behind the tile. You get a real number after a site visit, in writing, itemised.
Project gallery 03
Project 03 — scallop mosaic and sliding frameless glass
A second completed conversion, photographed on site rather than styled. It shows a different answer to the same three decisions: a low threshold, a linear drain, and glass that slides.
Project 03, guided tour
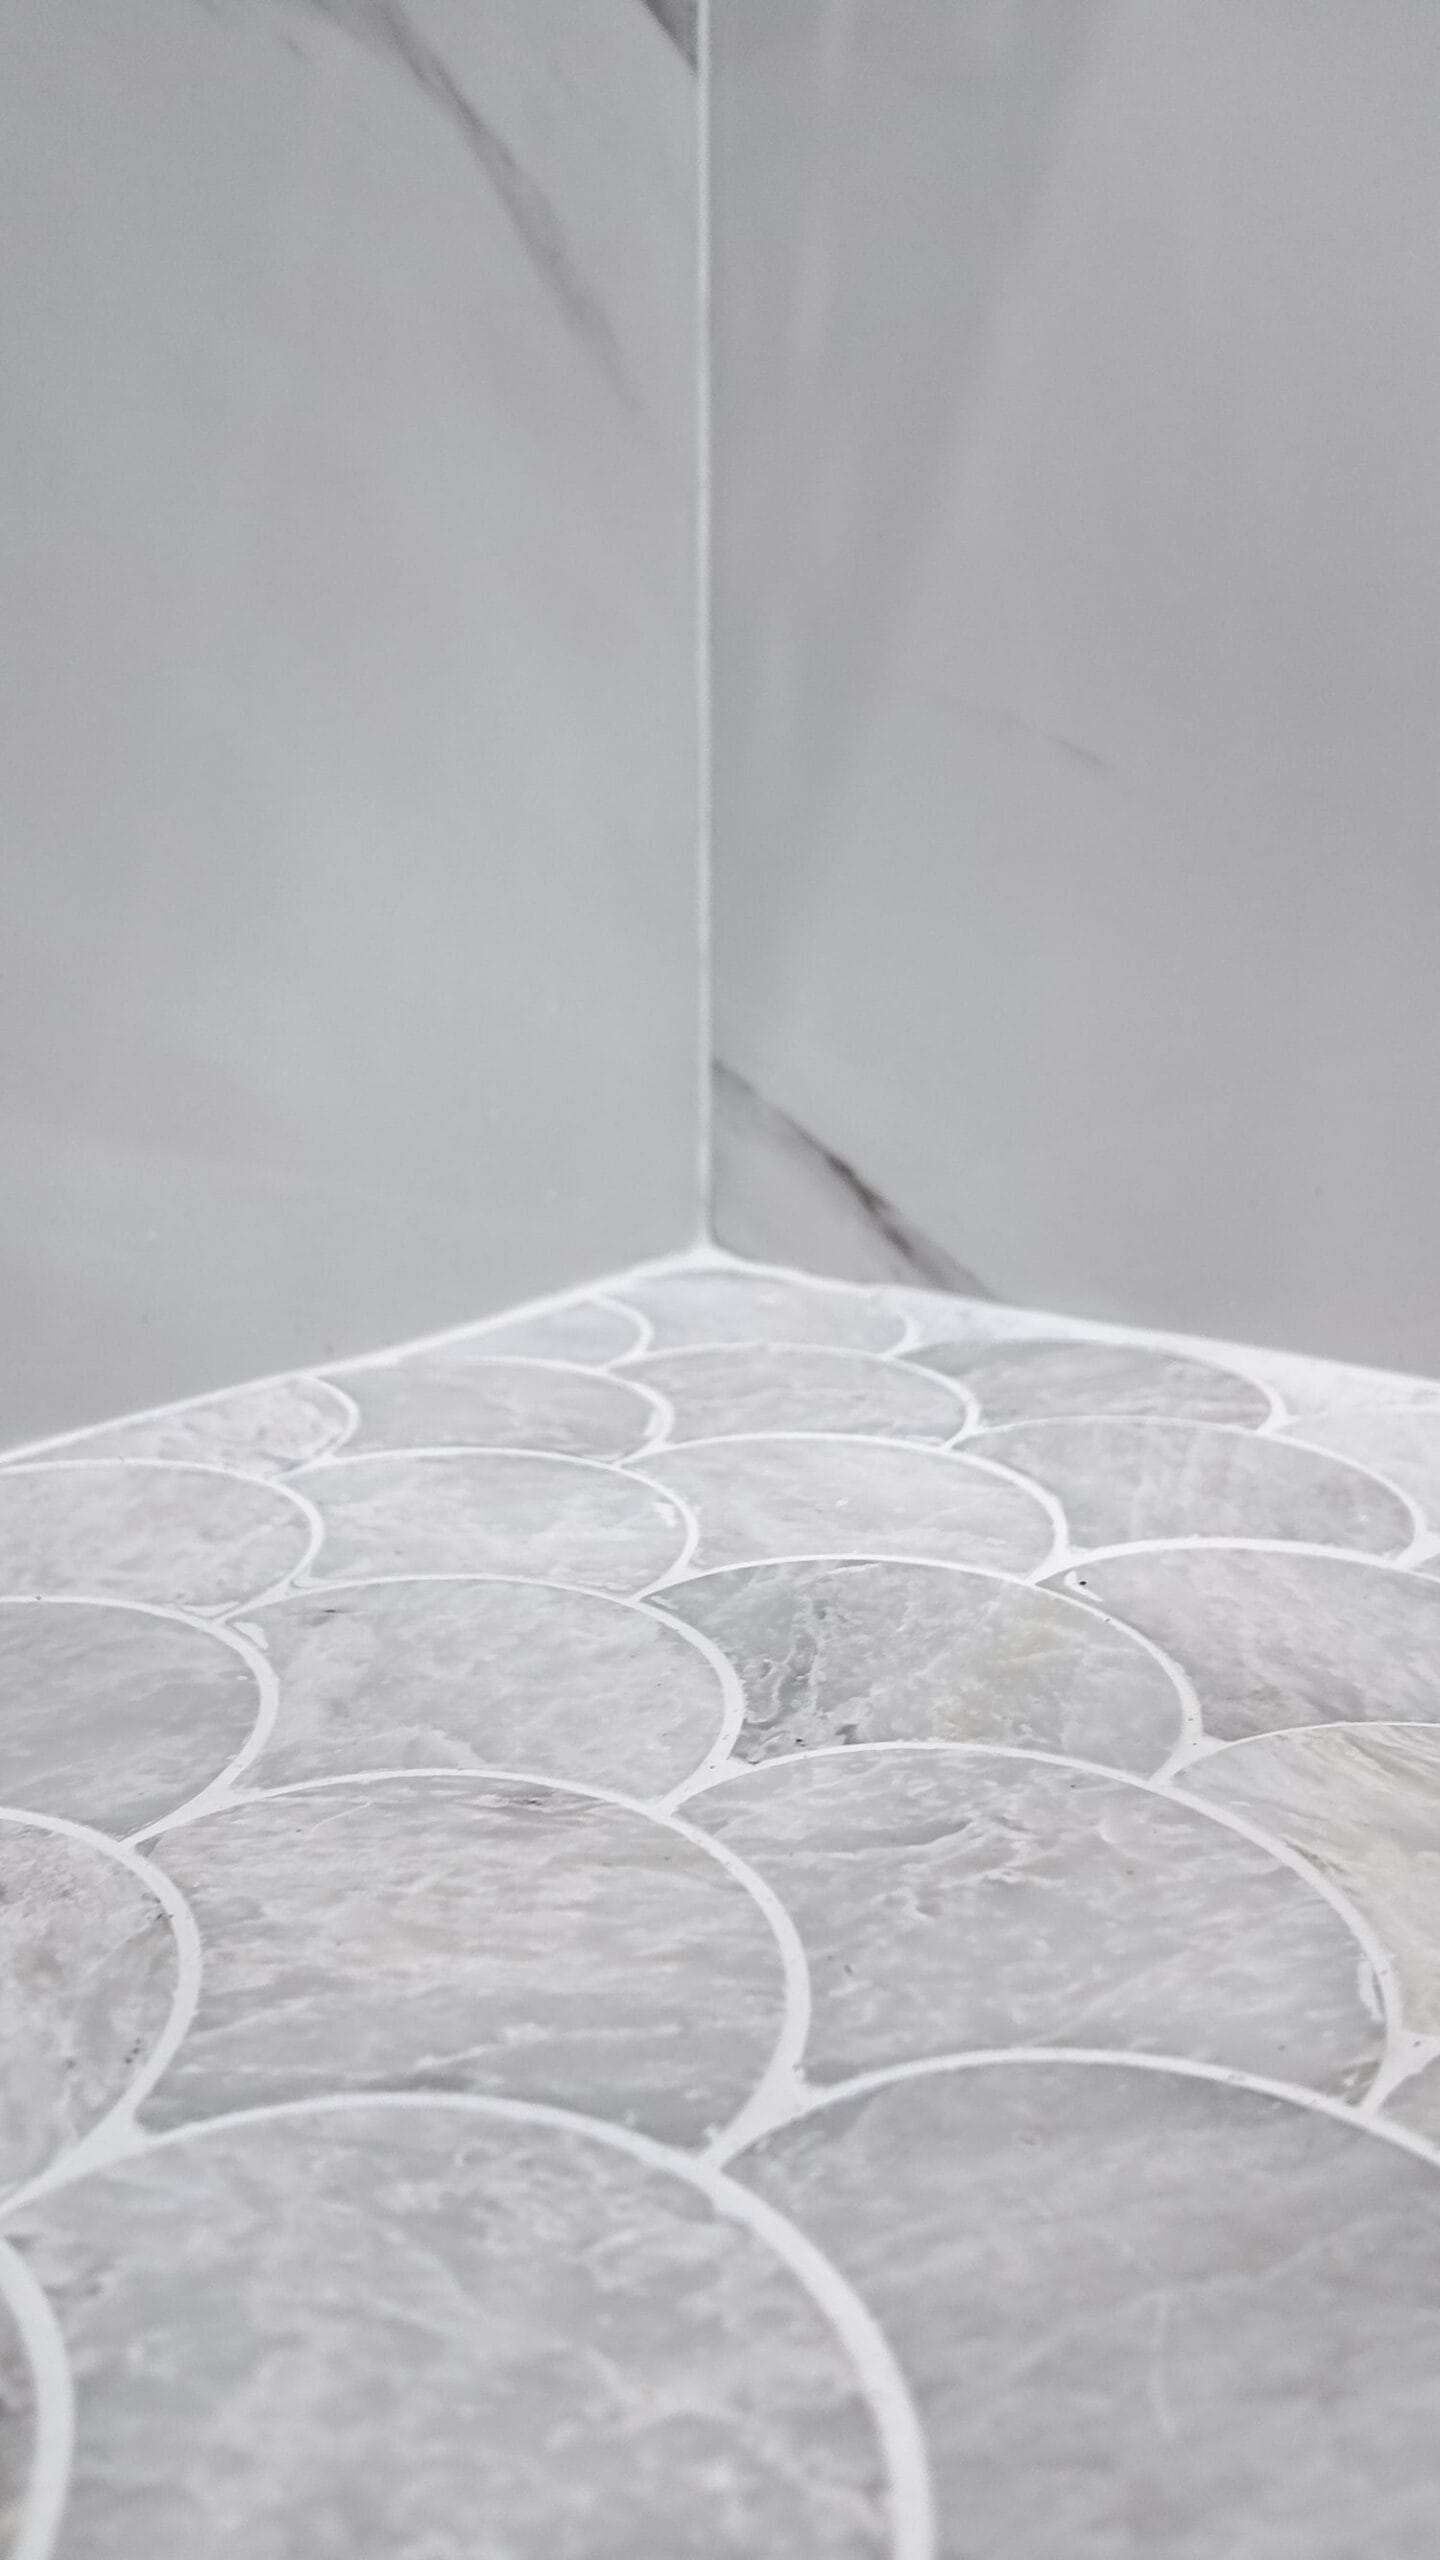
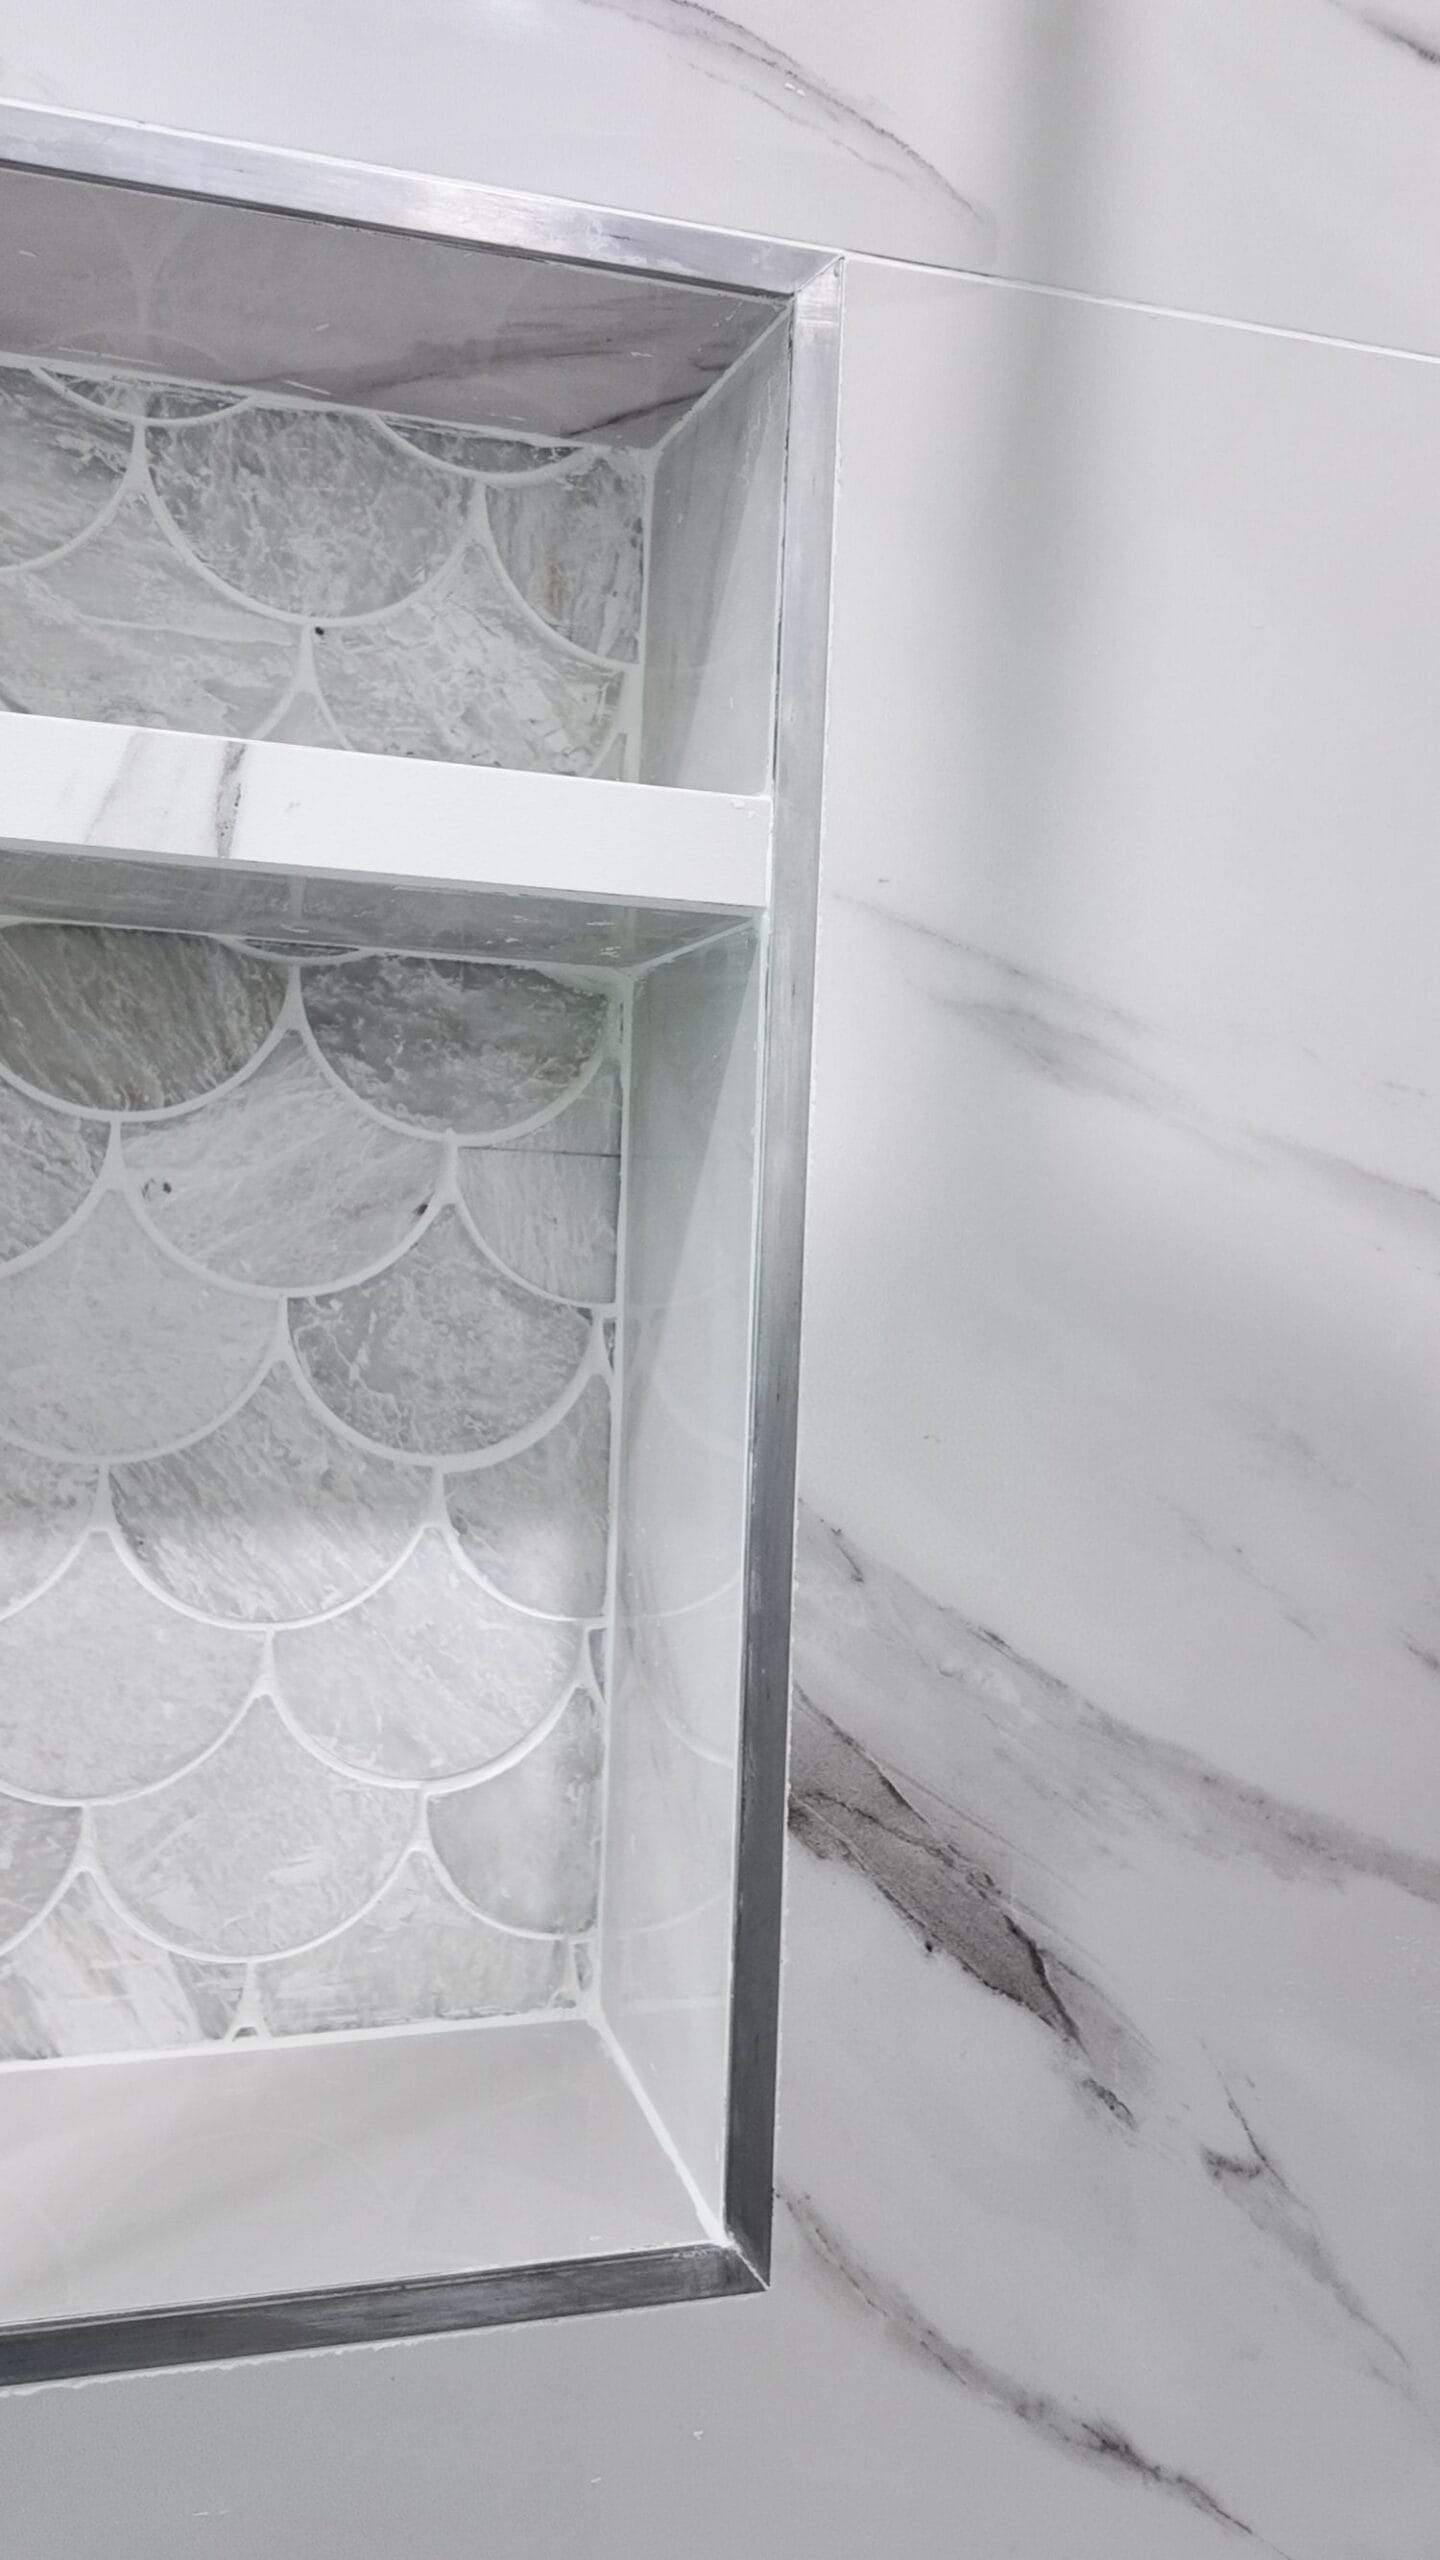
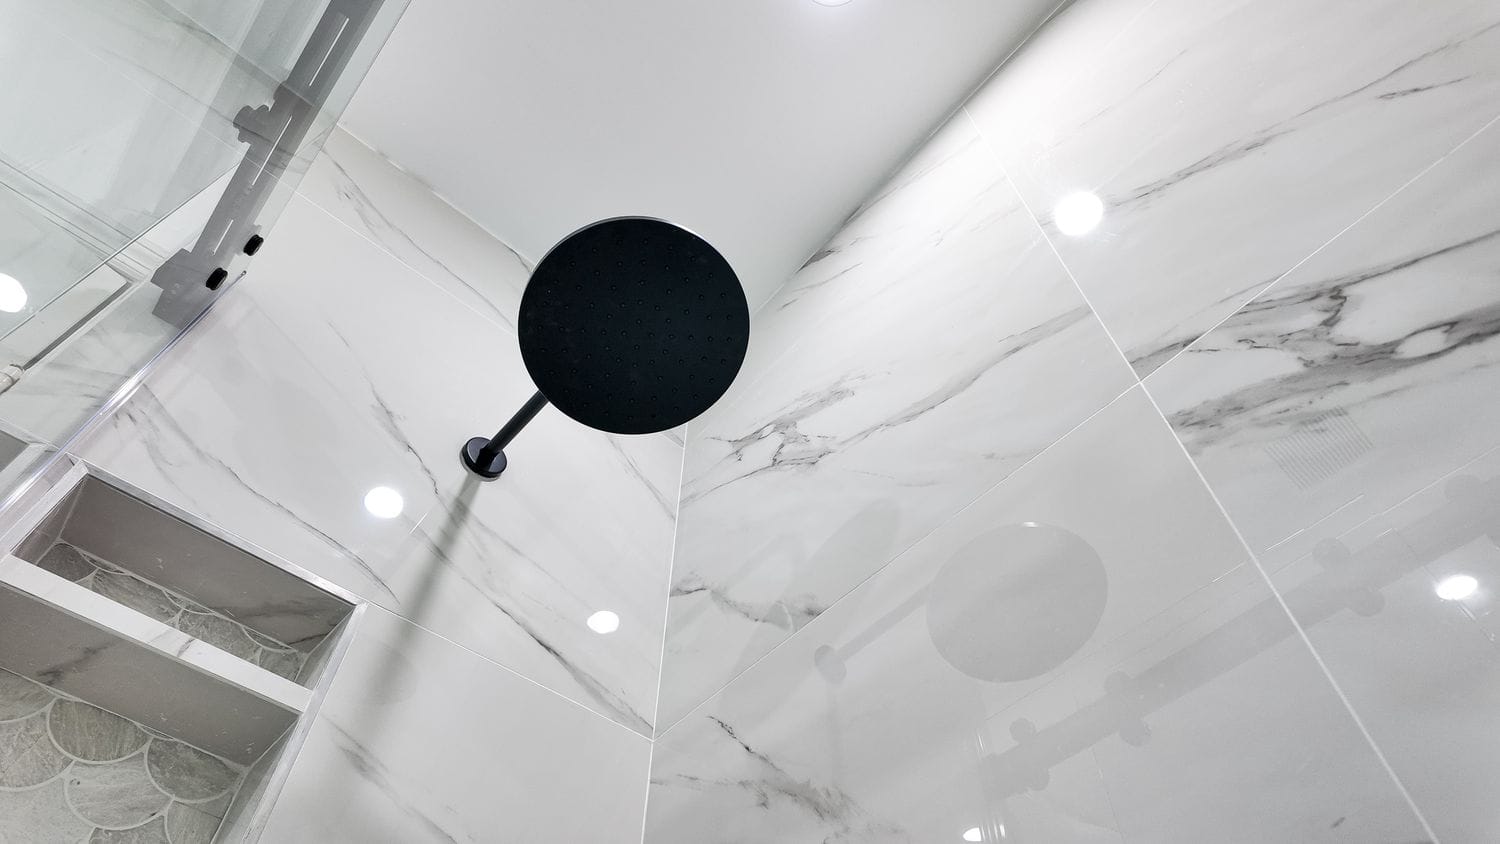
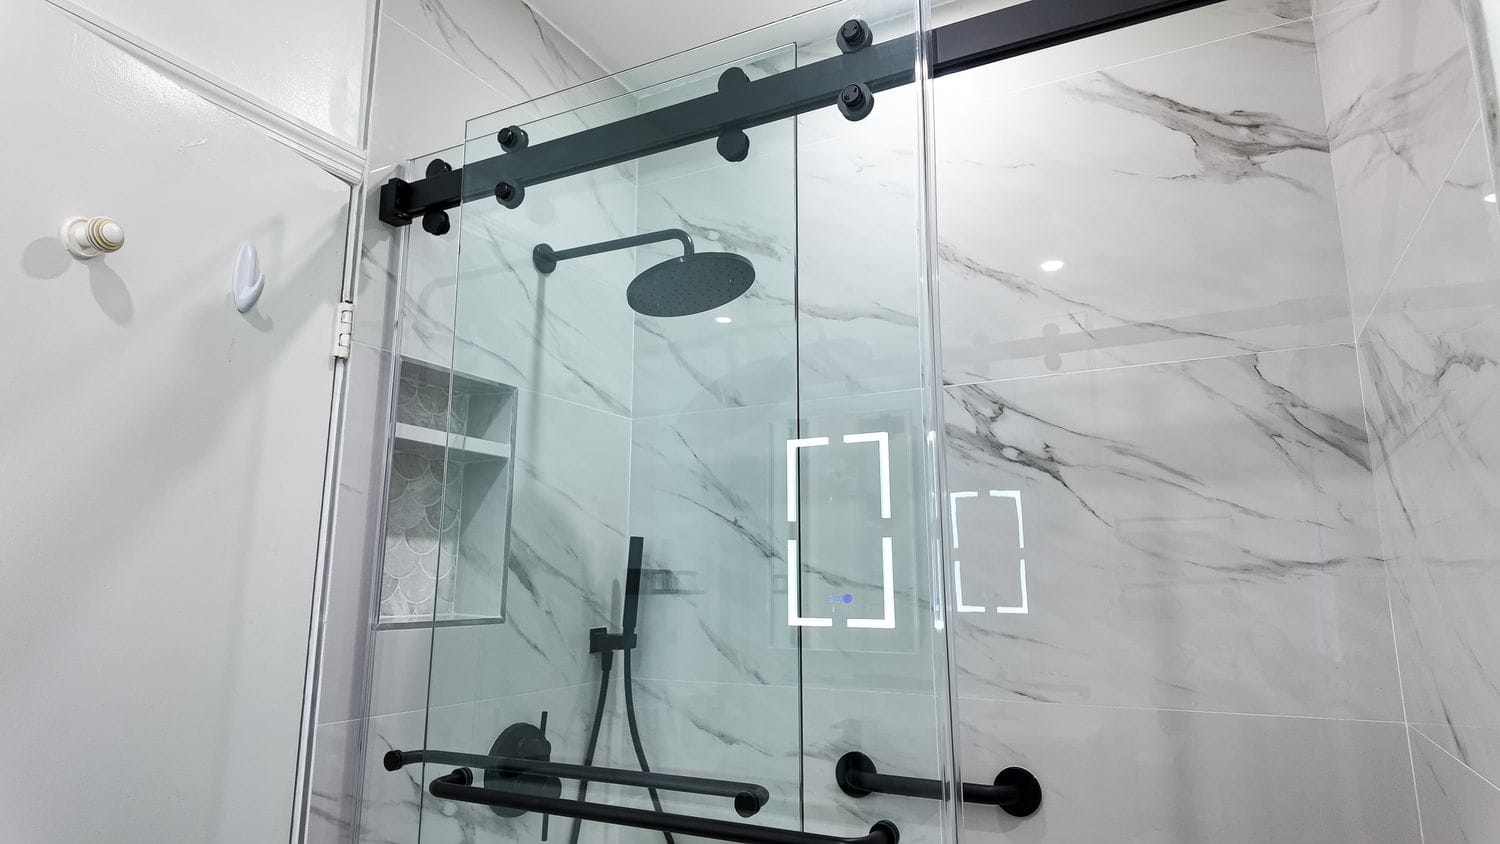
The enclosure
Sliding frameless glass runs on a black top track, with a black grab bar fitted on the wall alongside.
Starting point
These frames are on-site job documentation taken at completion. The condition of the room before work is not recorded here, so it is not described.
Design direction
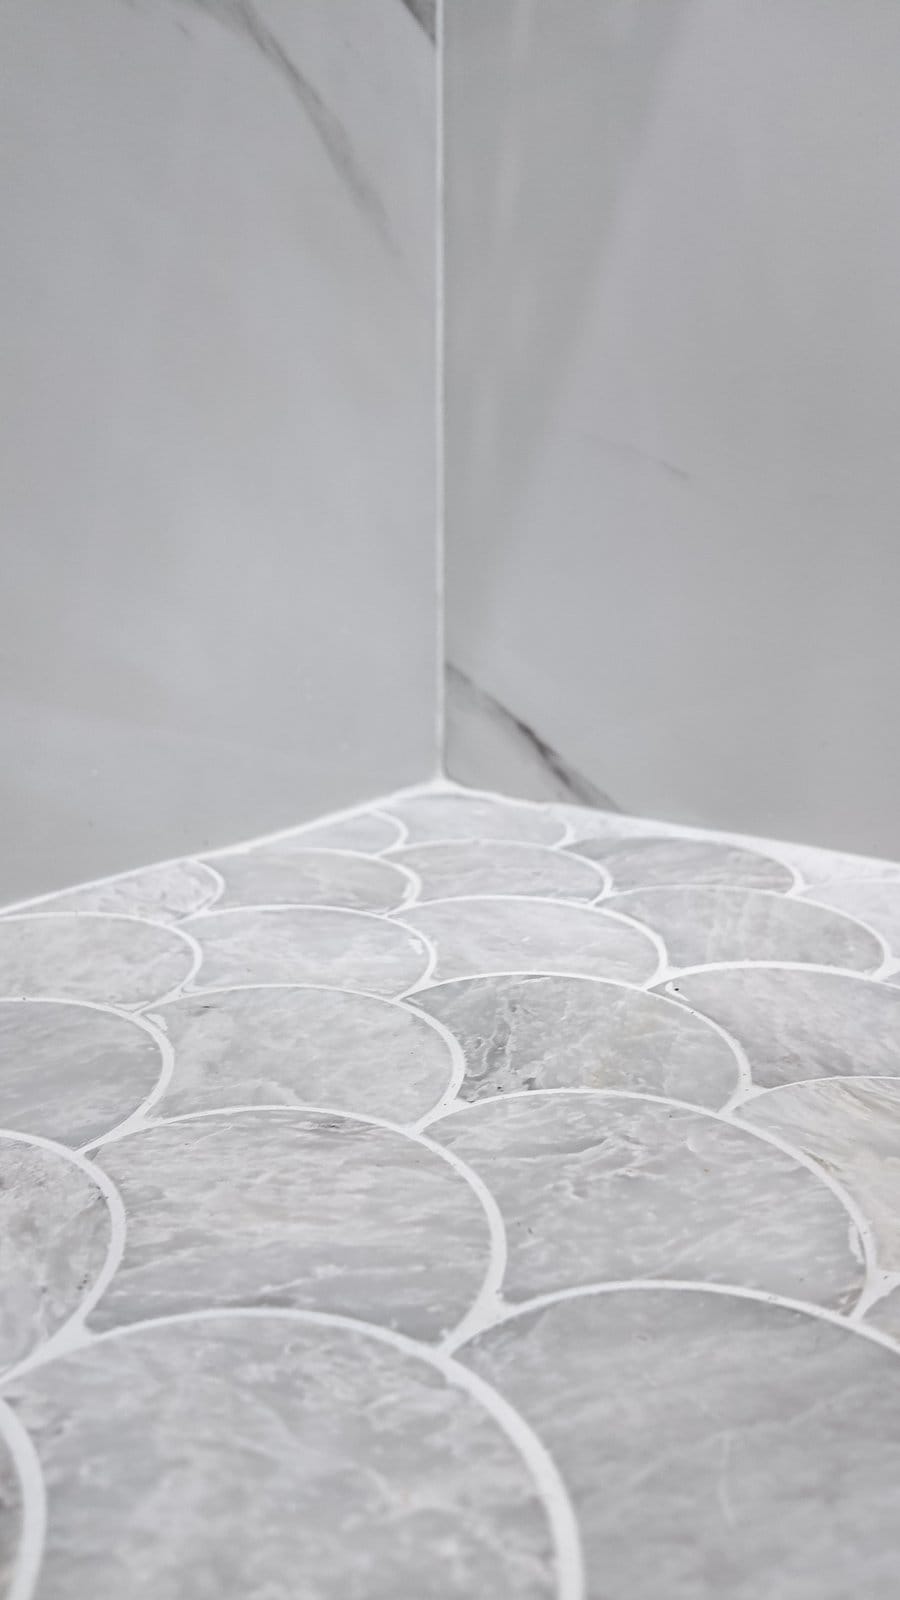
A restrained palette — marble-look porcelain, matt black metalwork and one decorative move: the scallop mosaic, used on the shower floor and repeated in the niche so the pattern reads as deliberate rather than incidental.
Visible work
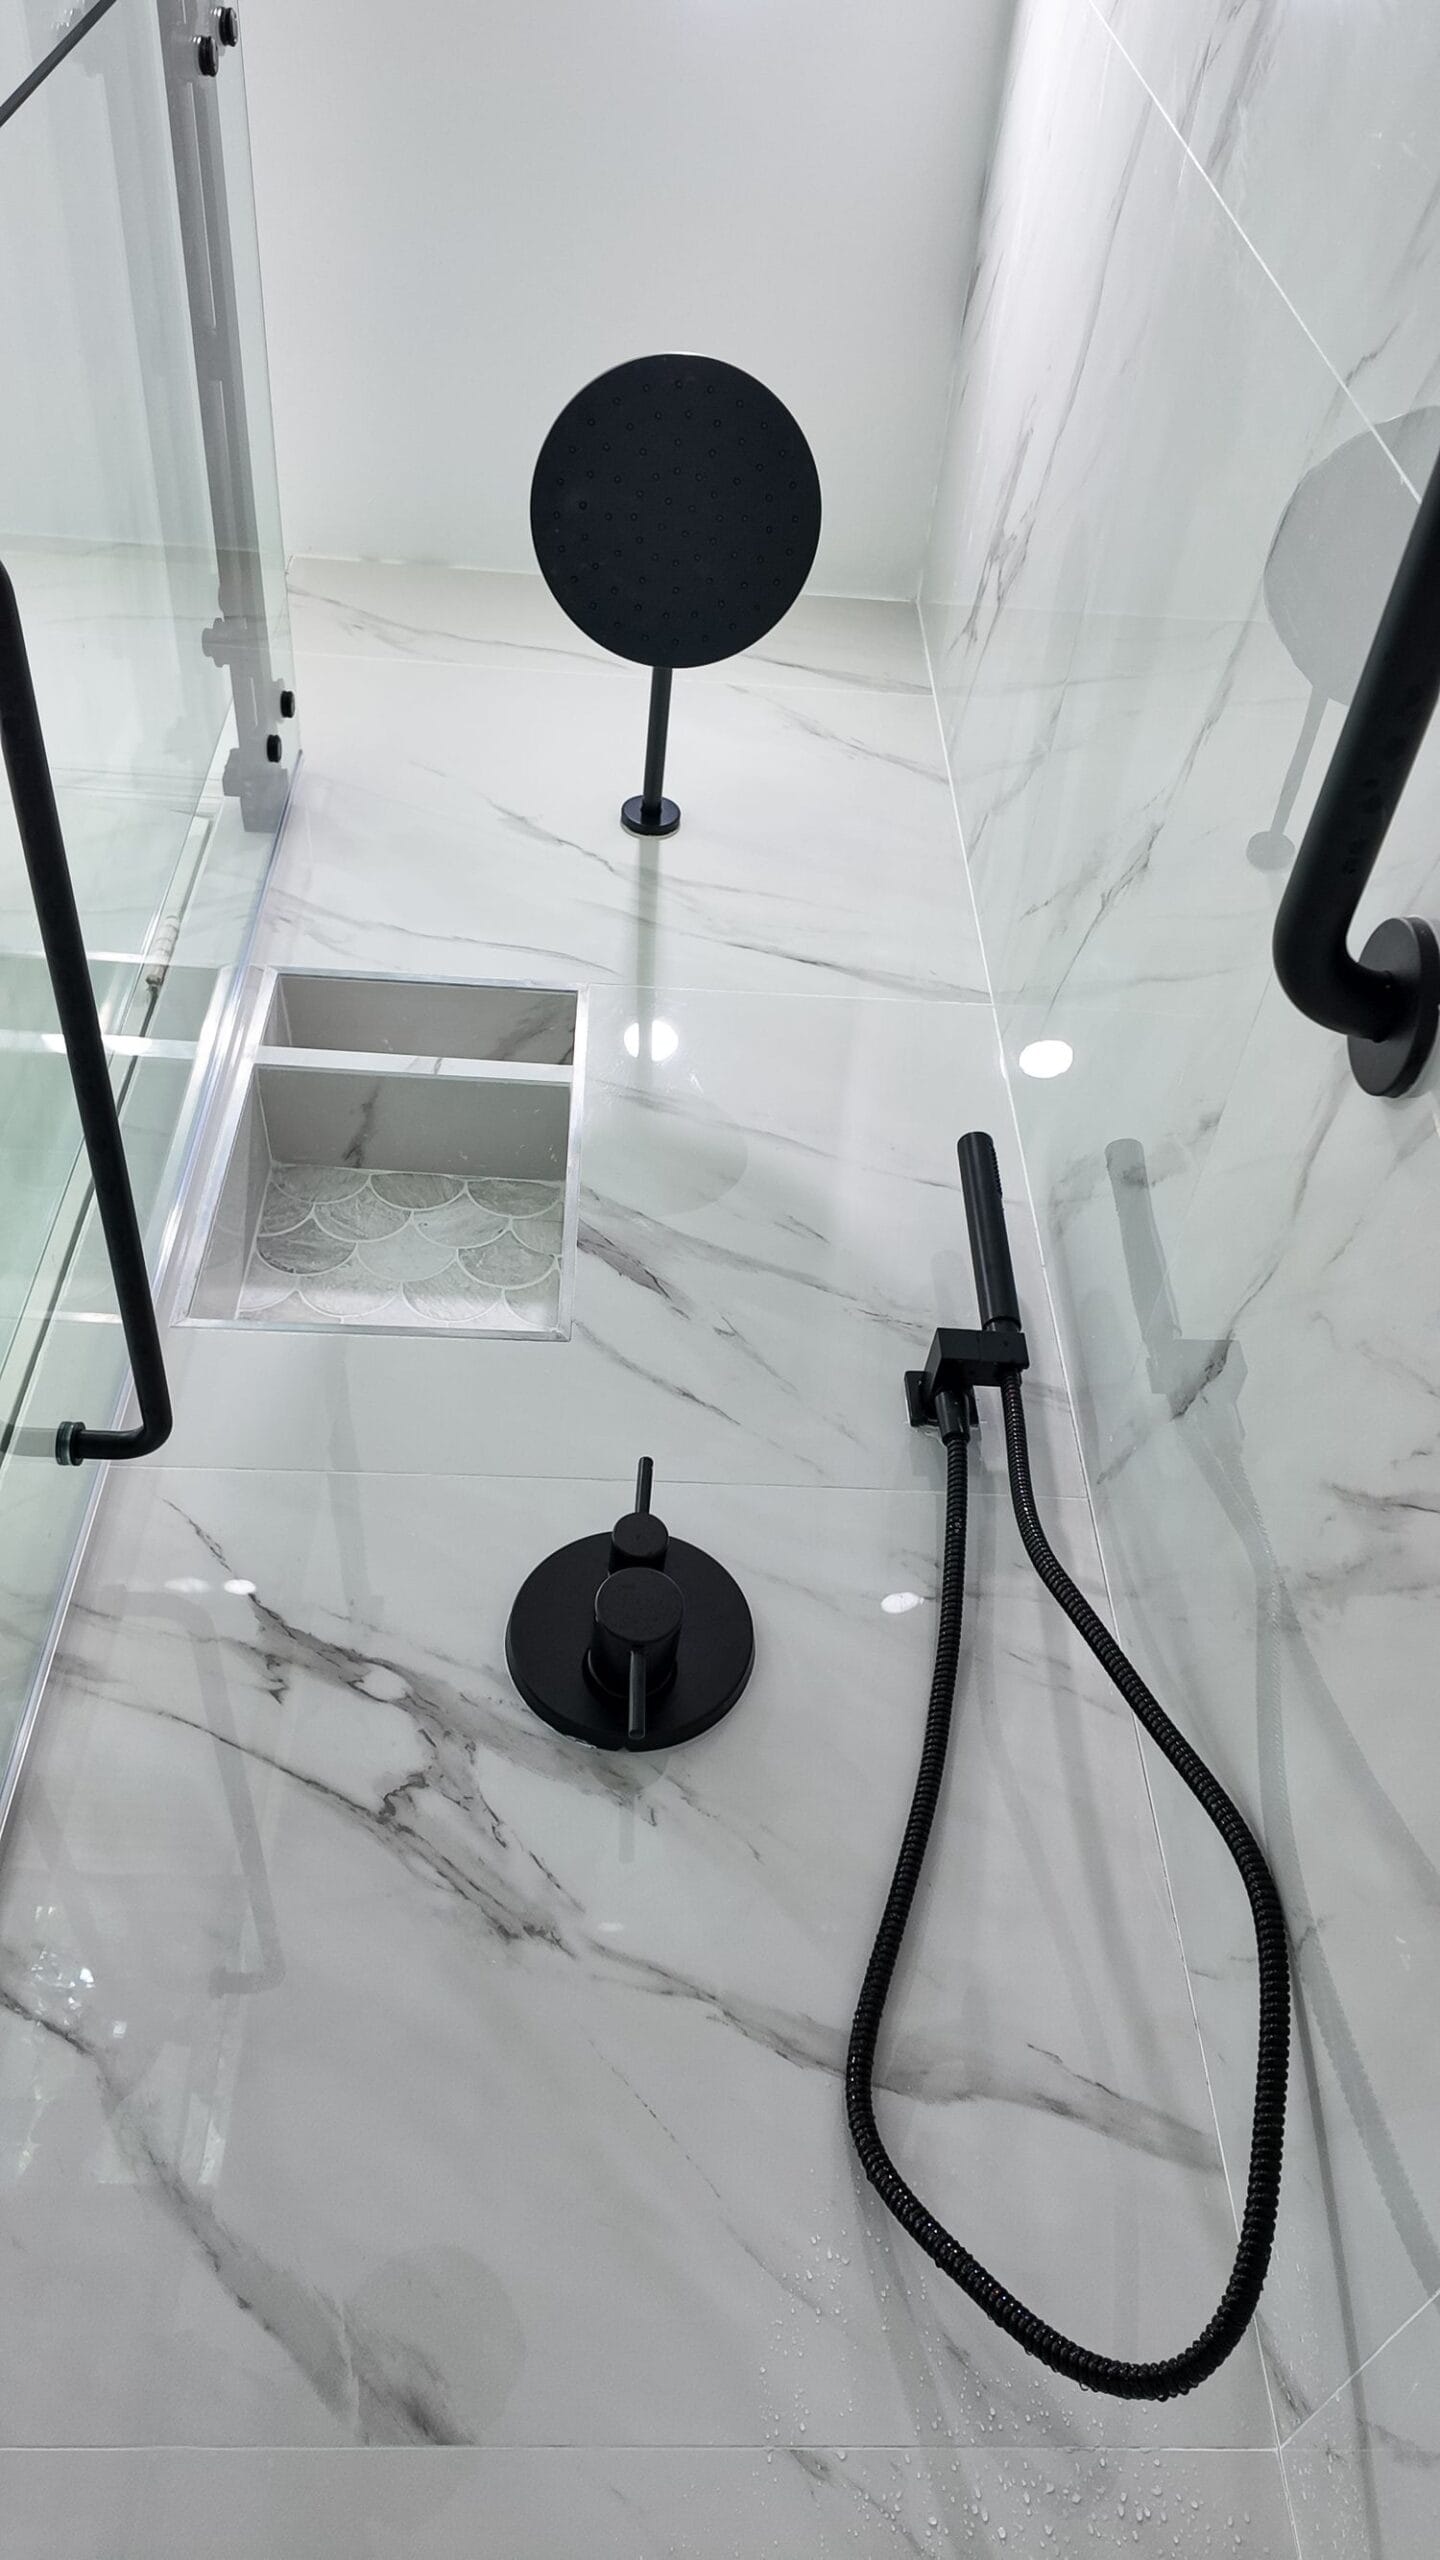
Full-height marble-look wall tile, a scallop mosaic shower floor laid to fall, a black linear drain, a metal-trimmed recessed niche, and sliding frameless glass on a black top track.
Materials and features
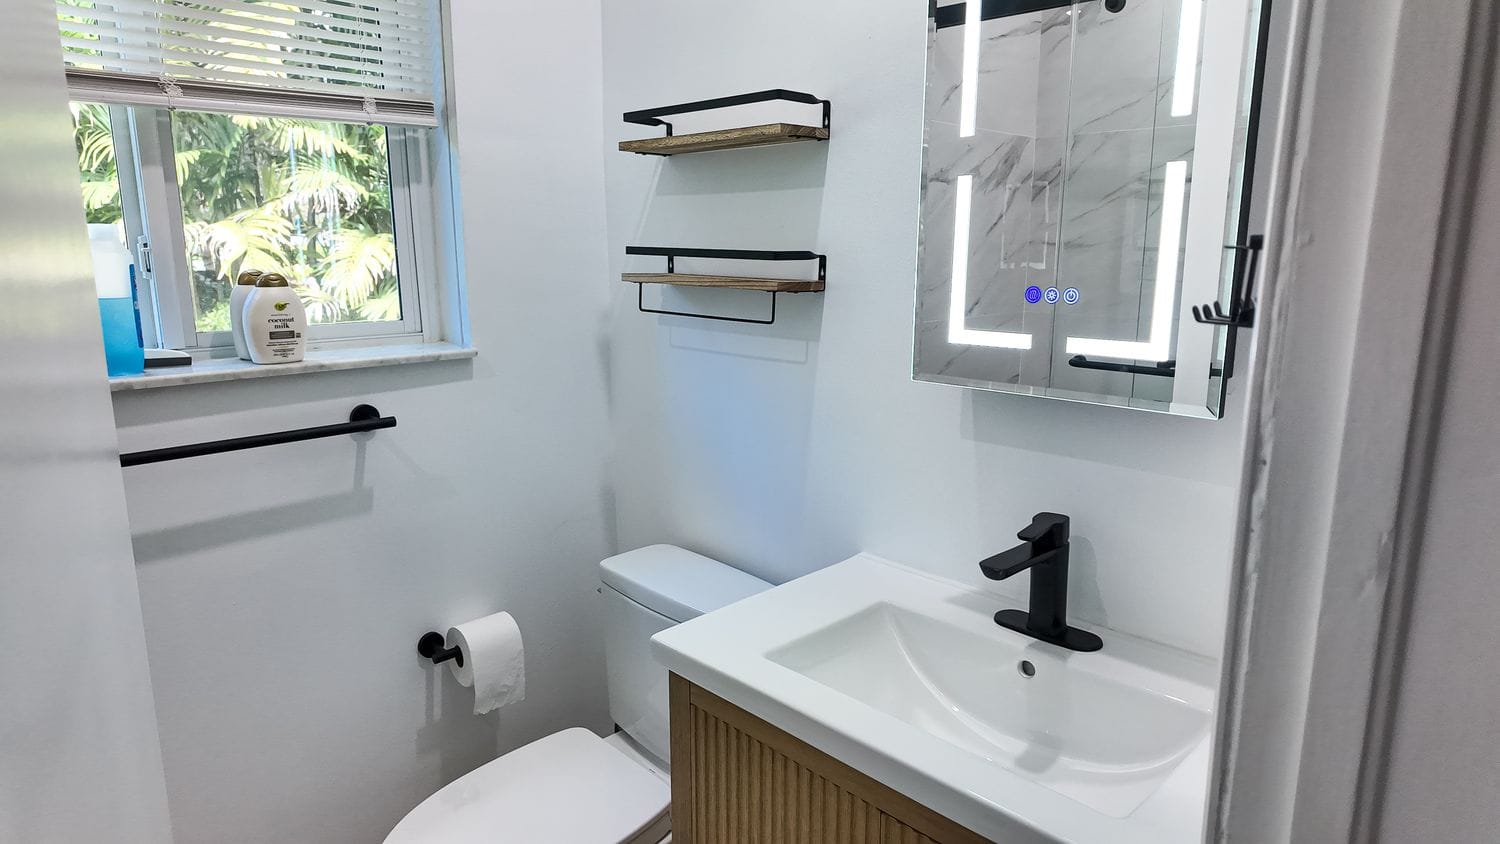
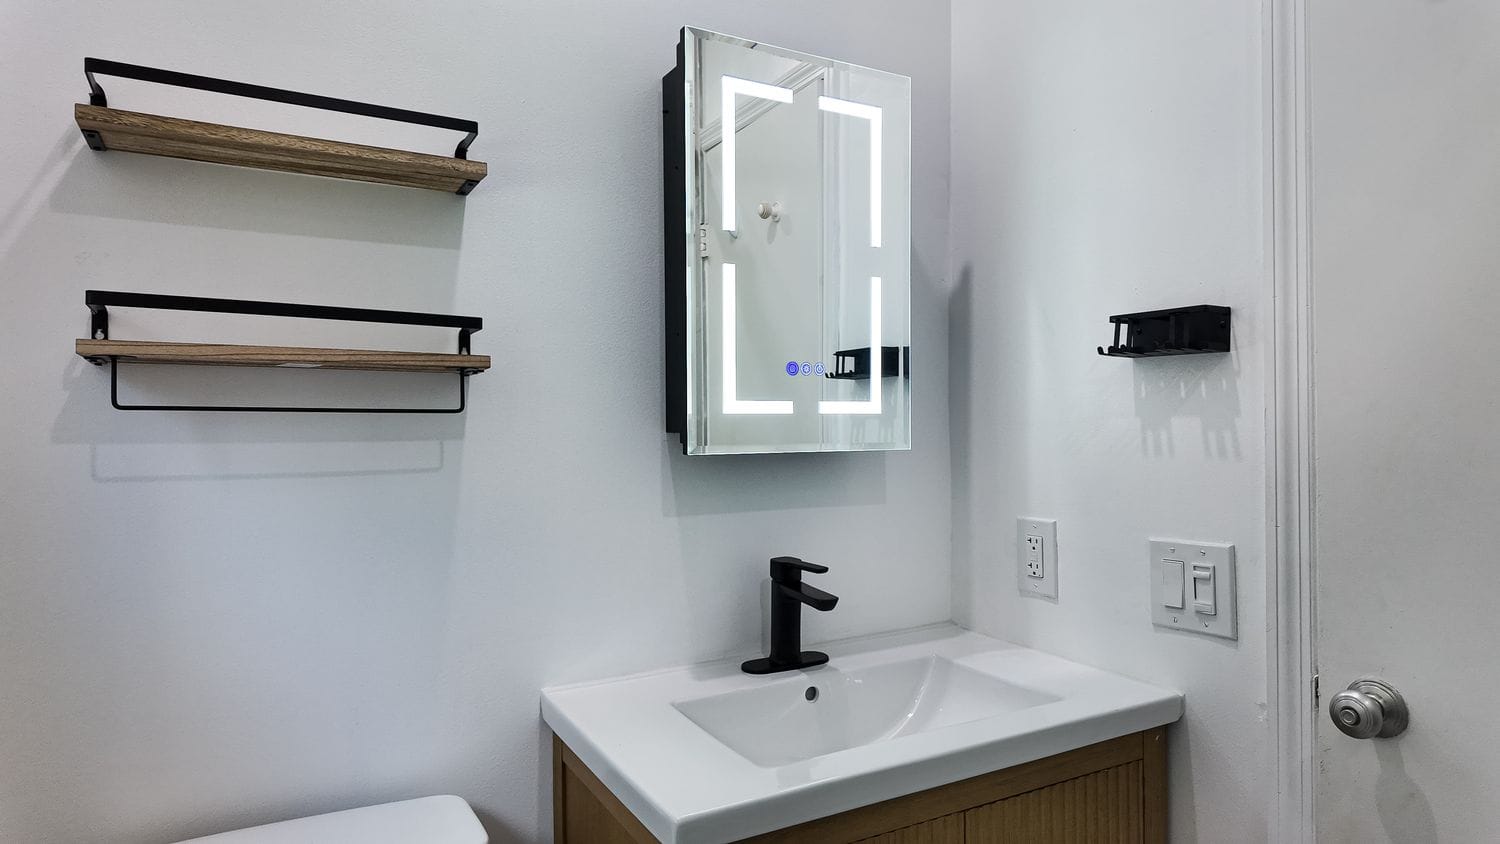
Marble-look large-format porcelain, scallop marble mosaic, matt black fittings and drain grate, a fluted oak vanity with an integrated basin, and a backlit mirror cabinet.
Functional improvements
A grab bar within reach of the opening, a handheld alongside the fixed head, a low threshold, and a linear drain along the entry edge to keep water off the bathroom floor.
Final result
A compact shower that feels considerably larger than its footprint, mostly because the glass slides rather than swings and the floor pattern runs uninterrupted.
Stage 06 · Live
Before, during and after — the same bathroom
Real footage from an Elbaz job: the bathroom as it was, stripped back to bare block during demolition, and finished. It is the clearest answer we can give to “what will this actually be like?”
How long it is unusable
From demolition until the glass is installed, this bathroom is out of use. If it is the only bathroom in the home, tell us at the site visit — it changes how we sequence the work.
Noise
Demolition is the loud part and it is front-loaded. Tile cutting is intermittent after that. In a condo, association rules on working hours are followed as a matter of course.
Dust
Barriers go up at the doorway before anything is opened and the route in is protected. Some dust is unavoidable; it should not reach the rest of the home.
Water and power
Water is shut off for short, planned periods rather than for days. We tell you in advance rather than after.
Who is in your home
A small number of trades, on the days their work is scheduled. You will have one point of contact throughout, not a different number for each trade.
Surprises
The one genuine unknown is what is behind the old tile. If demolition turns up damage, you hear about it that day, with photographs, before anything is covered back up.
Inspections
An inspector visits at the points the permit requires — typically rough plumbing while the walls are open, the shower pan water test, and a final. Someone needs to provide access.
The walkthrough
At the end we walk the room together and list anything outstanding. The shower is not used until the sealant has cured properly.
Why this is worth having done properly
Only claims we can stand behind. Everything below is either a matter of public record or something visible in the projects on this page.
Licensed, bonded and insured
Elbaz Construction is a licensed general contractor, CBC1265280. Bathroom work that touches plumbing or rebuilds a wet area is permitted work, and permits are pulled in the company's name.
Design and planning in-house
The drawings, the permit application and the construction are handled by the same company, so nothing waits on a hand-off between a designer, an expediter and a builder.
Local knowledge
We work across Miami-Dade, Broward and Palm Beach — 104 municipalities — and the differences between their building departments are a working detail for us rather than a surprise.
Coordination
Tile, plumbing, glass and inspections are sequenced against each other. Glass in particular cannot be ordered until tile is finished, and planning around that is what keeps the end date real.
Waterproofing as its own trade
The waterproofing layer is the part of a shower that fails, and it is treated as its own step with its own check — the pan is filled and held before any tile goes down.
Blocking behind the tile
Grab bars, benches and fittings are fixed to blocking set during rough-in. Fixing into tile alone is what makes a bar come loose later.
One point of contact
You speak to the same person from the site visit to the walkthrough.
Permit closeout
The permit is closed out, not left open. An open permit follows the property and turns up when it is sold.
Questions, by stage
Filter to the part of the job you are thinking about.
Can any bathtub be converted to a walk-in shower?Before starting
In the great majority of layouts, yes — the shower takes the tub's footprint and no walls move. What decides it is the floor construction, where the existing drain sits, and whether you want a curb or a level entry. That is exactly what the site visit is for.
Will removing my only bathtub hurt resale value?Before starting
It is a fair question and the honest answer is that it depends on the home. Where a house has more than one bathroom, converting one to a walk-in shower is generally well received. Where it is the only tub in a family home, some buyers do look for one. We will give you our view; it is your decision.
How long will the bathroom be out of use?Before starting
From demolition until the glass is fitted. We do not publish a number of days because the honest one depends on the scope, your jurisdiction's inspection scheduling and the glass lead time — all of which we can be specific about once we have seen the room.
What is the difference between a curbless and a low-curb shower?Design
A curb is a small waterproofed wall at the opening that retains the water. Curbless means the floor runs straight in and all the water control is built into the floor's fall and waterproofing. Curbless is easier to walk into and looks cleaner; a curb is simpler, cheaper and more forgiving to build.
Do I have to have grab bars?Design
No. But even if you do not want them now, ask for blocking behind the tile during rough-in. It costs very little at that stage and it means bars can be added later without opening the wall. Retrofitting into tile alone is not the same thing.
Why can't I have large tiles on the shower floor?Design
With a single centre drain the floor has to fall towards it from four directions at once, and a large rigid tile cannot follow that shape. Small mosaic sheets can. If you want large-format tile on the floor, that points to a linear drain and a single-direction fall.
Can I keep the existing tile on the rest of the bathroom?Design
Sometimes. It depends on whether the existing floor tile continues into the shower area and whether it can be matched at the join. We would rather tell you at the site visit that it will look like a patch than discover it at the end.
Do I need drawings for a shower conversion?Planning
Usually a plumbing plan and fixture layout are enough. More is needed if a wall moves, if a framed floor is being recessed for a curbless entry, or if your jurisdiction asks for it. We prepare what your building department requires.
I live in a condo. Is anything different?Planning
Generally yes. Most associations require their own approval on top of the building permit, and many have rules on working hours, elevator use, floor protection and where materials can be staged. Boards meet on their own schedule, so it is worth starting that submission early.
Does a walk-in shower conversion need a permit?Permits
If plumbing is being moved or a wet area is being rebuilt — which is what a conversion is — then permitted work is the norm across South Florida. Your local building department has the final say, and we confirm the requirement for your specific address before anything starts.
How long does the permit take?Permits
We will not give you a number, because review times differ by municipality and by how busy that department is. What we can say is that we handle the submission and the review comments, and that a clearly-defined scope draws fewer comments than a vague one.
What inspections are involved?Permits
Typically a rough plumbing inspection while the walls are still open, a shower pan or water test on the finished waterproofing before tile, and a final inspection at the end. The exact list is set by your jurisdiction.
What happens if a previous owner left an open permit?Permits
It has to be resolved, because an open permit follows the property. We will find it during the site review rather than at closing.
What happens if you find water damage behind the old tile?Construction
You hear about it the same day, with photographs, before anything is closed up. Damaged framing or subfloor is repaired rather than tiled over. This is the one part of the job that genuinely cannot be fully priced in advance, and we would rather say so than pretend otherwise.
Why is the glass installed so late?Construction
Because it is made to fit the finished room. It is templated off the completed tile, then fabricated, then installed — which makes it the longest single lead time in the job and the reason the shower is the last thing to be finished.
Can I stay in the house during the work?Construction
In almost every case, yes. The bathroom itself is out of use, the route in is protected and dust barriers go up at the doorway before anything is opened.
Why don't you publish prices for this?Cost
Because two identical-looking bathrooms can differ several-fold once the tile is off, depending on the floor construction, the drain position and what is behind the wall. A number published here would be a guess. You get a real, itemised figure in writing after a site visit.
What makes a conversion more expensive?Cost
In rough order: going curbless, moving the drain, water damage found at demolition, frameless glass, mosaic or feature tile, and a built bench. The selector further up this page lets you see which of those apply to you.
Do you offer financing?Cost
Talk to us about it at the consultation and we will tell you what is currently available rather than pointing you at something that may have changed.
What happens at handover?Completion
We walk the finished room together and list anything outstanding, then close it out. The permit is signed off at final inspection, and you should keep that record with your home's paperwork.
When can I actually use the shower?Completion
Not immediately. Silicone and grout need to cure properly, and using the shower early is a genuine way to shorten the life of the sealant. We will tell you the date at handover.
How do I look after a tiled walk-in shower?Maintenance
Squeegee the glass, keep the extractor running for a while after use, and clean the drain channel or grate regularly — a linear channel does collect residue. Avoid acidic cleaners on natural stone mosaic.
How long should the silicone last?Maintenance
Sealant at the changes of plane is a consumable, not a permanent element. Expect to renew it periodically. If it is discolouring or lifting early, that is worth a look rather than just re-sealing over.
What is the warranty?Maintenance
We will set out in writing what is covered and for how long as part of your proposal, alongside the manufacturers' own warranties on the products specified. We would rather put that in your contract than make a general claim on a web page.
Nothing in that stage yet — try “All”.
Start with the room, not a price list.
Every honest number for this work comes after somebody has looked at your floor, your drain and what is behind your wall. That visit is the next step.
Or read the bathtub-to-shower conversion page if you are still deciding between the two.
